一、背景
本人是基于nightingaleV6.7.2与k8s-amd64-v1.23.10进行了此文章中的操作。
使用categraf-v0.3.45-linux-amd64做数据采集工具,容器监控数据采集使用的cadvisor插件。关于categraf中使用caadvisor插件的文档:https://flashcat.cloud/docs/content/flashcat-monitor/categraf/plugin/cadvisor/。
但是我当时看了此文档后,还是有一个配置项bearer_token_string或bearer_token_file不知如何配置(相关的配置文档其实官网已经给出,只是我先前也没有找到),此方法不太方便暂不阐述,直接使用如下更简便的方法做配置达到监控kubelet与容器的目的。
二、配置步骤
参考flashcat官方文档:https://flashcat.cloud/blog/kubernetes-monitoring-05-kubelet/,转换成自己的描述、内容更加简洁,也是一个对flashcat及夜莺的一个宣传吧。
2.1 创建认证信息
访问”https://localhost:10250/metrics“时需要鉴权,按照如下方式创建k8s中的相关账号与角色。
1 2 3 4 5 6 7 8 9 10 11 12 13 14 15 16 17 18 19 20 21 22 23 24 25 26 27 28 29 30 31 32 33 34 35 36 37 38 39 --- apiVersion: v1 kind: Namespace metadata: name: flashcat --- apiVersion: rbac.authorization.k8s.io/v1 kind: ClusterRole metadata: name: categraf-daemonset rules: - apiGroups: - "" resources: - nodes/metrics - nodes/stats - nodes/proxy verbs: - get --- apiVersion: v1 kind: ServiceAccount metadata: name: categraf-daemonset namespace: flashcat --- apiVersion: rbac.authorization.k8s.io/v1 kind: ClusterRoleBinding metadata: name: categraf-daemonset roleRef: apiGroup: rbac.authorization.k8s.io kind: ClusterRole name: categraf-daemonset subjects: - kind: ServiceAccount name: categraf-daemonset namespace: flashcat
1
2
3
4
# 应用与查看
image-20240526231854765
2.2 测试上述创建的权限
已经成功创建了
ServiceAccount,把ServiceAccount的内容打印出来看一下:
1 kubectl get sa categraf-daemonset -n flashcat -o yaml
这个ServiceAccount实际是关联了一个Secret,再看看这个Secret的内容:
1
2
3
4
5
6
7
8
9
10
11
12
13
14
kubectl get sa categraf-daemonset -n flashcat -o yaml
把这个token字段拿到,然后base64转码一下,作为Bearer
Token来请求测试一下:
1
2
3
4
5
6
7
8
9
10
11
12
13
14
15
token=`kubectl -n flashcat get secret categraf-daemonset-token-h4p94 -o jsonpath={.data.token} | base64 -d`# 输出如下内容表示已经正常访问https://localhost:10250/metrics # HELP apiserver_audit_event_total [ALPHA] Counter of audit events generated and sent to the audit backend. # TYPE apiserver_audit_event_total counter # HELP apiserver_audit_requests_rejected_total [ALPHA] Counter of apiserver requests rejected due to an error in audit logging backend. # TYPE apiserver_audit_requests_rejected_total counter # HELP apiserver_client_certificate_expiration_seconds [ALPHA] Distribution of the remaining lifetime on the certificate used to authenticate a request. # TYPE apiserver_client_certificate_expiration_seconds histogram
至此,我们已经成功获取到”https://localhost:10250/metrics“的token,可以将其配置到categraf的conf/input.cadvisor/cadvisor.toml
文件中的bearer_token_string配置项。但如果要正常获取k8s集群中所有容器数据,需要为k8s集群每个节点都安装categraf并如此配置。如果后续k8s集群新增节点了,新增加的节点也需要重复此配置,考虑到此,引出下文中的创建daemonset。
如果使用了如下daemonset,理应将categraf中的cadvisor插件关闭,否则二者重复了。
2.3 创建ConfigMap
1 2 3 4 5 6 7 8 9 10 11 12 13 14 15 16 17 18 19 20 21 22 23 24 25 26 27 28 29 30 31 32 33 34 35 36 37 38 39 40 41 42 --- kind: ConfigMap metadata: name: categraf-config apiVersion: v1 data: config.toml: | [global] hostname = "$HOSTNAME" interval = 15 providers = ["local"] [writer_opt] batch = 2000 chan_size = 10000 [[writers]] url = "http://172.20.180.50:17000/prometheus/v1/write" timeout = 5000 dial_timeout = 2500 max_idle_conns_per_host = 100 --- kind: ConfigMap metadata: name: categraf-input-prometheus apiVersion: v1 data: prometheus.toml: | [[instances]] urls = ["http://127.0.0.1:10249/metrics"] labels = { job="kube-proxy" } [[instances]] urls = ["https://127.0.0.1:10250/metrics"] bearer_token_file = "/var/run/secrets/kubernetes.io/serviceaccount/token" use_tls = true insecure_skip_verify = true labels = { job="kubelet" } [[instances]] urls = ["https://127.0.0.1:10250/metrics/cadvisor"] bearer_token_file = "/var/run/secrets/kubernetes.io/serviceaccount/token" use_tls = true insecure_skip_verify = true labels = { job="cadvisor" }
如上内容中,”172.20.180.50:17000“是夜莺服务所在的ip与端口,根据实际情况修改。
hostname = "$HOSTNAME" 这个配置用了 $
符号,后面创建 Daemonset 的时候会把 HOSTNAME 这个环境变量注入,让
Categraf 自动拿到。
1
2
3
4
# 应用此文件
2.4 创建daemonset
1 2 3 4 5 6 7 8 9 10 11 12 13 14 15 16 17 18 19 20 21 22 23 24 25 26 27 28 29 30 31 32 33 34 35 36 37 38 39 40 41 42 43 44 45 46 47 48 49 50 51 apiVersion: apps/v1 kind: DaemonSet metadata: labels: app: categraf-daemonset name: categraf-daemonset spec: selector: matchLabels: app: categraf-daemonset template: metadata: labels: app: categraf-daemonset spec: containers: - env: - name: TZ value: Asia/Shanghai - name: HOSTNAME valueFrom: fieldRef: apiVersion: v1 fieldPath: status.hostIP - name: HOSTIP valueFrom: fieldRef: apiVersion: v1 fieldPath: status.hostIP image: flashcatcloud/categraf:v0.2.18 imagePullPolicy: IfNotPresent name: categraf volumeMounts: - mountPath: /etc/categraf/conf name: categraf-config - mountPath: /etc/categraf/conf/input.prometheus name: categraf-input-prometheus hostNetwork: true serviceAccountName: categraf-daemonset restartPolicy: Always tolerations: - effect: NoSchedule operator: Exists volumes: - configMap: name: categraf-config name: categraf-config - configMap: name: categraf-input-prometheus name: categraf-input-prometheus
根据官方文档,创建 Daemonset,会把 HOSTNAME
环境变量注入进去。官方文档默认使用的是spec.nodeName,我改成使用status.hostIP,这样后续采集到的指标数据中,ident属性的值就不再是容器宿主机名,而是容器宿主机ip了。
1
2
3
4
5
6
7
8
9
10
11
12
13
14
15
# 应用此文件 # 稍等一会儿,等pod正常运行 # daemonset运行正常
2.5 确认采集到的数据
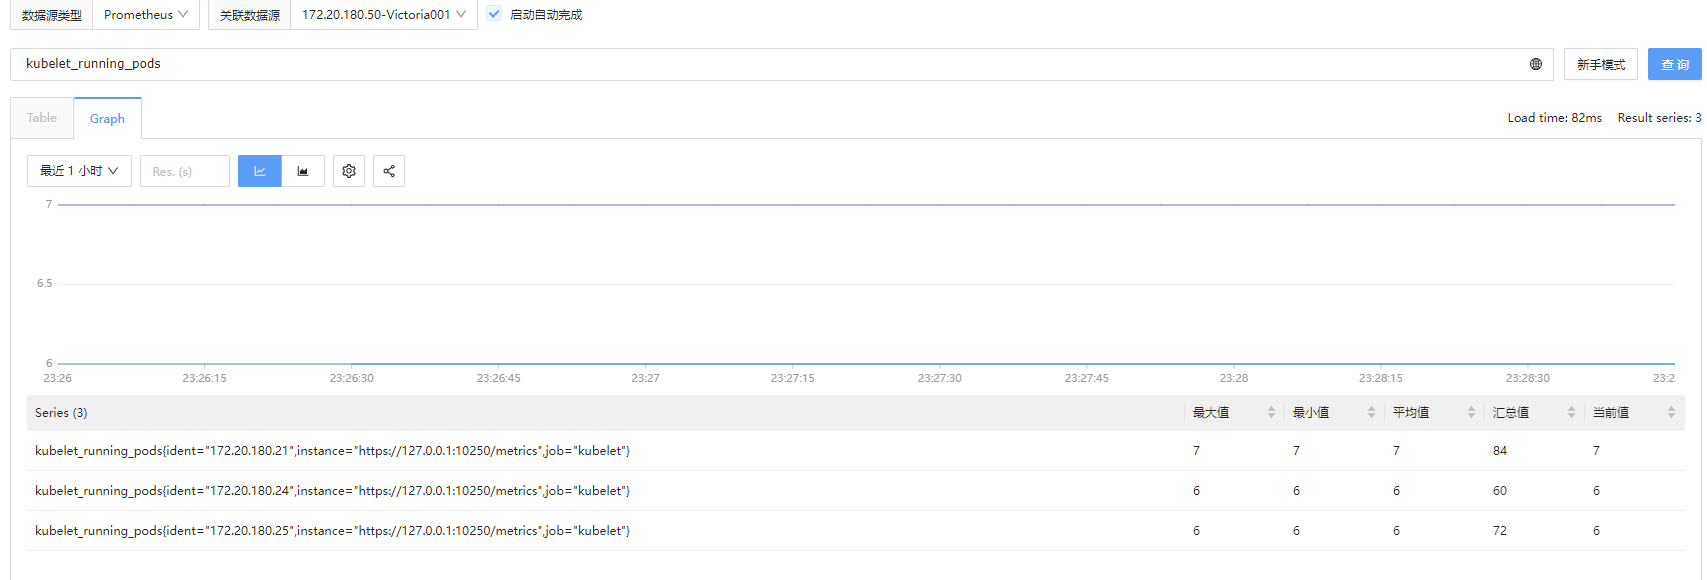
查看kubelet本身的指标,它是从 Kubelet 的 /metrics
接口采集的(可以看到采集到的指标数据中有一个属性ident属性,它的值是被监控服务器的ip,如下是172.20.180.21):
image-20240526232912388
再确认cAdvisor 采集的指标及其数据,它是从
/metrics/cadvisor 接口采集的:
image-20240526233510353
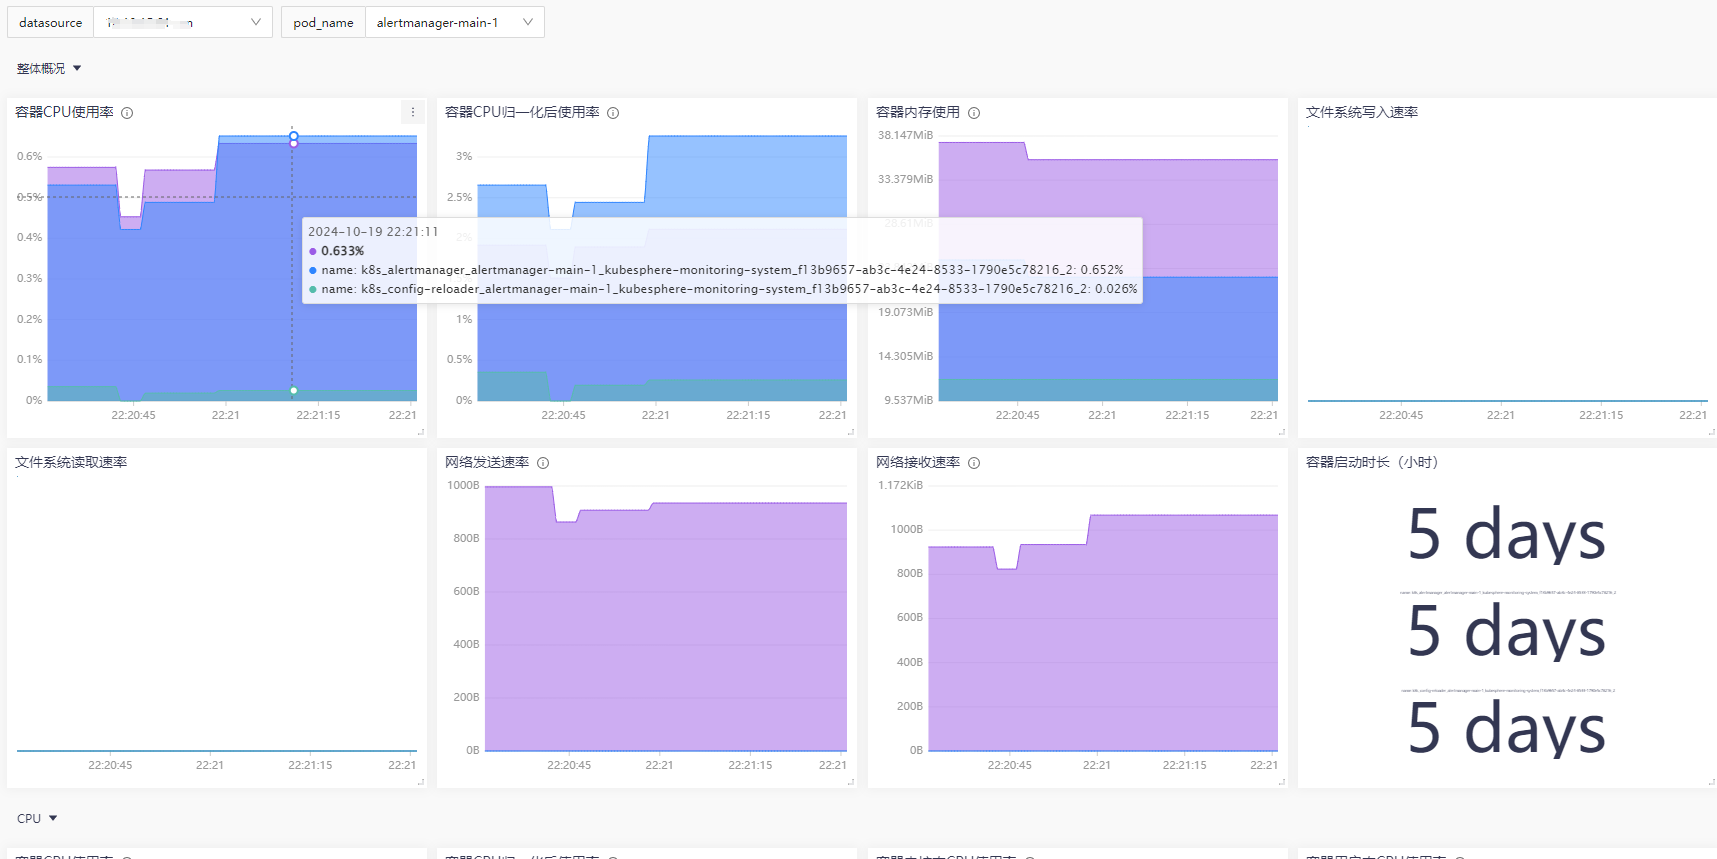
2.6 监控仪表盘
使用内置仪表盘 “Kubernetes /
Container”,克隆一个自己使用的仪表盘。得到的大体效果如下:
image-20241019222209824