搭建互为主备MySQL5.7集群并实现自动切换

一、背景

服务器:两个x86服务器(本文使用的是两个OpenStack虚拟机)

MySQL版本信息:mysql-5.7.36-linux-glibc2.12-x86_64

其中,两个服务器及操作系统的信息如下:

主机名 IP 用途 规格 磁盘空间 操作系统
ztmonitor01 172.20.180.44 互为主从数据库中的节点1 4c16g 500G Centos7.9-amd64
ztmonitor02 172.20.180.165 互为主从数据库中的节点2 4c16g 500G Centos7.9-amd64
~ 172.20.180.43 Keepalived的虚拟IP ~ ~ ~

如无特殊说明,所有终端命令操作都是以root用户执行的。

按照此文档最终实现的效果:两个MySQL数据库实例组成一个互为主备MySQL集群,同一时间只有一个数据库会对提供服务。两个数据库实例分别在不同的节点1与节点2上,在两个节点上部署了keepalived服务(两个节点的优先级相同,先运行的即为keepalived集群master节点,后面只有当角色为master的节点上的keepalived停掉才会出现keepalived角色切换),通过针对keepalived的notify_master、notify_backup、notify_stop与vrrp_script编写自定义脚本程序实现两个节点上的数据库实例中数据的同步。

二、搭建配置步骤

2.1 安装 MySQL 实例

MySQL5.7安装文件下载地址:https://mirrors.aliyun.com/mysql/MySQL-5.7/mysql-5.7.36-linux-glibc2.12-x86_64.tar.gz

2.1.1 节点1上安装数据库实例

1
2
3
4
5
6
7
8
9
10
11
12
13
14
15
16
17
18
19
20
21
22
23
24
25
26
27
28
29
30
31
32
33
34
35
36
37
38
39
40
41
42
43
44
45
46
47
48
49
50
51
52
53
54
55
56
57
58
59
60
61
62
63
64
65
66
67
68
69
70
71
72
73
74
75
76
#1解压MySQL5.7.36
[root@ztmonitor01 ~]# cd /data/softs
[root@ztmonitor01 softs]# wget https://mirrors.aliyun.com/mysql/MySQL-5.7/mysql-5.7.36-linux-glibc2.12-x86_64.tar.gz
[root@ztmonitor01 softs]# tar xf mysql-5.7.36-linux-glibc2.12-x86_64.tar.gz -C /usr/local/
[root@ztmonitor01 softs]# mv /usr/local/mysql-5.7.36-linux-glibc2.12-x86_64 /usr/local/mysql

#2设置MySQL的环境变量
[root@ztmonitor01 softs]# vi /etc/profile
export MYSQL_HOME=/usr/local/mysql
PATH=$MYSQL_HOME/bin:$PATH
export LD_LIBRARY_PATH=:$MYSQL_HOME/lib

#3创建mysql用户组与用户
[root@ztmonitor01 softs]# groupadd -r mysql
[root@ztmonitor01 softs]# useradd -M -r -s /sbin/nologin -g mysql mysql

#4准备数据目录、设置属主与属组为mysql:mysql
[root@ztmonitor01 softs]# mkdir /data/mysql
[root@ztmonitor01 softs]# chown -R mysql. /data/mysql

#5初始化数据库
[root@ztmonitor01 softs]# source /etc/profile
[root@ztmonitor01 softs]# mysqld --initialize-insecure --user=mysql --basedir=/usr/local/mysql --datadir=/data/mysql

#6准备mysql配置文件(#每个MySQL数据库的server_id都设置成不同的)
[root@ztmonitor01 softs]# vi /etc/my.cnf
[mysqld]
user=mysql
port=3306
server_id=1 #各个MySQL数据库服务端都有一个唯一id
basedir=/usr/local/mysql
datadir=/data/mysql
log_bin=mysql-bin #开启binlog,binlog日志文件只对增删改有记录,查询操作是没有记录的
gtid-mode=on
enforce-gtid-consistency=true
socket=/data/mysql.sock
log_error=/data/mysql/mysql_err.log
character-set-server=utf8
symbolic-links=0
expire_logs_days=10
default_password_lifetime=0 #设置密码不过期
[mysql]
socket=/data/mysql.sock

#7使用systemd托管mysql服务
[root@ztmonitor01 softs]# cat /usr/lib/systemd/system/mysqld.service
[Unit]
Description=MySQL Server
Documentation=man:mysqld(8)
Documentation=http://dev.mysql.com/doc/refman/en/using-systemd.html
After=network.target
After=syslog.target
[Install]
WantedBy=multi-user.target
[Service]
User=mysql
Group=mysql
ExecStart=/usr/local/mysql/bin/mysqld --defaults-file=/etc/my.cnf
LimitNOFILE=5000

#8启动数据库
[root@ztmonitor01 softs]# systemctl daemon-reload
[root@ztmonitor01 softs]# systemctl start mysqld
[root@ztmonitor01 softs]# systemctl enable mysqld
[root@ztmonitor01 softs]# systemctl status mysqld

#9设置root密码(此处设置为123456)
[root@ztmonitor01 softs]# mysqladmin -u root -P 3306 password '123456'

#10登录数据库
[root@ztmonitor01 softs]# mysql -uroot -p123456
#下面的%表示允许任何ip访问此mysql数据库
mysql> GRANT ALL PRIVILEGES ON *.* TO 'root'@'%' IDENTIFIED BY '123456' WITH GRANT OPTION;
mysql> flush privileges;
mysql> exit;

2.1.2 节点2上安装数据库实例

注意,ztmonitor02上的操作与ztmonitor01上的几乎一样,但/etc/my.cnf文件中[mysqld]下面的server_id配置项的值一定要不同。

1
2
3
4
5
6
7
8
9
10
11
12
13
14
15
16
17
18
19
20
21
22
23
24
25
26
27
28
29
30
31
32
33
34
35
36
37
38
39
40
41
42
43
44
45
46
47
48
49
50
51
52
53
54
55
56
57
58
59
60
61
62
63
64
65
66
67
68
69
70
71
72
73
74
#1解压MySQL5.7.36
[root@ztmonitor02 ~]# tar xf /data/softs/mysql-5.7.36-linux-glibc2.12-x86_64.tar.gz -C /usr/local/
[root@ztmonitor02 ~]# mv /usr/local/mysql-5.7.36-linux-glibc2.12-x86_64 /usr/local/mysql

#2设置MySQL的环境变量
[root@ztmonitor02 ~]# vi /etc/profile
export MYSQL_HOME=/usr/local/mysql
export PATH=$MYSQL_HOME/bin:$PATH
export LD_LIBRARY_PATH=:/usr/local/mysql/lib

#3创建mysql用户组与用户
[root@ztmonitor02 ~]# groupadd -r mysql
[root@ztmonitor02 ~]# useradd -M -r -s /sbin/nologin -g mysql mysql

#4准备数据目录
[root@ztmonitor02 ~]# mkdir /data/mysql
[root@ztmonitor02 ~]# chown -R mysql.mysql /data/mysql

#5准备mysql配置文件
[root@ztmonitor02 ~]# vi /etc/my.cnf
[mysqld]
user=mysql
port=3306
server_id=2 #各个MySQL数据库服务端都有一个唯一id
basedir=/usr/local/mysql
datadir=/data/mysql
log_bin=mysql-bin #开启binlog,binlog日志文件只对增删改有记录,查询操作是没有记录的
gtid-mode=on
enforce-gtid-consistency=true
socket=/data/mysql.sock
log_error=/data/mysql/mysql_err.log
character-set-server=utf8
symbolic-links=0
expire_logs_days=10
default_password_lifetime=0 #设置密码不过期
[mysql]
socket=/data/mysql.sock

#6初始化数据库
[root@ztmonitor02 ~]# source /etc/profile
[root@ztmonitor02 ~]# mysqld --initialize-insecure --user=mysql --basedir=/usr/local/mysql --datadir=/data/mysql

#7使用systemd托管mysql服务
[root@ztmonitor02 ~]# vi /usr/lib/systemd/system/mysqld.service
[Unit]
Description=MySQL Server
Documentation=man:mysqld(8)
Documentation=http://dev.mysql.com/doc/refman/en/using-systemd.html
After=network.target
After=syslog.target
[Install]
WantedBy=multi-user.target
[Service]
User=mysql
Group=mysql
ExecStart=/usr/local/mysql/bin/mysqld --defaults-file=/etc/my.cnf
LimitNOFILE = 5000

#8启动数据库
[root@ztmonitor02 ~]# systemctl daemon-reload
[root@ztmonitor02 ~]# systemctl start mysqld
[root@ztmonitor02 ~]# systemctl enable mysqld
[root@ztmonitor02 ~]# systemctl status mysqld

#9设置root密码
[root@ztmonitor02 ~]# mysqladmin -u root password '123456'

#10登录数据库
[root@ztmonitor02 ~]# mysql -uroot -p123456

#下面的%表示允许任何ip访问此mysql数据库
mysql> GRANT ALL PRIVILEGES ON *.* TO 'root'@'%' IDENTIFIED BY '123456' WITH GRANT OPTION;
mysql> flush privileges;
mysql> exit;

2.1.3 确认两数据库实例id

如下可以看到两个数据库实例的id是不同的。

1
2
3
4
5
6
7
8
#节点1
[root@ztmonitor01 ~]# mysql -uroot -p123456 -e "select @@server_id"
mysql: [Warning] Using a password on the command line interface can be insecure.
+-------------+
| @@server_id |
+-------------+
| 1 |
+-------------+
1
2
3
4
5
6
7
8
#节点2
[root@ztmonitor02 ~]# mysql -uroot -p123456 -e "select @@server_id"
mysql: [Warning] Using a password on the command line interface can be insecure.
+-------------+
| @@server_id |
+-------------+
| 2 |
+-------------+

2.2 配置互为主备MySQL集群

上面,MySQL 数据库集群的两个实例节点已经搭建完成了,下面将这些搭建的数据库实例配置成互为主备复制集群。

配置 MySQL 主备复制集群的大致步骤:

  • 主库开启 Binlog 日志,从库复制主库数据要通过 Binlog 进行复制。
  • 主库创建专门用作主从复制的用户。
  • 将主库数据进行备份,再从库中恢复(如果主库与从库都是新搭建的,无内容需要恢复,此步骤可跳过)。
  • 配置从库连接主库的复制信息。
  • 启动主从复制集群。

2.2.1 确认数据库节点已开启 Binlog

1
2
3
4
5
6
7
8
9
10
11
12
[root@ztmonitor01 ~]# mysql -uroot -p123456 -e "show variables like '%log_bin%';"
mysql: [Warning] Using a password on the command line interface can be insecure.
+---------------------------------+-----------------------------+
| Variable_name | Value |
+---------------------------------+-----------------------------+
| log_bin | ON |
| log_bin_basename | /data/mysql/mysql-bin |
| log_bin_index | /data/mysql/mysql-bin.index |
| log_bin_trust_function_creators | OFF |
| log_bin_use_v1_row_events | OFF |
| sql_log_bin | ON |
+---------------------------------+-----------------------------+
1
2
3
4
5
6
7
8
9
10
11
12
[root@ztmonitor02 ~]# mysql -uroot -p123456 -e "show variables like '%log_bin%';"
mysql: [Warning] Using a password on the command line interface can be insecure.
+---------------------------------+-----------------------------+
| Variable_name | Value |
+---------------------------------+-----------------------------+
| log_bin | ON |
| log_bin_basename | /data/mysql/mysql-bin |
| log_bin_index | /data/mysql/mysql-bin.index |
| log_bin_trust_function_creators | OFF |
| log_bin_use_v1_row_events | OFF |
| sql_log_bin | ON |
+---------------------------------+-----------------------------+

可以看到,两个数据库实例的log_bin都是开启的。从库复制主库(主库与从库是可以切换的,比如节点1在某情况下是主库,但在某情况又会切换成备库)数据与恢复数据,都是通过 Binlog 进行的。

2.2.2 创建主从复制的用户

两个数据库实例上都要执行,执行的如下相同的命令即可。

1
2
3
4
#创建用户replication,密码是replication,此用户能从任何ip登录进主库,对所有数据库的所有成员拥有replication slave权限
mysql> GRANT REPLICATION SLAVE,REPLICATION CLIENT ON *.* TO replication@'%' IDENTIFIED BY 'replication';
mysql> flush privileges;
mysql> exit;

2.2.3 在节点1上执行同步操作

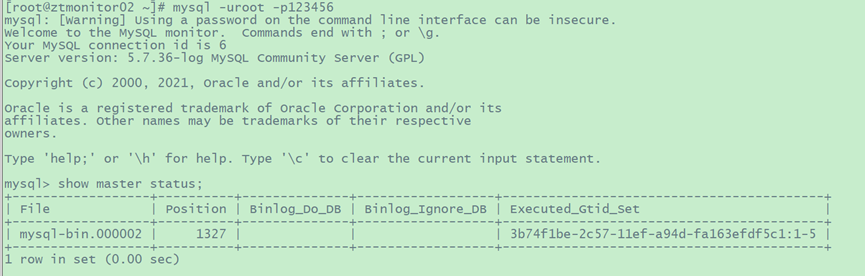
首先在节点2上查询其上的数据库实例状态信息。

1
mysql> show master status;
image-20240810231040169

记住此File列与Position列的值mysql-bin.000002、1327

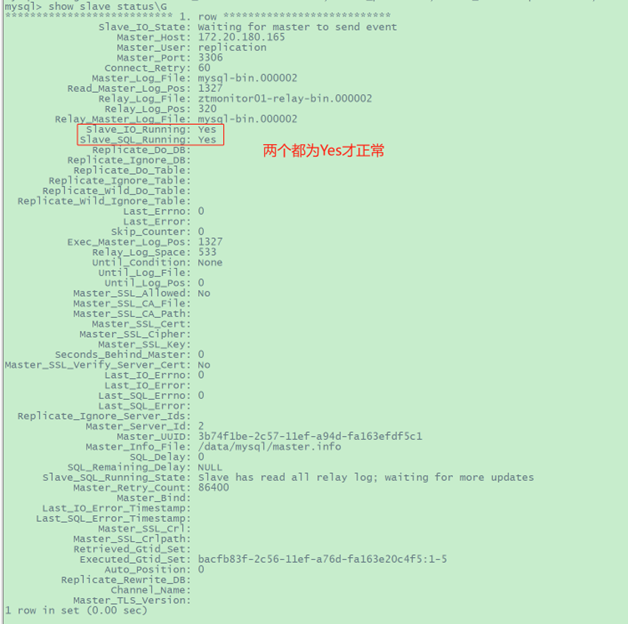
以下命令在节点1上执行(节点1数据库实例的主库是节点2上的数据库实例)

1
2
3
4
mysql> change master to master_host='172.20.180.165',master_port=3306,master_user='replication',master_password='replication',master_log_file='mysql-bin.000002',master_log_pos=1327;
mysql> start slave;
mysql> show slave status\G
mysql> exit;
image-20240810231319922
image-20240810231352704

2.2.4 在节点2上执行同步操作

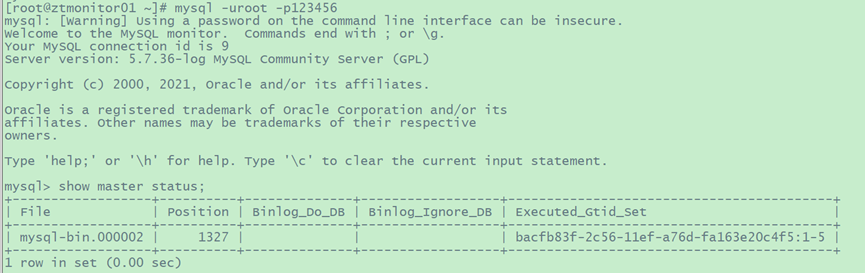
首先在节点1上查询其上的数据库实例状态信息。

1
mysql> show master status;
image-20240810231523835

记住此File列与Position列的值mysql-bin.000002、1327

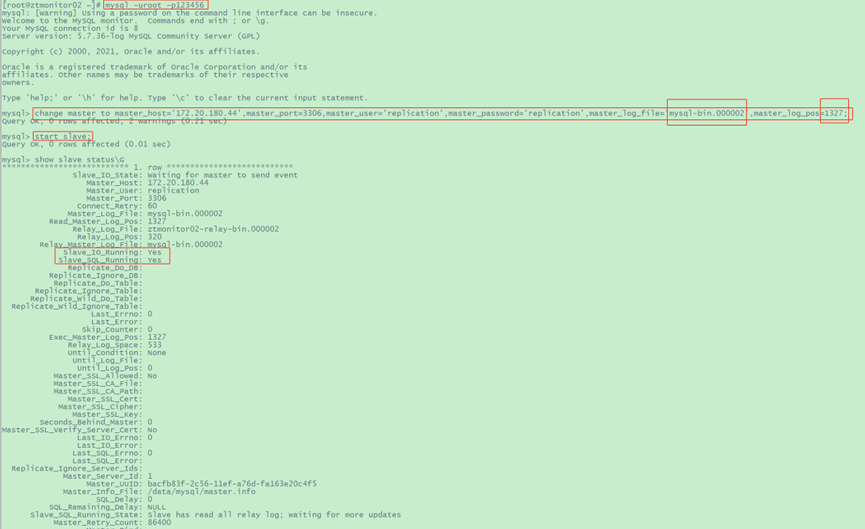
以下命令在节点2上执行(节点2数据库实例的主库是节点1上的数据库实例)

1
2
3
4
mysql> change master to master_host='172.20.180.44',master_port=3306,master_user='replication',master_password='replication',master_log_file='mysql-bin.000002',master_log_pos=1327;
mysql> start slave;
mysql> show slave status\G
mysql> exit;
image-20240810231640870
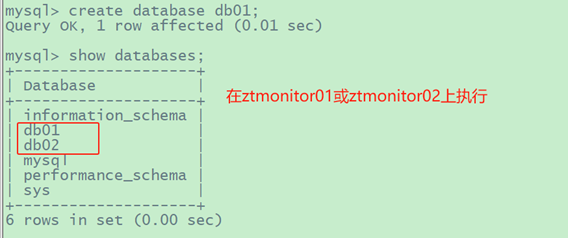
2.2.5 验证互为主从数据库生效

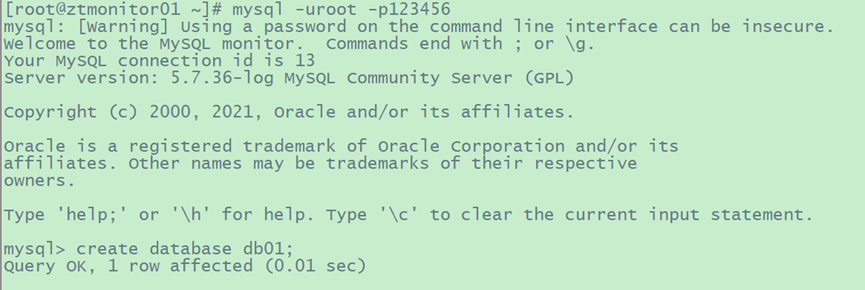
在节点1上的MySQL数据库实例中创建数据库db01。

1
[root@ztmonitor01 ~]# mysql -uroot -p123456 -e "create database db01;"
image-20240810231810961

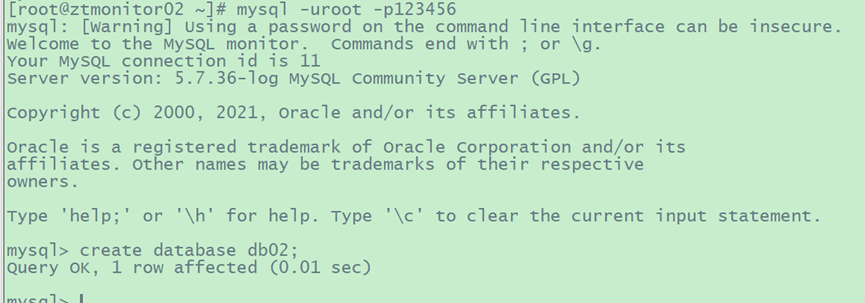
在节点2上的MySQL数据库实例中创建数据库db02。

1
[root@ztmonitor02 ~]# mysql -uroot -p123456 -e "create database db02;"
image-20240810231906754

#在节点1或节点2上的MySQL数据库实例上查看现有的所有数据库名称(正常情况下,在任何一方对所有数据库的所有操作都会同步)

1
mysql> show databases;
image-20240810232108875

2.2.6 创建切换脚本

这些脚本只存在于MySQL集群的节点1与节点2上。

切换脚本规划,将所有切换脚本放在/data/server/mysql目录下,相关脚本说明如下:

创建并进入/data/server/mysql目录,如下文件:

  • Logs   //存储日志的文件目录
  • mybackup.sh //清空slave配置,重新获取远程日志文件及Pos,并开启同步
  • mycheck.sh //检查mysql运行状态,如果运行正常,退出。如果运行不正常调用pkill keepalived
  • mymaster.sh //先判断同步复制是否执行完成,如果未执行完成等待1分钟后,停止同步(stop slave;),并且记录切换后的日志和pos
  • .mysqlenv //脚本运行环境文件
  • mystop.sh //设置参数保证数据不丢失,最后检查看是否还有写操作,最后1分钟退出
  • syncposfile //每次切换后,Master最后一次File值和Position值。

:这些脚本参考自此文章https://www.cnblogs.com/saneri/p/11423059.html(感谢),但自己做了少许改动与验证

2.2.7 环境变量文件

1
2
3
#在两个节点上都执行如下操作
mkdir /data/server/mysql
cd /data/server/mysql

2.2.7.1 节点1上的环境文件

1
2
3
4
5
6
7
#节点1的ip是172.20.180.44,下面REMOTE_IP应该配置成节点2的ip(172.20.180.165)
[root@ztmonitor01 mysql]# vi .mysqlenv
MYSQL=/usr/local/mysql/bin/mysql
MYSQL_CMD="-uroot -p123456"
#远端主机的IP地址
REMOTE_IP=172.20.180.165
export mysql="$MYSQL $MYSQL_CMD "

2.2.7.2 节点2上的环境文件

1
2
3
4
5
6
7
#节点2的ip是172.20.180.165,下面REMOTE_IP应该配置成节点1的ip(172.20.180.44)
[root@ztmonitor02 mysql]# vi .mysqlenv
MYSQL=/usr/local/mysql/bin/mysql
MYSQL_CMD="-uroot -p123456"
#远端主机的IP地址
REMOTE_IP=172.20.180.44
export mysql="$MYSQL $MYSQL_CMD "

2.2.8 服务检查脚本

在两个节点上,以下4个脚本文件的内容是一样的。

2.2.8.1 检查脚本mycheck.sh

1
2
3
4
5
6
7
8
9
10
11
12
13
14
15
16
17
18
19
20
21
22
23
24
25
26
27
28
29
30
31
32
33
34
35
36
37
38
39
40
41
42
43
44
45
46
47
48
49
[root@ztmonitor01 ~]# cat mycheck.sh
#!/bin/bash

##################################################
#File Name : mycheck.sh
#Description: mysql is working MYSQL_OK is 1
# mysql is down MYSQL_OK is 0
##################################################

BASEPATH=/data/server/mysql
LOGSPATH=$BASEPATH/logs
source $BASEPATH/.mysqlenv
if [ ! -d $LOGSPATH ];then
mkdir -p $LOGSPATH
fi

CHECK_TIME=3
MYSQL_OK=1
##################################################################
function check_mysql_helth (){
$mysql -e "show status;" >/dev/null 2>&1
if [ $? == 0 ]
then
MYSQL_OK=1
else
MYSQL_OK=0
#systemctl status keepalived
fi
return $MYSQL_OK
}

#check_mysql_helth
while [ $CHECK_TIME -ne 0 ] #不等于
do
let "CHECK_TIME -= 1"
check_mysql_helth
if [ $MYSQL_OK = 1 ];then
CHECK_TIME=0
echo "$(date "+%Y-%m-%d %H:%M:%S") The scripts mycheck.sh is running ..." >> $LOGSPATH/mysql_switch.log
exit 0
fi
if [ $MYSQL_OK -eq 0 ] && [ $CHECK_TIME -eq 0 ]
then
echo "$(date "+%Y-%m-%d %H:%M:%S") The mycheck.sh, mysql is down, after switch..." >> $LOGSPATH/mysql_switch.log
systemctl stop keepalived
exit 1
fi
sleep 1
done

2.2.8.2 切换脚本mymaster.sh

1
2
3
4
5
6
7
8
9
10
11
12
13
14
15
16
17
18
19
20
21
22
23
24
25
26
27
28
29
30
31
32
33
34
35
36
37
38
39
40
41
42
43
44
45
46
47
48
49
50
51
52
53
[root@ztmonitor01 ~]# vi mymaster.sh
#!/bin/bash

##################################################
#File Name : mymaster.sh
#Description: First determine whether synchronous
# replication is performed, and if no
# execution is completed, wait for 1
# minutes. Log logs and POS after
# switching, and record files synchronously.
##################################################

BASEPATH=/data/server/mysql
LOGSPATH=$BASEPATH/logs
source $BASEPATH/.mysqlenv
if [ ! -d $LOGSPATH ];then
mkdir $LOGSPATH
fi

$mysql -e "show slave status\G" > $LOGSPATH/mysqlslave.states
Master_Log_File=`cat $LOGSPATH/mysqlslave.states | grep -w Master_Log_File | awk -F": " '{print $2}'`
Relay_Master_Log_File=`cat $LOGSPATH/mysqlslave.states | grep -w Relay_Master_Log_File | awk -F": " '{print $2}'`
Read_Master_Log_Pos=`cat $LOGSPATH/mysqlslave.states | grep -w Read_Master_Log_Pos | awk -F": " '{print $2}'`
Exec_Master_Log_Pos=`cat $LOGSPATH/mysqlslave.states | grep -w Exec_Master_Log_Pos | awk -F": " '{print $2}'`
i=1

while true
do
if [ $Master_Log_File = $Relay_Master_Log_File ] && [ $Read_Master_Log_Pos -eq $Exec_Master_Log_Pos ];then
echo "$(date "+%Y-%m-%d %H:%M:%S") The mymaster.sh, slave sync ok... " >> $LOGSPATH/mysql_switch.log
break
else
sleep 1
if [ $i -gt 60 ];then
break
fi
continue
let i++
fi
done

#$mysql -e "stop slave;"
$mysql -e "set global innodb_support_xa=0;"
$mysql -e "set global sync_binlog=0;"
$mysql -e "set global innodb_flush_log_at_trx_commit=0;"
$mysql -e "flush logs;GRANT ALL PRIVILEGES ON *.* TO 'replication'@'%' IDENTIFIED BY 'replication';flush privileges;"
timestr=`date "+%y%m%d-%H%M"`
$mysql -e "show master status;" > $LOGSPATH/master_status_${timestr}.txt

# sync pos file
ssh -t root@$REMOTE_IP "if [ ! -d $BASEPATH/syncposfile ];then mkdir -p $BASEPATH/syncposfile; fi" >> /dev/null
/usr/bin/scp $LOGSPATH/master_status_${timestr}.txt root@$REMOTE_IP:$BASEPATH/syncposfile/backup_master.status
echo "$(date "+%Y-%m-%d %H:%M:%S") The mymaster.sh, Sync pos file sucess." >> $LOGSPATH/mysql_switch.log

2.2.8.3 回切脚本mybackup.sh

1
2
3
4
5
6
7
8
9
10
11
12
13
14
15
16
17
18
19
20
21
22
23
24
25
26
27
28
29
30
31
32
33
34
35
36
37
38
39
40
41
42
43
[root@ztmonitor01 ~]# vi mybackup.sh
#!/bin/bash

##################################################
#File Name : mybackup.sh
#Description: Empty the slave configuration, retrieve
# the remote log file and Pos, and open
# the synchronization
##################################################

BASEPATH=/data/server/mysql
LOGSPATH=$BASEPATH/logs
source $BASEPATH/.mysqlenv
if [ ! -d $LOGSPATH ];then
mkdir $LOGSPATH
fi

$mysql -e "GRANT ALL PRIVILEGES ON *.* TO 'replication'@'%' IDENTIFIED BY 'replication';flush privileges;"
$mysql -e "set global innodb_support_xa=0;"
$mysql -e "set global sync_binlog=0;"
$mysql -e "set global innodb_flush_log_at_trx_commit=0;"
$mysql -e "flush logs;"
$mysql -e "reset slave all;"

if [ -f $BASEPATH/syncposfile/backup_master.status ];then
New_ReM_File=`cat $BASEPATH/syncposfile/backup_master.status | grep -v File |awk '{print $1}'`
New_ReM_Position=`cat $BASEPATH/syncposfile/backup_master.status | grep -v File |awk '{print $2}'`
echo "$(date "+%Y-%m-%d %H:%M:%S") This mybackup.sh, New_ReM_File:$New_ReM_File,New_ReM_Position:$New_ReM_Position" >> $LOGSPATH/mysql_switch.log
$mysql -e "change master to master_host='$REMOTE_IP',master_port=3306,master_user='replication',master_password='replication',master_log_file='$New_ReM_File',master_log_pos=$New_ReM_Position;"
$mysql -e "start slave;"
timestr=`date "+%y%m%d-%H%M"`
$mysql -e "show slave status\G;" > $LOGSPATH/slave_status_${timestr}.txt
cat $LOGSPATH/slave_status_${timestr}.txt >> $LOGSPATH/mysql_switch.log
rm -f $BASEPATH/syncposfile/backup_master.status

timestr=`date "+%y%m%d-%H%M"`
$mysql -e "show master status;" > $LOGSPATH/master_status_${timestr}.txt
# sync pos file to master node
ssh -t root@$REMOTE_IP "if [ ! -d $BASEPATH/syncposfile ];then mkdir -p $BASEPATH/syncposfile; fi" >> /dev/null
/usr/bin/scp $LOGSPATH/master_status_${timestr}.txt root@$REMOTE_IP:$BASEPATH/syncposfile/backup_master.status
else
echo "$(date "+%Y-%m-%d %H:%M:%S") The scripts mybackup.sh running error..." >> $LOGSPATH/mysql_switch.log
fi

2.2.8.4 停止脚本mystop.sh

1
2
3
4
5
6
7
8
9
10
11
12
13
14
15
16
17
18
19
20
21
22
23
24
25
26
27
28
29
30
31
32
33
34
35
36
37
38
39
40
41
42
43
44
45
46
47
48
[root@ztmonitor01 ~]# vi mystop.sh
#!/bin/bash

##################################################
#File Name : mystop.sh
#Description: Set parameters to ensure that the data
# is not lost, and finally check to see
# if there are still write operations,
# the last 1 minutes to exit

##################################################

BASEPATH=/data/server/mysql
LOGSPATH=$BASEPATH/logs
source $BASEPATH/.mysqlenv
if [ ! -d $LOGSPATH ];then
mkdir $LOGSPATH
fi

$mysql -e "GRANT ALL PRIVILEGES ON *.* TO 'replication'@'%' IDENTIFIED BY 'replication';flush privileges;"
$mysql -e "set global innodb_support_xa=1;"
$mysql -e "set global sync_binlog=1;"
$mysql -e "set global innodb_flush_log_at_trx_commit=1;"
$mysql -e "show master status\G" > $LOGSPATH/mysqlmaster0.states
M_File1=`cat $LOGSPATH/mysqlmaster0.states | awk -F': ' '/File/{print $2}'`
M_Position1=`cat $LOGSPATH/mysqlmaster0.states | awk -F': ' '/Position/{print $2}'`
sleep 2
$mysql -e "show master status\G" > $LOGSPATH/mysqlmaster1.states
M_File2=`cat $LOGSPATH/mysqlmaster1.states | awk -F': ' '/File/{print $2}'`
M_Position2=`cat $LOGSPATH/mysqlmaster1.states | awk -F': ' '/Position/{print $2}'`

i=1

while true
do
if [ $M_File1 = $M_File2 ] && [ $M_Position1 -eq $M_Position2 ];then
echo "$(date "+%Y-%m-%d %H:%M:%S") The mystop.sh, master sync ok.." >> $LOGSPATH/mysql_switch.log
exit 0
else
sleep 1
if [$i -gt 60 ];then
break
fi
continue
let i++
fi
done
echo "$(date "+%Y-%m-%d %H:%M:%S") The mystop.sh, master sync exceed one minutes..." >> $LOGSPATH/mysql_switch.log

2.2.9 给服务检查脚本赋予执行权限

在两个节点上都要执行。

1
2
3
cd /data/server/mysql 
chmod a+x my*.sh
chmod a+x .mysqlenv

2.3 安装与配置keepalived

2.3.1 安装keepalived

以下操作在两个节点都需要执行。

1
2
3
4
5
6
7
8
9
10
#安装gcc、OpenSSL
yum install -y gcc-c++ openssl openssl-devel

#二进制安装文件安装keepalived
cd /data/softs/
wget http://www.keepalived.org/software/keepalived-2.0.7.tar.gz
tar -zxf keepalived-2.0.7.tar.gz
cd keepalived-2.0.7
./configure --bindir=/usr/bin --sbindir=/usr/sbin --sysconfdir=/etc --mandir=/usr/share
make && make install

2.3.2 OpenStack中关于vip的配置
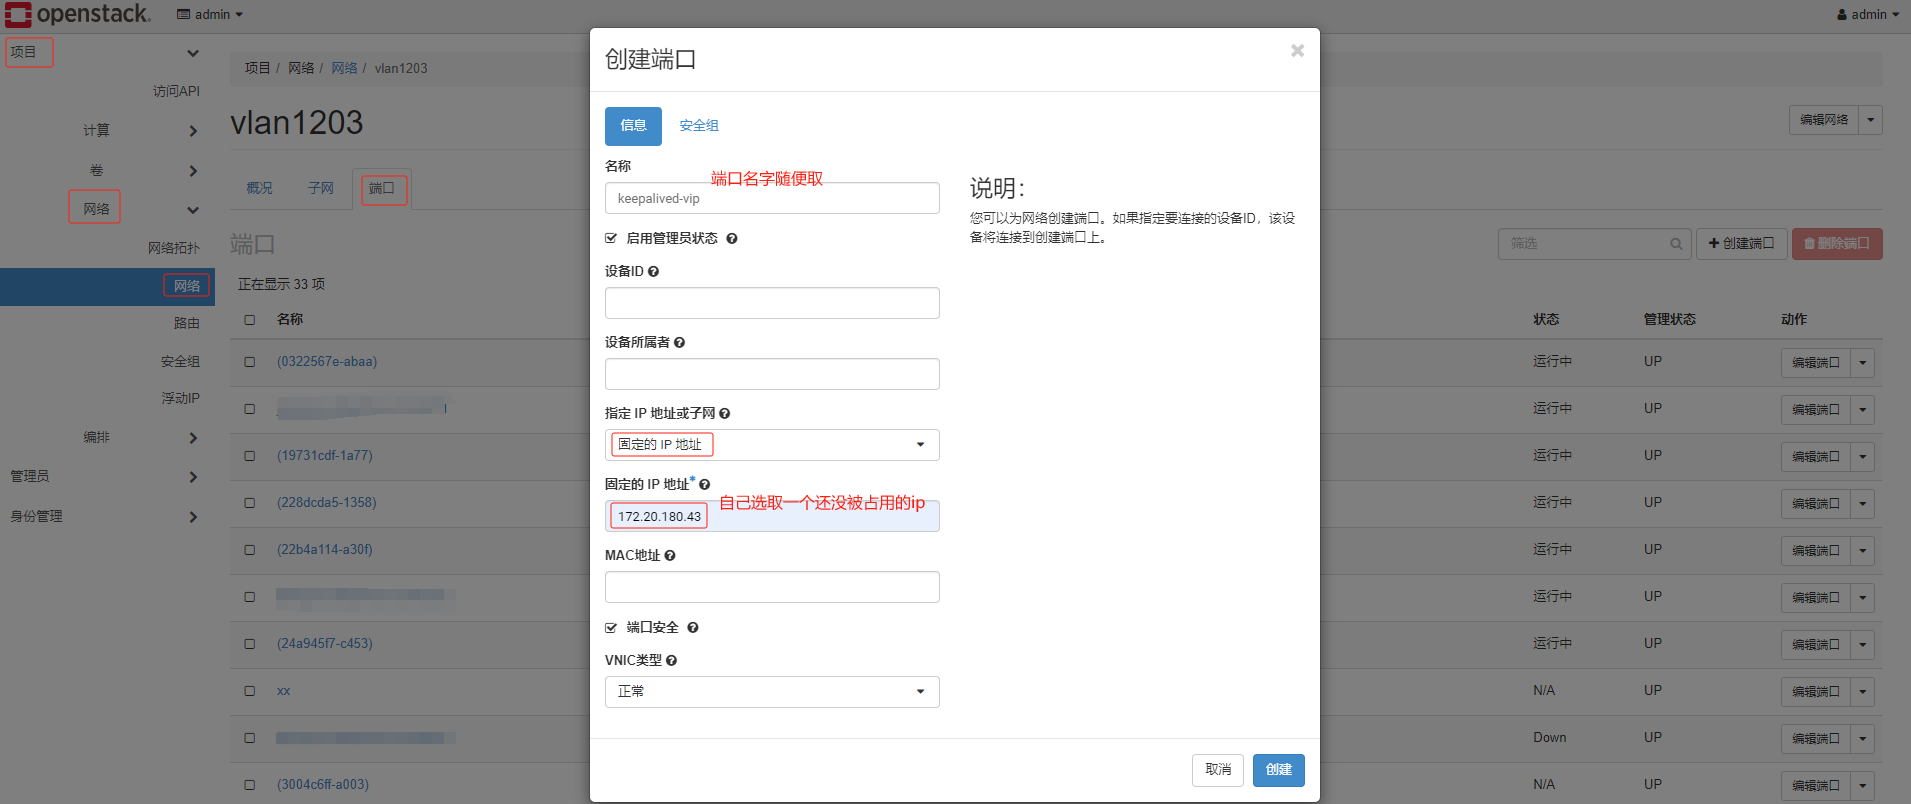
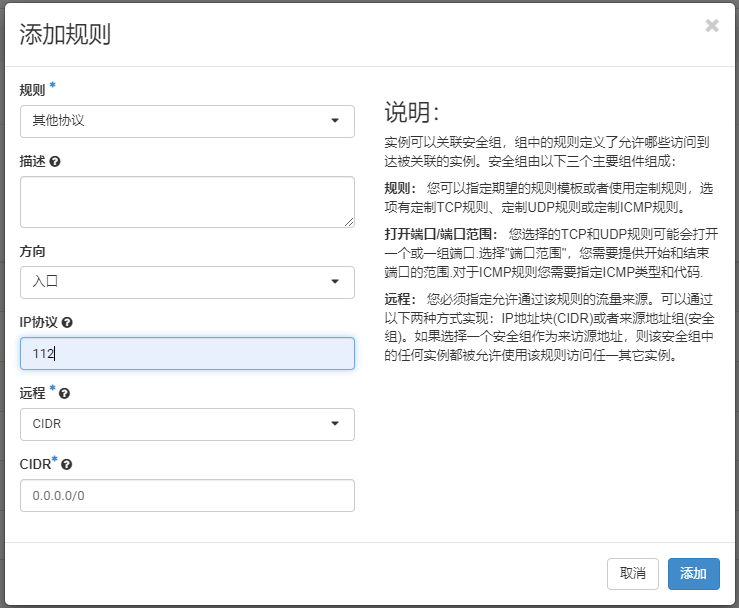
2.3.2.1 创建虚拟IPimage-20240811114458647

2.3.2.2 虚拟机启用VIP

1
2
#在OpenStack中执行
root@control01:~# openstack port list | egrep "172.20.180.44|172.20.180.165"
image-20240811114754762
1
2
root@control01:~# neutron port-update 90b6b1c7-4c4d-42fc-a1f9-3fd814711551 --allowed_address_pairs list=true type=dict ip_address=172.20.180.43
root@control01:~# neutron port-update 926ca68d-ef07-4243-bc02-f2600c3a68ff --allowed_address_pairs list=true type=dict ip_address=172.20.180.43

2.3.2.3 安全组允许VRRP协议

直接在OpenStack的horizon组件的dashborad界面中操作:项目->网络->安全组,确定上述两个节点对应虚拟机所使用的安全组,然后点击后面的”管理规则“按钮进入规则列表;点击”添加规则“按钮,弹出窗口中,在规则的下拉选里选择”其他协议“,然后在 “IP协议” 文本框输入”112“,最后点击添加按钮即可(其余未说明的保持默认设置;VRRP协议的编号是112)

image-20240811115636444

2.3.3 配置keepalived

Keepalived可实现将虚拟IP地址在实体物理机上来回漂移。Keepalived在转换状态时会依照状态来呼叫配置文件中内置的定义。

  • 当进入Master状态时会呼叫notify_master定义的脚本。
  • 当进入Backup状态时会呼叫notify_backup定义的脚本。
  • 当keepalived程序终止时呼叫notify_stop定义的脚本。
  • 当发现异常情况时进入Fault状态呼叫notify_fault定义的脚本。

切换的过程如下:

  1. 在Master主机上keepalived运行时执行mycheck.sh脚本不停的检查mysql的运行状态,当发现mysql停止后将keepalived进程杀掉。
  2. 此时Slave主机上会接管虚拟IP地址,并调用notify_master定义的脚本
  3. 当原Master主机上的mysql和keepalived进程恢复正常后,会调用notify_backup定义的脚本,此时数据库的主端还在Savle主机上。
  4. 回切,关闭Slave端的keepavlied进程,会调用notify_stop脚本,同时Master主机上会调用notify_master定义的脚本。此时数据库的主端在Master主机上
  5. 启动Slave端的keepavlied进程,会调用notify_backup脚本,此时完成数据同步。

如果按照如下服务器顺序启动keepalived服务,则节点1上的数据库实例是MySQL集群中的主库,节点2的则是备库,:

ztmonitor01->ztmonitor02

2.3.3.1 节点1上的keepalived配置

1
2
3
4
5
6
7
8
9
10
11
12
13
14
15
16
17
18
19
20
21
22
23
24
25
26
27
28
29
30
31
32
33
34
35
36
37
38
39
40
41
42
43
44
45
46
47
48
49
50
51
52
53
54
55
56
57
58
59
60
61
62
63
64
65
66
67
68
69
70
71
72
73
74
75
76
77
78
79
80
81
82
83
84
85
86
87
88
89
90
91
[root@ztmonitor01 ~]# vi /etc/keepalived/keepalived.conf
[root@ztmonitor01 ~]# cat /etc/keepalived/keepalived.conf
! Configuration File for keepalived, 172.20.180.44 - keepalived.conf - master default
global_defs {
router_id LVS_DEVEL
vrrp_skip_check_adv_addr
script_user root
enable_script_security
}

vrrp_script check_mysql {
script "/data/server/mysql/mycheck.sh"
interval 10
weight 2
}

vrrp_script chk_state_down {
script "/etc/keepalived/scripts/chk_state_down.sh"
interval 2
weight 3
}

vrrp_instance VI_1 {
state BACKUP #都设置为BACKUP,首先启动的作为Master
nopreempt # 非抢占模式
interface eth0
virtual_router_id 123 #所有节点的此值是一样的,表示是同一keepalived集群
priority 120 #两个服务器的优先级一样高,都是120
advert_int 1

track_interface {
eth0
}

unicast_src_ip 172.20.180.44

unicast_peer{
172.20.180.165
}

authentication {
auth_type PASS
auth_pass 1111
}
track_script {
check_mysql
chk_state_down
}
notify_master /data/server/mysql/mymaster.sh
notify_backup /data/server/mysql/mybackup.sh
notify_stop /data/server/mysql/mystop.sh

virtual_ipaddress {
172.20.180.43/24
}
}

[root@ztmonitor01 ~]# mkdir -p /etc/keepalived/scripts/
[root@ztmonitor01 ~]# cat /etc/keepalived/scripts/chk_state_down.sh
#!/bin/bash
if [ -f /etc/keepalived/down ];then
exit 1
else
exit 0
fi
[root@ztmonitor01 ~]# chmod a+x /etc/keepalived/scripts/chk_state_down.sh

#在如下文件中如下位置添加“--log-file=/tmp/keepalived.log”,设置其日志输出位置
[root@ztmonitor01 ~]# vi /usr/lib/systemd/system/keepalived.service
[Unit]
Description=LVS and VRRP High Availability Monitor
After= network-online.target syslog.target
Wants=network-online.target

[Service]
Type=forking
PIDFile=/var/run/keepalived.pid
KillMode=process
EnvironmentFile=-/etc/sysconfig/keepalived
ExecStart=/usr/sbin/keepalived --log-file=/tmp/keepalived.log $KEEPALIVED_OPTIONS
ExecReload=/bin/kill -HUP $MAINPID

[Install]
WantedBy=multi-user.target


#启动keepalived服务并设置为开机自动启动
[root@ztmonitor01 ~]# systemctl daemon-reload
[root@ztmonitor01 ~]# systemctl start keepalived
[root@ztmonitor01 ~]# systemctl enable keepalived
[root@ztmonitor01 ~]# systemctl status keepalived

2.3.3.2 节点2上的keepalived配置

1
2
3
4
5
6
7
8
9
10
11
12
13
14
15
16
17
18
19
20
21
22
23
24
25
26
27
28
29
30
31
32
33
34
35
36
37
38
39
40
41
42
43
44
45
46
47
48
49
50
51
52
53
54
55
56
57
58
59
60
61
62
63
64
65
66
67
68
69
70
71
72
73
74
75
76
77
78
79
80
81
82
83
84
85
86
87
88
89
90
91
92
[root@ztmonitor02 ~]# vi /etc/keepalived/keepalived.conf
[root@ztmonitor02 ~]# cat /etc/keepalived/keepalived.conf
! Configuration File for keepalived, 172.20.180.165 - keepalived.conf - master default
global_defs {
router_id LVS_DEVEL
vrrp_skip_check_adv_addr
script_user root
enable_script_security
}

vrrp_script check_mysql {
script "/data/server/mysql/mycheck.sh"
interval 10
weight 2
}

vrrp_script chk_state_down {
script "/etc/keepalived/scripts/chk_state_down.sh"
interval 2
weight 3
}

vrrp_instance VI_1 {
state BACKUP #都设置为BACKUP,首先启动的作为Master
nopreempt # 非抢占模式
interface eth0
virtual_router_id 123
priority 120
advert_int 1

track_interface {
eth0
}

unicast_src_ip 172.20.180.165

unicast_peer{
172.20.180.44
}

authentication {
auth_type PASS
auth_pass 1111
}
track_script {
check_mysql
chk_state_down
}
notify_master /data/server/mysql/mymaster.sh
notify_backup /data/server/mysql/mybackup.sh
notify_stop /data/server/mysql/mystop.sh

virtual_ipaddress {
172.20.180.43/24
}
}

[root@ztmonitor02 ~]# mkdir -p /etc/keepalived/scripts/
[root@ztmonitor01 ~]# cat /etc/keepalived/scripts/chk_state_down.sh
#!/bin/bash

if [ -f /etc/keepalived/down ];then
exit 1
else
exit 0
fi
[root@ztmonitor01 ~]# chmod a+x /etc/keepalived/scripts/chk_state_down.sh

#在如下文件中如下位置添加“--log-file=/tmp/keepalived.log”
[root@ztmonitor02 ~]# vi /usr/lib/systemd/system/keepalived.service
[Unit]
Description=LVS and VRRP High Availability Monitor
After= network-online.target syslog.target
Wants=network-online.target

[Service]
Type=forking
PIDFile=/var/run/keepalived.pid
KillMode=process
EnvironmentFile=-/etc/sysconfig/keepalived
ExecStart=/usr/sbin/keepalived --log-file=/tmp/keepalived.log $KEEPALIVED_OPTIONS
ExecReload=/bin/kill -HUP $MAINPID

[Install]
WantedBy=multi-user.target


#启动keepalived服务并设置为开机自动启动
[root@ztmonitor02 ~]# systemctl daemon-reload
[root@ztmonitor02 ~]# systemctl start keepalived
[root@ztmonitor02 ~]# systemctl enable keepalived
[root@ztmonitor02 ~]# systemctl status keepalived

2.3.4 验证keepalived配置是否生效

2.3.4.1 查看keepalived集群的master节点

1
2
3
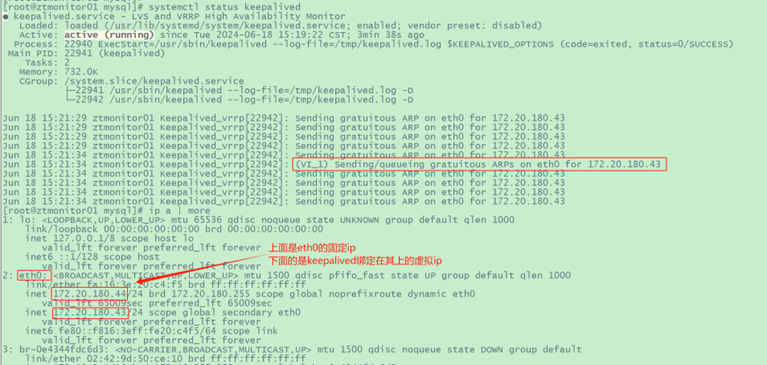
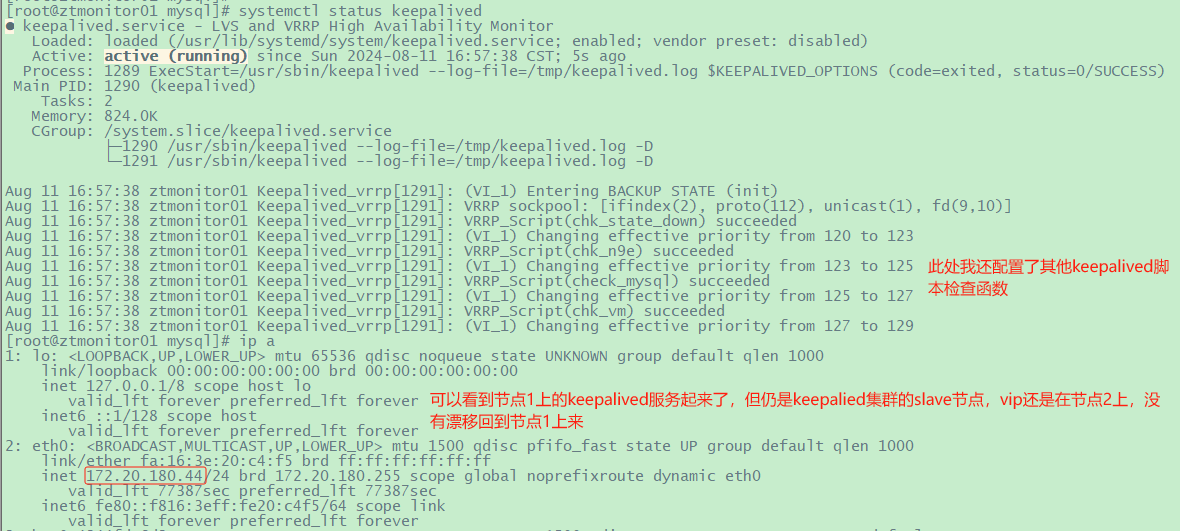
#在节点1上,keepalived服务处于正常运行状态、且eth0网口上除了配置了172.20.180.44外还绑定了keepalived的vip
[root@ztmonitor01 ~]# systemctl status keepalived
[root@ztmonitor01 ~]# ip a | more
image-20240811155008229
1
2
3
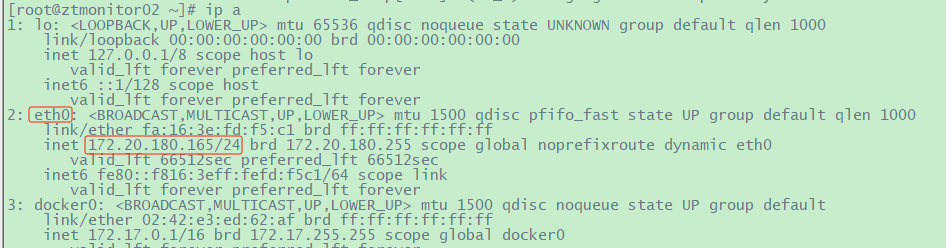
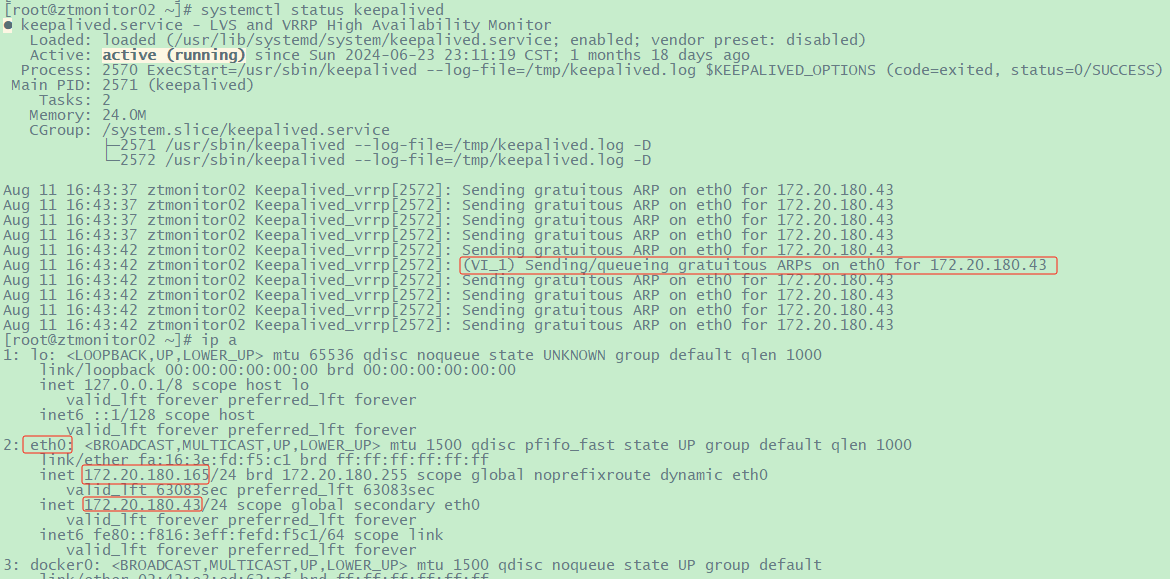
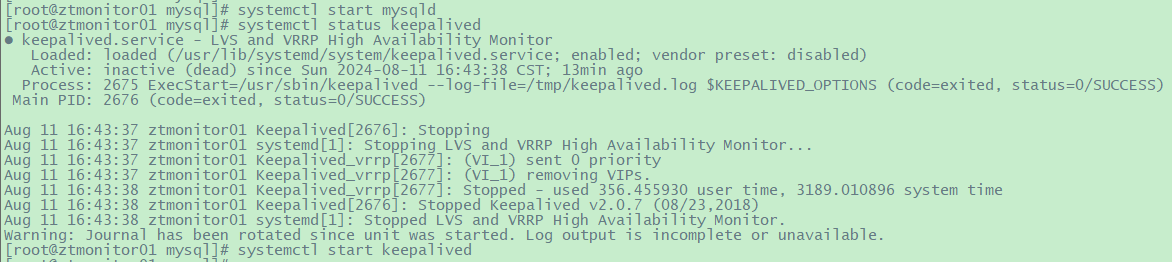
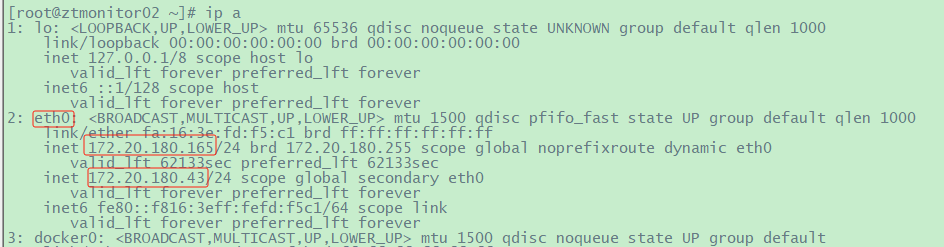
#在节点2上,keepalived服务也处于正常运行状态,但eth0网口上只配置了172.20.180.164这个ip
[root@ztmonitor02 ~]# systemctl status keepalived
[root@ztmonitor02 ~]# ip a | more
image-20240811155432743

2.3.4.2 通过keepalived的vip连接MySQL

1
2
3
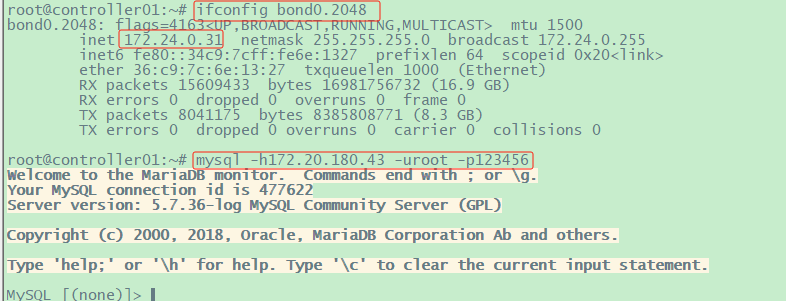
#通过节点1、节点2外的另外一个服务器(操作系统ip:172.24.0.31)经由keepalived的vip连接MySQL集群
root@controller01:~# ifconfig bond0.2048
root@controller01:~# mysql -h172.20.180.43 -uroot -p123456
image-20240811160425430
1
2
3
4
5
6
7
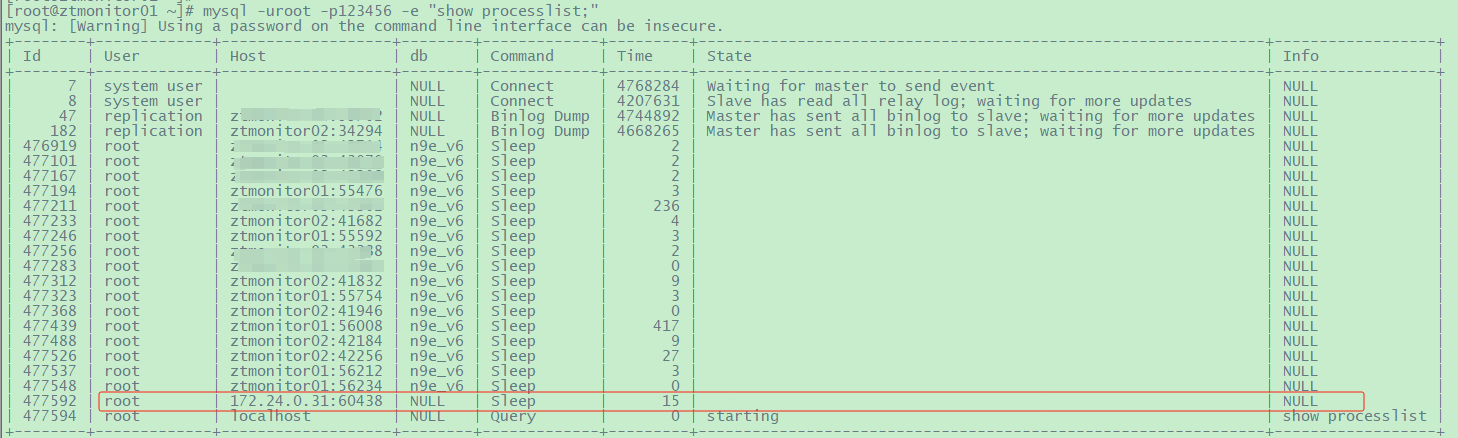
#然后在节点1上的数据库实例中,查看此数据库实例中现有的所有进程(下图将一些其他跟此验证无关的进程马赛克处理了)。其中发现存在一个来自172.24.0.31的连接进程
[root@ztmonitor01 ~]# mysql -uroot -p123456 -e "show processlist;"

#对比下,节点2上的数据库实例,除了系统自己创建的连接或主从复制创建的连接外,没有来自外部的连接
[root@ztmonitor02 ~]# mysql -uroot -p123456 -e "show processlist;"

#由此也可确定,节点1上数据库实例当前是MySQL数据库集群的主库
image-20240811160008455
image-20240811160854661

2.4 最后的验证

按照前面的配置与启动顺序,当前,节点1、节点2分别是keepalived集群的master节点;节点1上的数据库实例才是MySQL集群的真正服役数据库实例。

2.4.1 模拟主备自动切换

因为前面所述的针对keepalived配置的可执行脚本程序,当节点1上的数据库实例down掉即mysql服务停止后,keepalived会自动检测到(通过不断执行/data/server/mysql/mycheck.sh),然后在mycheck.sh中将节点1上的keepalived服务停止,keepalived服务在完全停止前会先执行”notify_stop /data/server/mysql/mystop.sh“中配置的mystop.sh脚本。

1
2
[root@ztmonitor01 mysql]# systemctl stop mysqld
[root@ztmonitor01 mysql]# systemctl status keepalived
image-20240811164432033

节点2在keepalived集群中的角色由slave变成master,vip漂移到节点2上。同时由于”notify_master /data/server/mysql/mymaster.sh“这个配置,keepalived将会触发mymaster.sh的执行,将节点2上的数据库实例状态保存并传输到节点1上的”/data/server/mysql/syncposfile/backup_master.status“。

1
2
[root@ztmonitor02 ~]# systemctl status keepalived
[root@ztmonitor02 ~]# ip a
image-20240811165006678
1
2
3
4
#节点2上的数据库实例状态已经被保存下来传输到节点1上的/data/server/mysql/syncposfile/backup_master.status
[root@ztmonitor01 ~]# cd /data/server/mysql/
[root@ztmonitor01 mysql]# ll syncposfile/
[root@ztmonitor01 mysql]# cat syncposfile/backup_master.status
image-20240811165127852
1
2
3
4
5
6
7
8
9
10
11
12
13
14
15
16
17
18
19
20
21
22
23
#连接到此MySQL集群中,在db01数据库中创建一个张数据表t1
[root@ztmonitor02 ~]# mysql -h172.20.180.43 -uroot -p123456
mysql: [Warning] Using a password on the command line interface can be insecure.
Welcome to the MySQL monitor. Commands end with ; or \g.
Your MySQL connection id is 467246
Server version: 5.7.36-log MySQL Community Server (GPL)

Copyright (c) 2000, 2021, Oracle and/or its affiliates.

Oracle is a registered trademark of Oracle Corporation and/or its
affiliates. Other names may be trademarks of their respective
owners.

Type 'help;' or '\h' for help. Type '\c' to clear the current input statement.

mysql> use db02;
Database changed
mysql> create table t1(
-> id int primary key auto_increment,
-> name varchar(20) not null
-> )charset utf8;
Query OK, 0 rows affected (0.08 sec)
mysql> exit

后面如果节点1上的MySQL数据库实例被正常拉起来了,需要手动将节点1上的keepalived拉起(因为在keepalived集群中,节点1与节点2的priority是一样,所以此时节点2仍然是keepalived集群的master节点,即某个节点的keepalived服务down了才会发生keepalived的master/slave转移),此时节点1上的keepalived将会去执行"notify_backup /data/server/mysql/mybackup.sh"中的mybackup.sh,将节点2上数据库实例在”节点1上数据库实例停止到当前时刻“这段时间内所执行的操作同步到节点1上的数据库实例中。

1
2
3
4
5
6
[root@ztmonitor01 mysql]# systemctl start mysqld
[root@ztmonitor01 mysql]# systemctl status keepalived
[root@ztmonitor01 mysql]# systemctl start keepalived

[root@ztmonitor01 mysql]# systemctl status keepalived
[root@ztmonitor01 mysql]# ip a
image-20240811170138305
image-20240811165823320
1
2
3
4
5
6
7
8
9
10
11
12
13
14
15
16
17
18
19
20
21
22
23
24
25
26
27
#可以看到在节点1上数据库实例down掉期间,在节点2上数据库实例上执行的操作被成功同步到节点1上
[root@ztmonitor01 mysql]# mysql -uroot -p123456
mysql: [Warning] Using a password on the command line interface can be insecure.
Welcome to the MySQL monitor. Commands end with ; or \g.
Your MySQL connection id is 41
Server version: 5.7.36-log MySQL Community Server (GPL)

Copyright (c) 2000, 2021, Oracle and/or its affiliates.

Oracle is a registered trademark of Oracle Corporation and/or its
affiliates. Other names may be trademarks of their respective
owners.

Type 'help;' or '\h' for help. Type '\c' to clear the current input statement.

mysql> use db02;
Reading table information for completion of table and column names
You can turn off this feature to get a quicker startup with -A

Database changed
mysql> show tables;
+----------------+
| Tables_in_db02 |
+----------------+
| t1 |
+----------------+
1 row in set (0.00 sec)
image-20240811170554893

至此,节点1与节点2上的数据库实例中的数据还是同步且相同的。


搭建互为主备MySQL5.7集群并实现自动切换
https://jiangsanyin.github.io/2024/08/10/搭建互为主备MySQL5-7集群并实现自动切换/
作者
sanyinjiang
发布于
2024年8月10日
许可协议