一、安装LLaMAFactory环境
以下是在ubuntu20.04 LTS环境上进行操作。
安装python虚拟环境
1
2
3
4
5
6
7
8
9
10
11
12
13
14
15
16
17
root@ksp-registry:~# wget --user-agent="Mozilla" https://mirrors.tuna.tsinghua.edu.cn/anaconda/archive/Anaconda3-2024.06-1-Linux-x86_64.sh# # 加载~/.bashrc # 查看现有的conda管理的所有虚拟python环境
CUDA安装
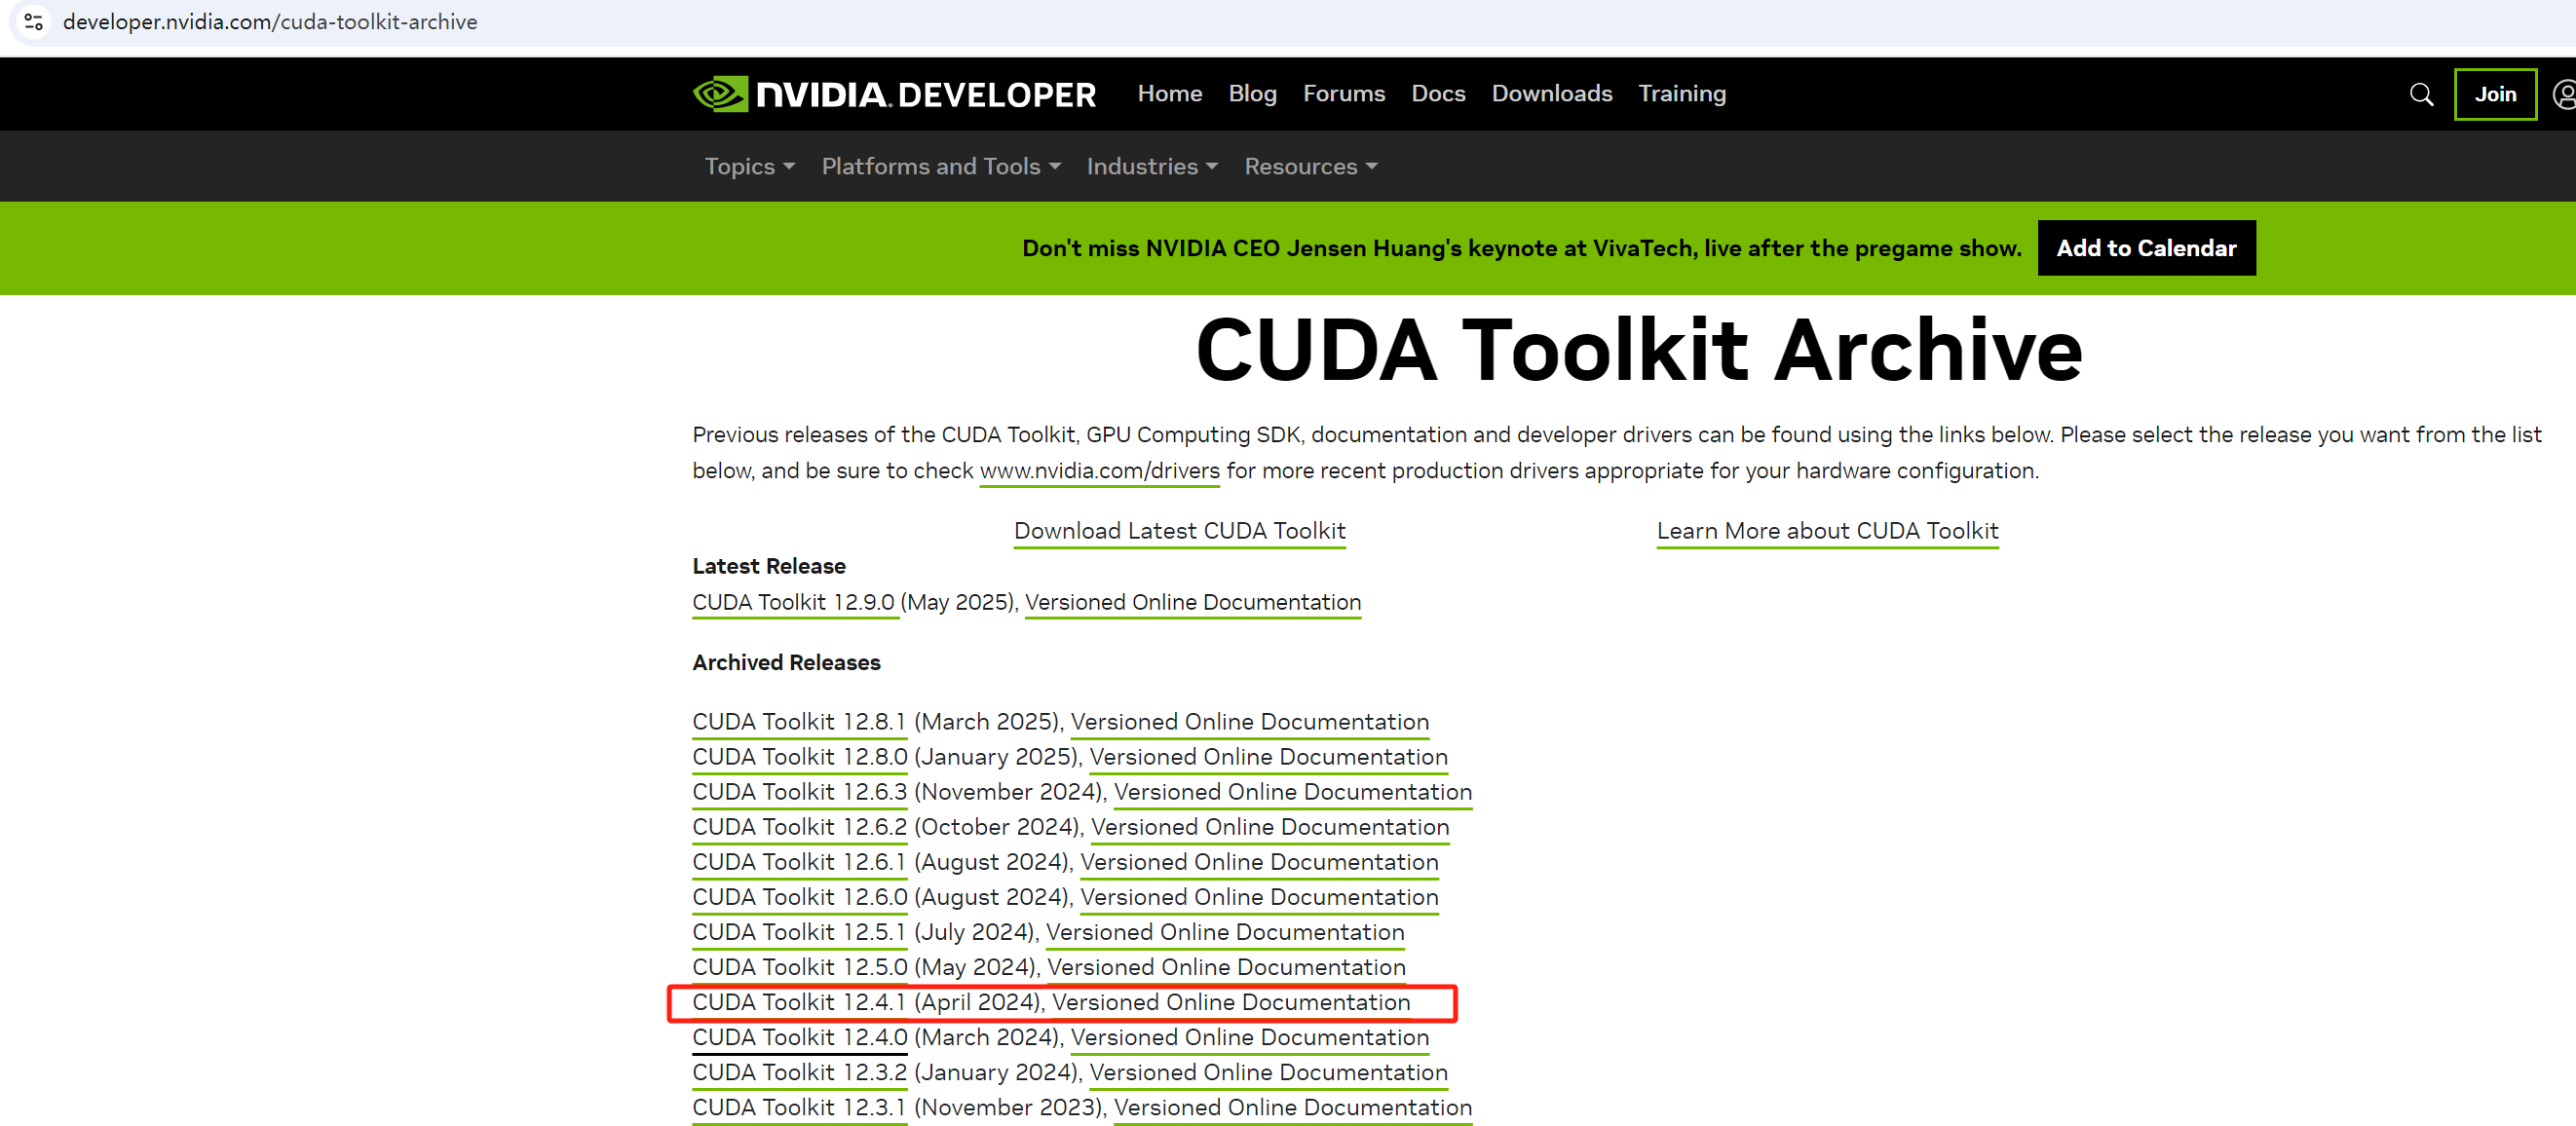
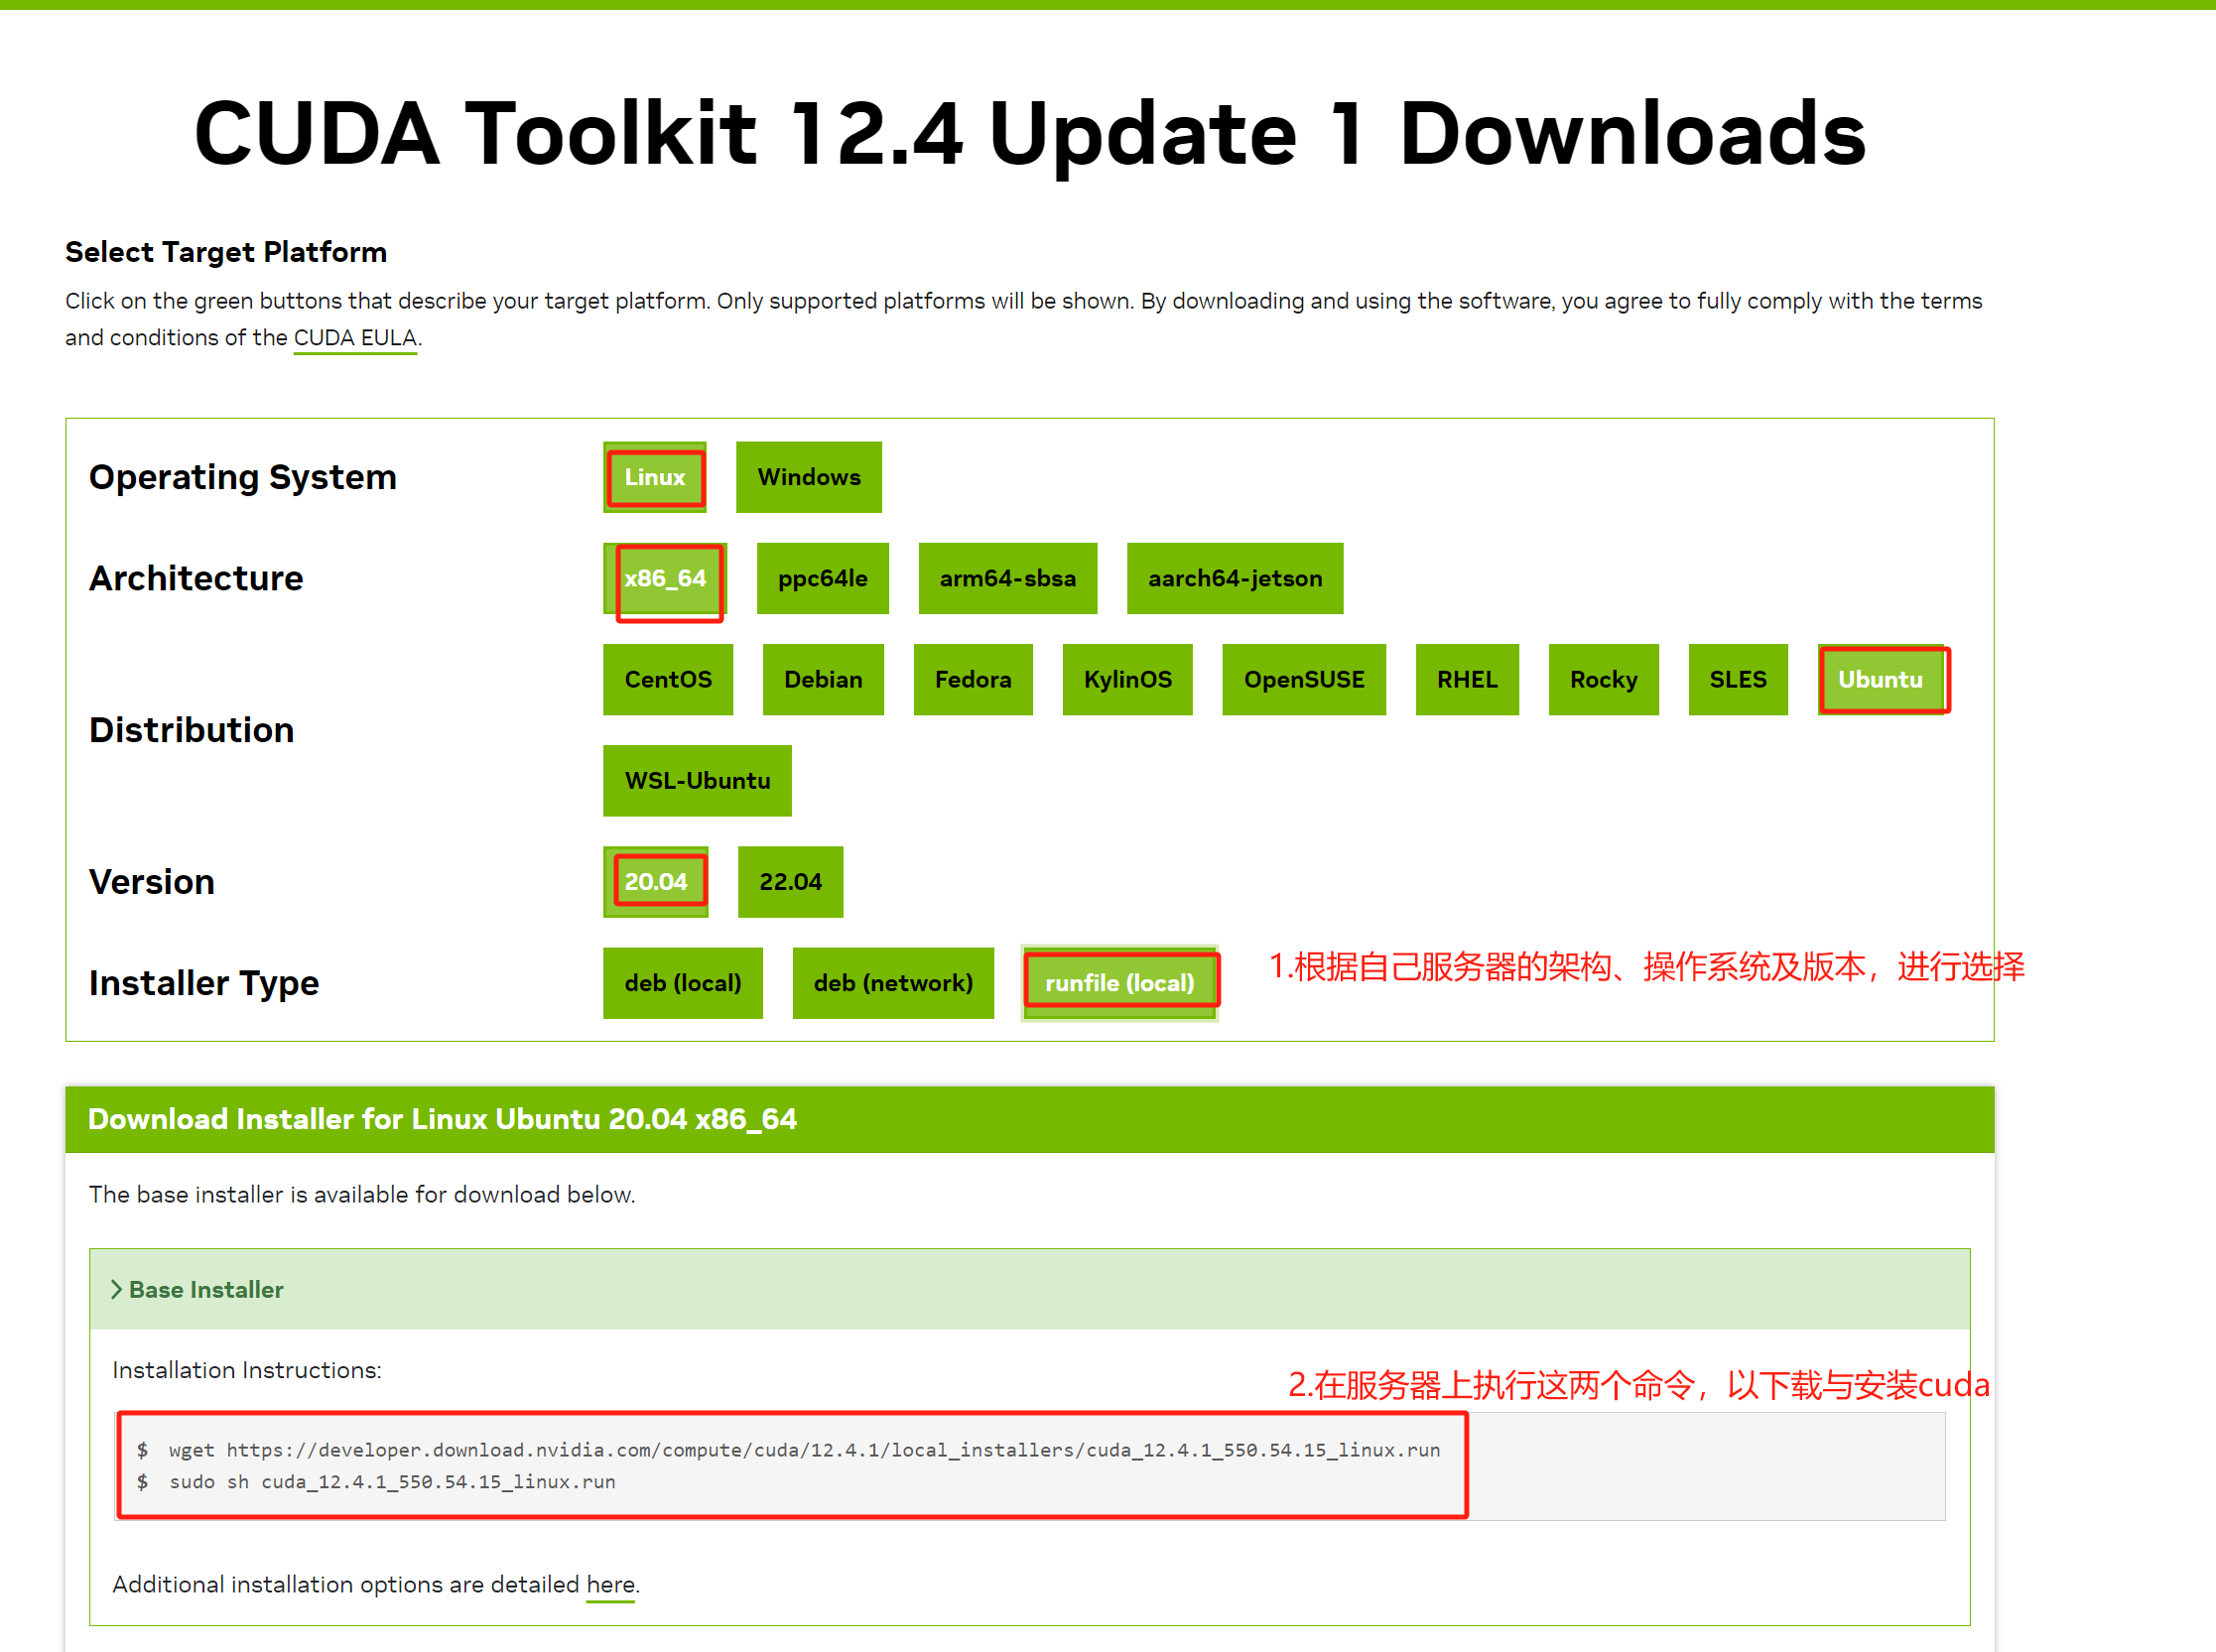
假设NVIDIA驱动已经安装好。接下来下载合适版本的CUDA安装文件:https://developer.nvidia.com/cuda-toolkit-archive
,以下是下载与安装cuda的步骤:
image-20250530094620001
image-20250530094925281
笔者NVIDIA驱动版本是,已经安装CUDA12.4
1
2
3
4
5
6
(llamafactory) root@ksp-registry:/opt/code_repos/LLaMA-Factory# nvcc -V
LLaMAFactory安装
1
2
3
4
5
6
7
8
9
10
11
12
13
14
15
16
17
18
19
20
21
(llamafactory) root@ksp-registry:/opt/code_repos# git clone --depth 1 https://github.com/hiyouga/LLaMA-Factory.git# 如果上述github仓库访问失败,可以使用 https://gitee.com/sy-jiang/LLaMA-Factory.git # 修改pip安装源 # 安装 LLaMA-Factory 及其依赖 # 其中重要的python库版本 # torch==2.6.0 transformers==4.50.0 # 上述命令执行后,并没有成功安装metrics这一python库,执行如下命令再次安装 # metrics==0.0.2
1 2 3 4 5 6 7 8 9 10 import torchprint (torch.__version__) print (torch.cuda.is_available()) print (torch.version.cuda)
LLaMA-Factory校验
1
2
3
4
5
6
7
8
9
10
# 校验安装是否成功 # 查看帮助
二、命令行使用(可选)
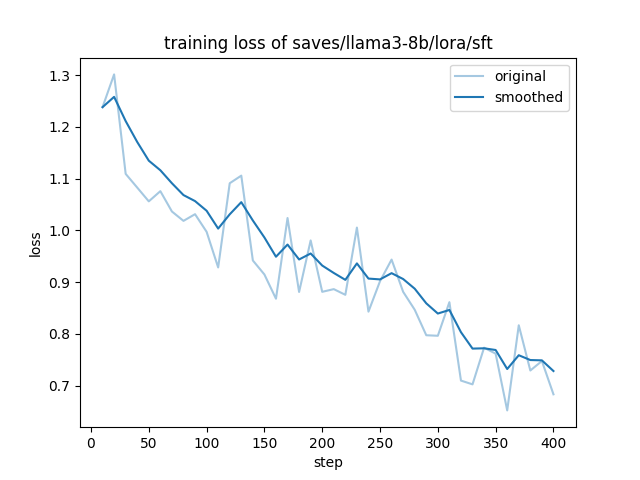
1
2
3
4
5
6
7
8
9
10
11
12
13
14
15
16
17
18
19
20
21
22
23
24
25
26
27
28
29
30
31
32
# 安装modelscope python库 # 使用魔搭社区下载模型文件与数据集(很关键) # 文件备份 # 修改examples/train_lora/llama3_lora_sft.yaml,默认的model名或路径是hf中,在modelscope中不一定存在 # # # 启动微调(以下展示了微调过程中输出内容的最后几行)
如上生成的文件”saves/llama3-8b/lora/sft/training_loss.png“的内容如下:
image-20250331162458504
提示,如下是一个微调DeepSeek-R1-Distill-Qwen-1.5B模型时用到的yaml文件:
1 2 3 4 5 6 7 8 9 10 11 12 13 14 15 16 17 18 19 20 21 22 23 24 25 26 27 28 29 30 31 32 33 34 35 36 37 38 39 40 41 42 43 44 45 46 47 model_name_or_path: deepseek-ai/DeepSeek-R1-Distill-Qwen-1.5B image_max_pixels: 262144 video_max_pixels: 16384 trust_remote_code: true stage: sft do_train: true finetuning_type: lora lora_rank: 8 lora_target: all dataset: alpaca_zh_demo template: deepseekr1 cutoff_len: 2048 max_samples: 100000 overwrite_cache: true preprocessing_num_workers: 16 dataloader_num_workers: 4 output_dir: saves/DeepSeek-R1-1.5B-Distill/lora/sft logging_steps: 5 save_steps: 100 plot_loss: true overwrite_output_dir: true save_only_model: false report_to: none per_device_train_batch_size: 2 gradient_accumulation_steps: 8 learning_rate: 0.00005 num_train_epochs: 3.0 lr_scheduler_type: cosine warmup_ratio: 0 bf16: true ddp_timeout: 180000000 resume_from_checkpoint: null
三、WebUI使用
3.1
启动与使用(微调Llama-3-8B-Instruct)
参考:https://llamafactory.readthedocs.io/zh-cn/latest/getting_started/webui.html、https://github.com/hiyouga/LLaMA-Factory/blob/main/examples/README_zh.md
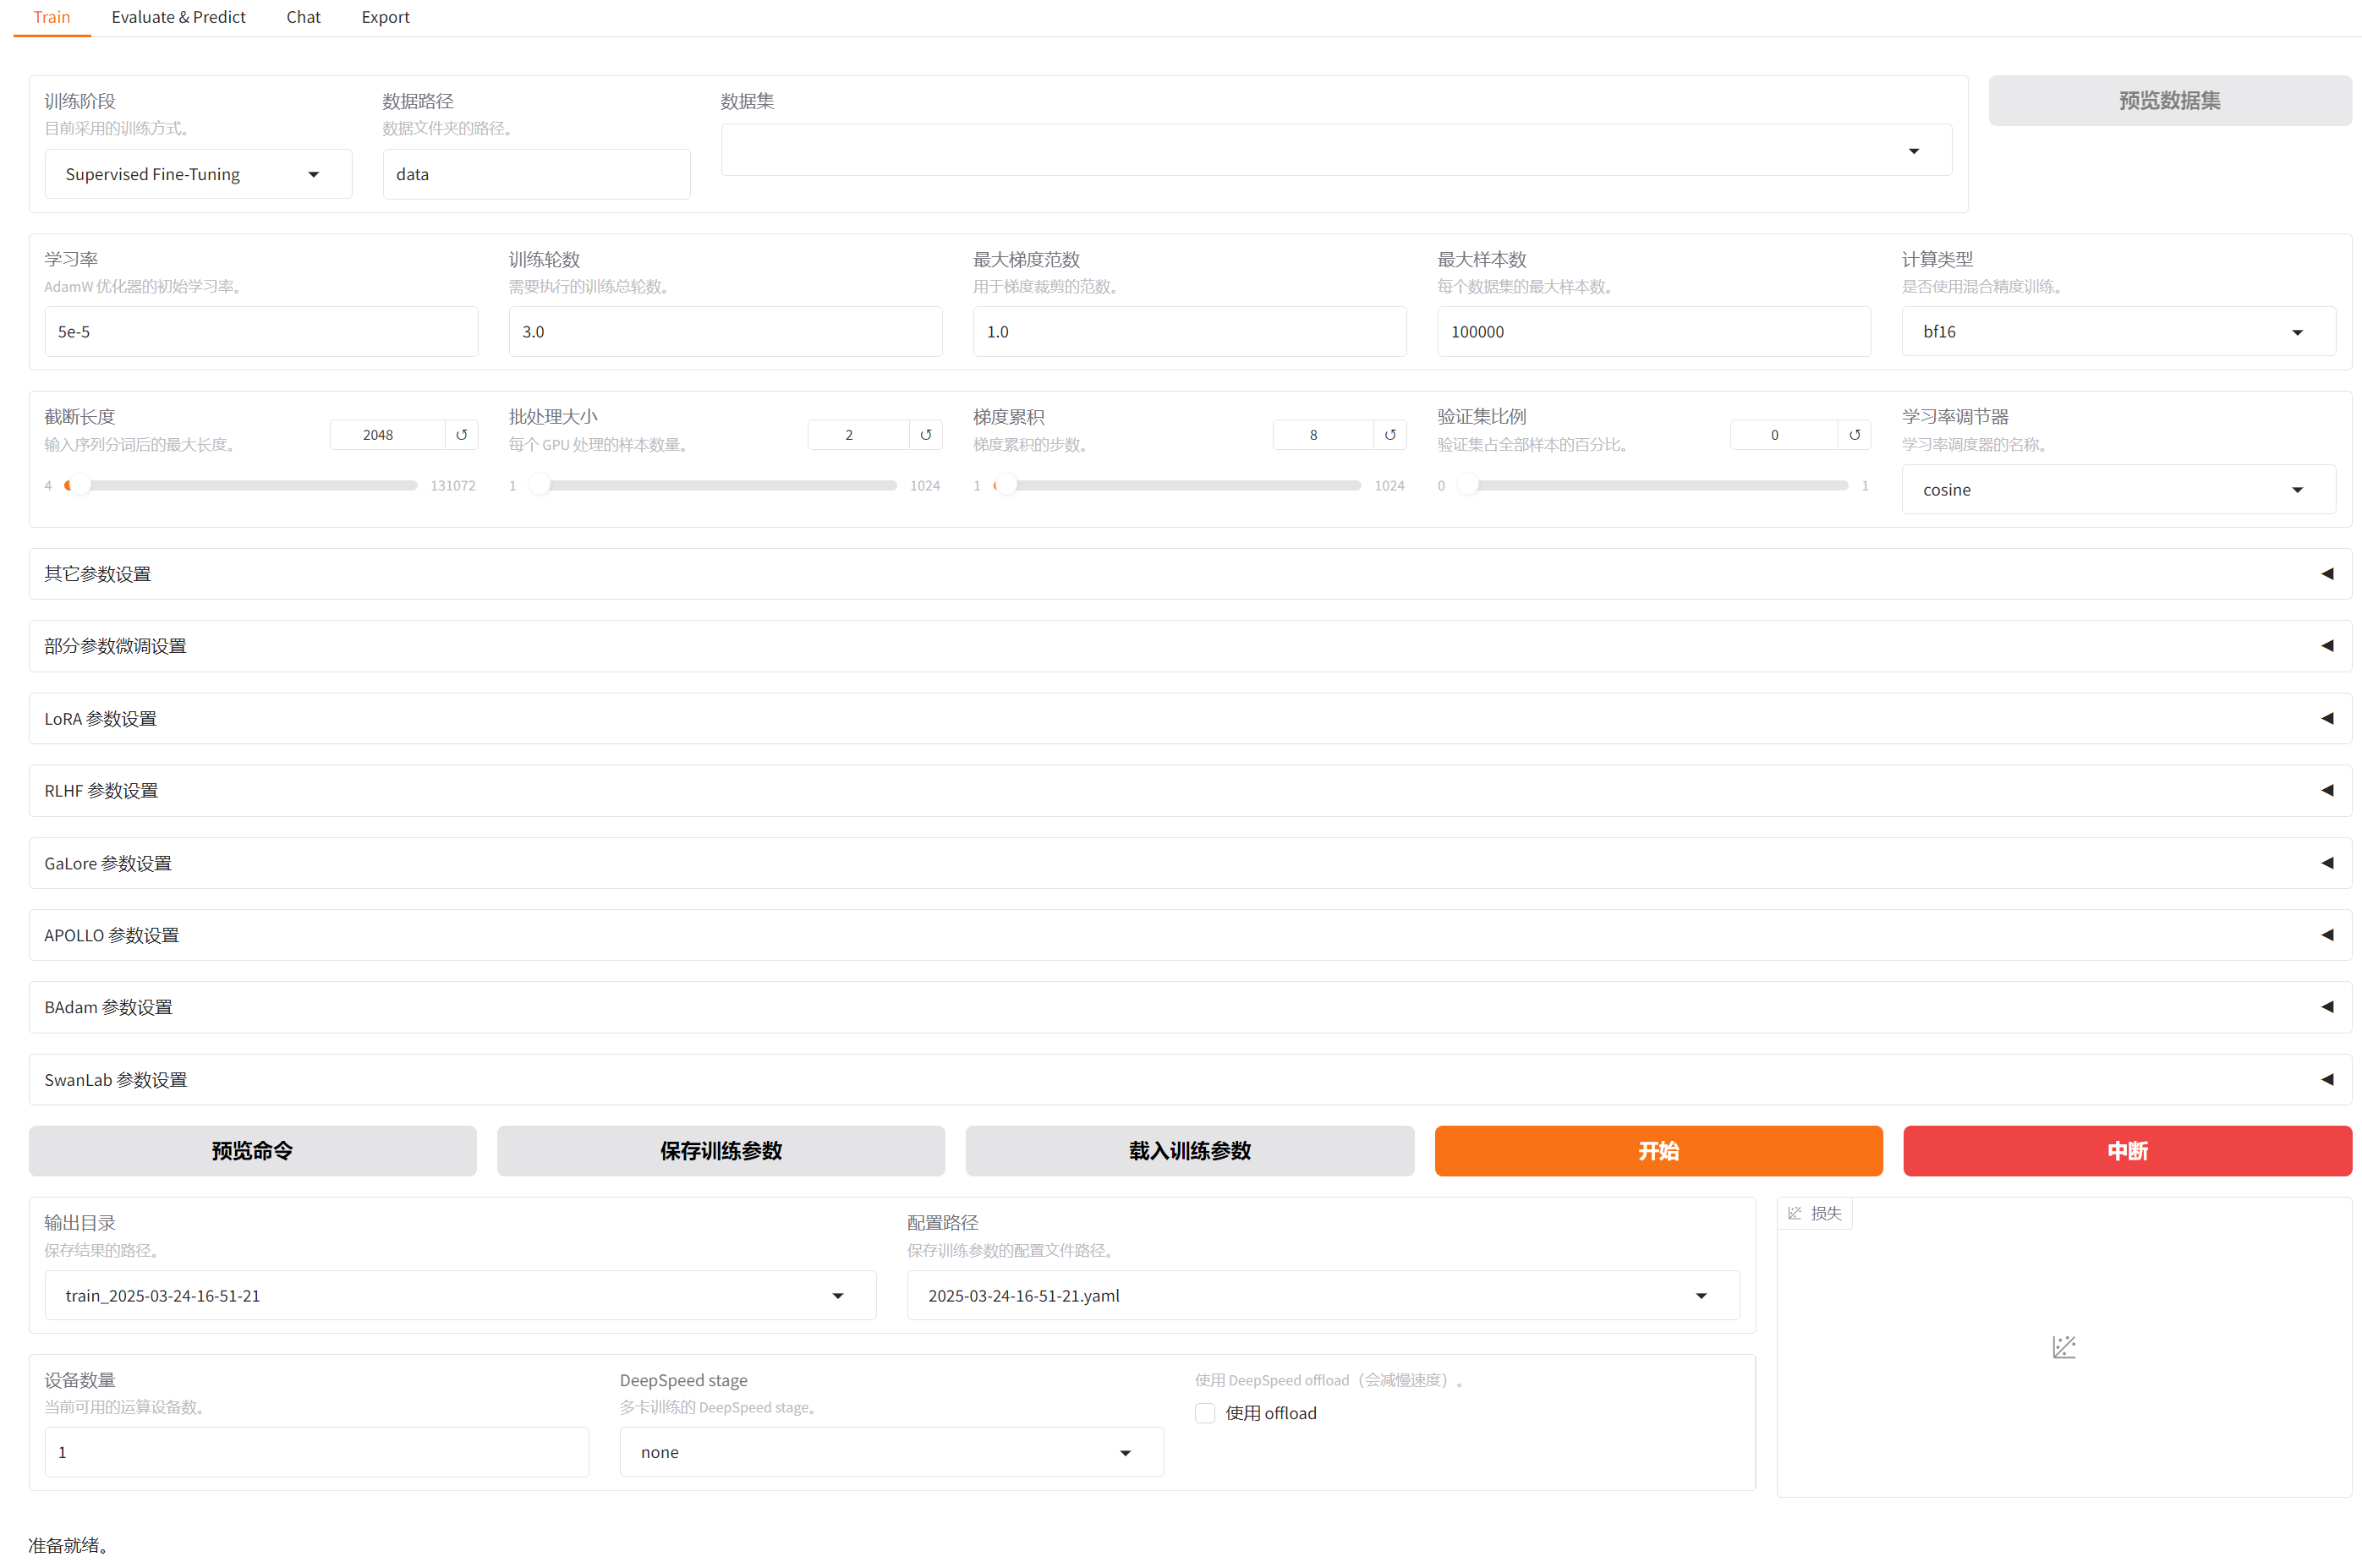
1
2
3
4
5
6
# 使用以下命令启动webui # 可以在“llamafactory-cli webui”命令前添加一些变量比如CUDA_VISIBLE_DEVICES=0,1,2。此时在web界面设备数量就是3,当然如果不指定此变量,默认也是全部可用加速卡设备的数量3 # (llamafactory) root@ksp-registry:~# CUDA_VISIBLE_DEVICES=0,1,2 llamafactory-cli webuillamafactory-cli webui # 假如启动此进程的服务器IP是:172.20.0.22,此时在笔记本电脑浏览器地址栏中输入“http://172.20.0.22:7860/” 将看到如下界面与内容
image-20250324165207061
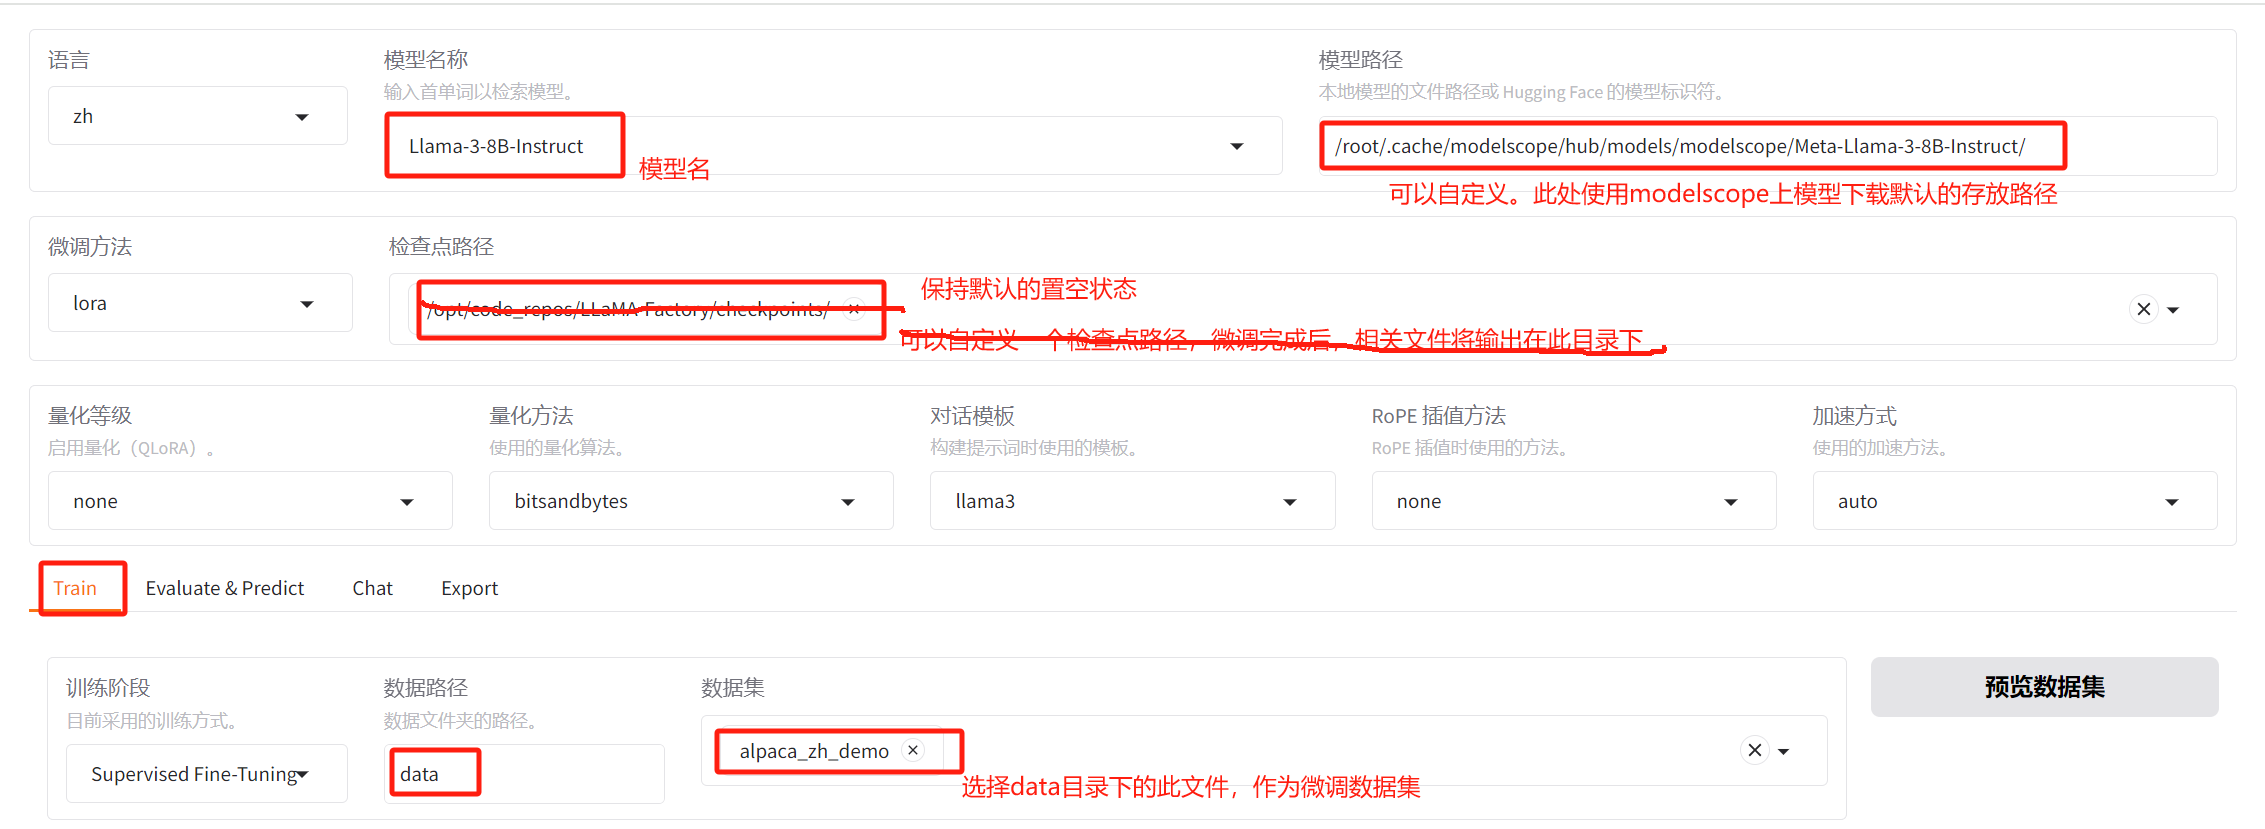
进行微调配置(下图中“检查点路径”无须配置任何值,未注明或显式修改配置项,保持默认即可):
image-20250331165053689
image-20250331163655420
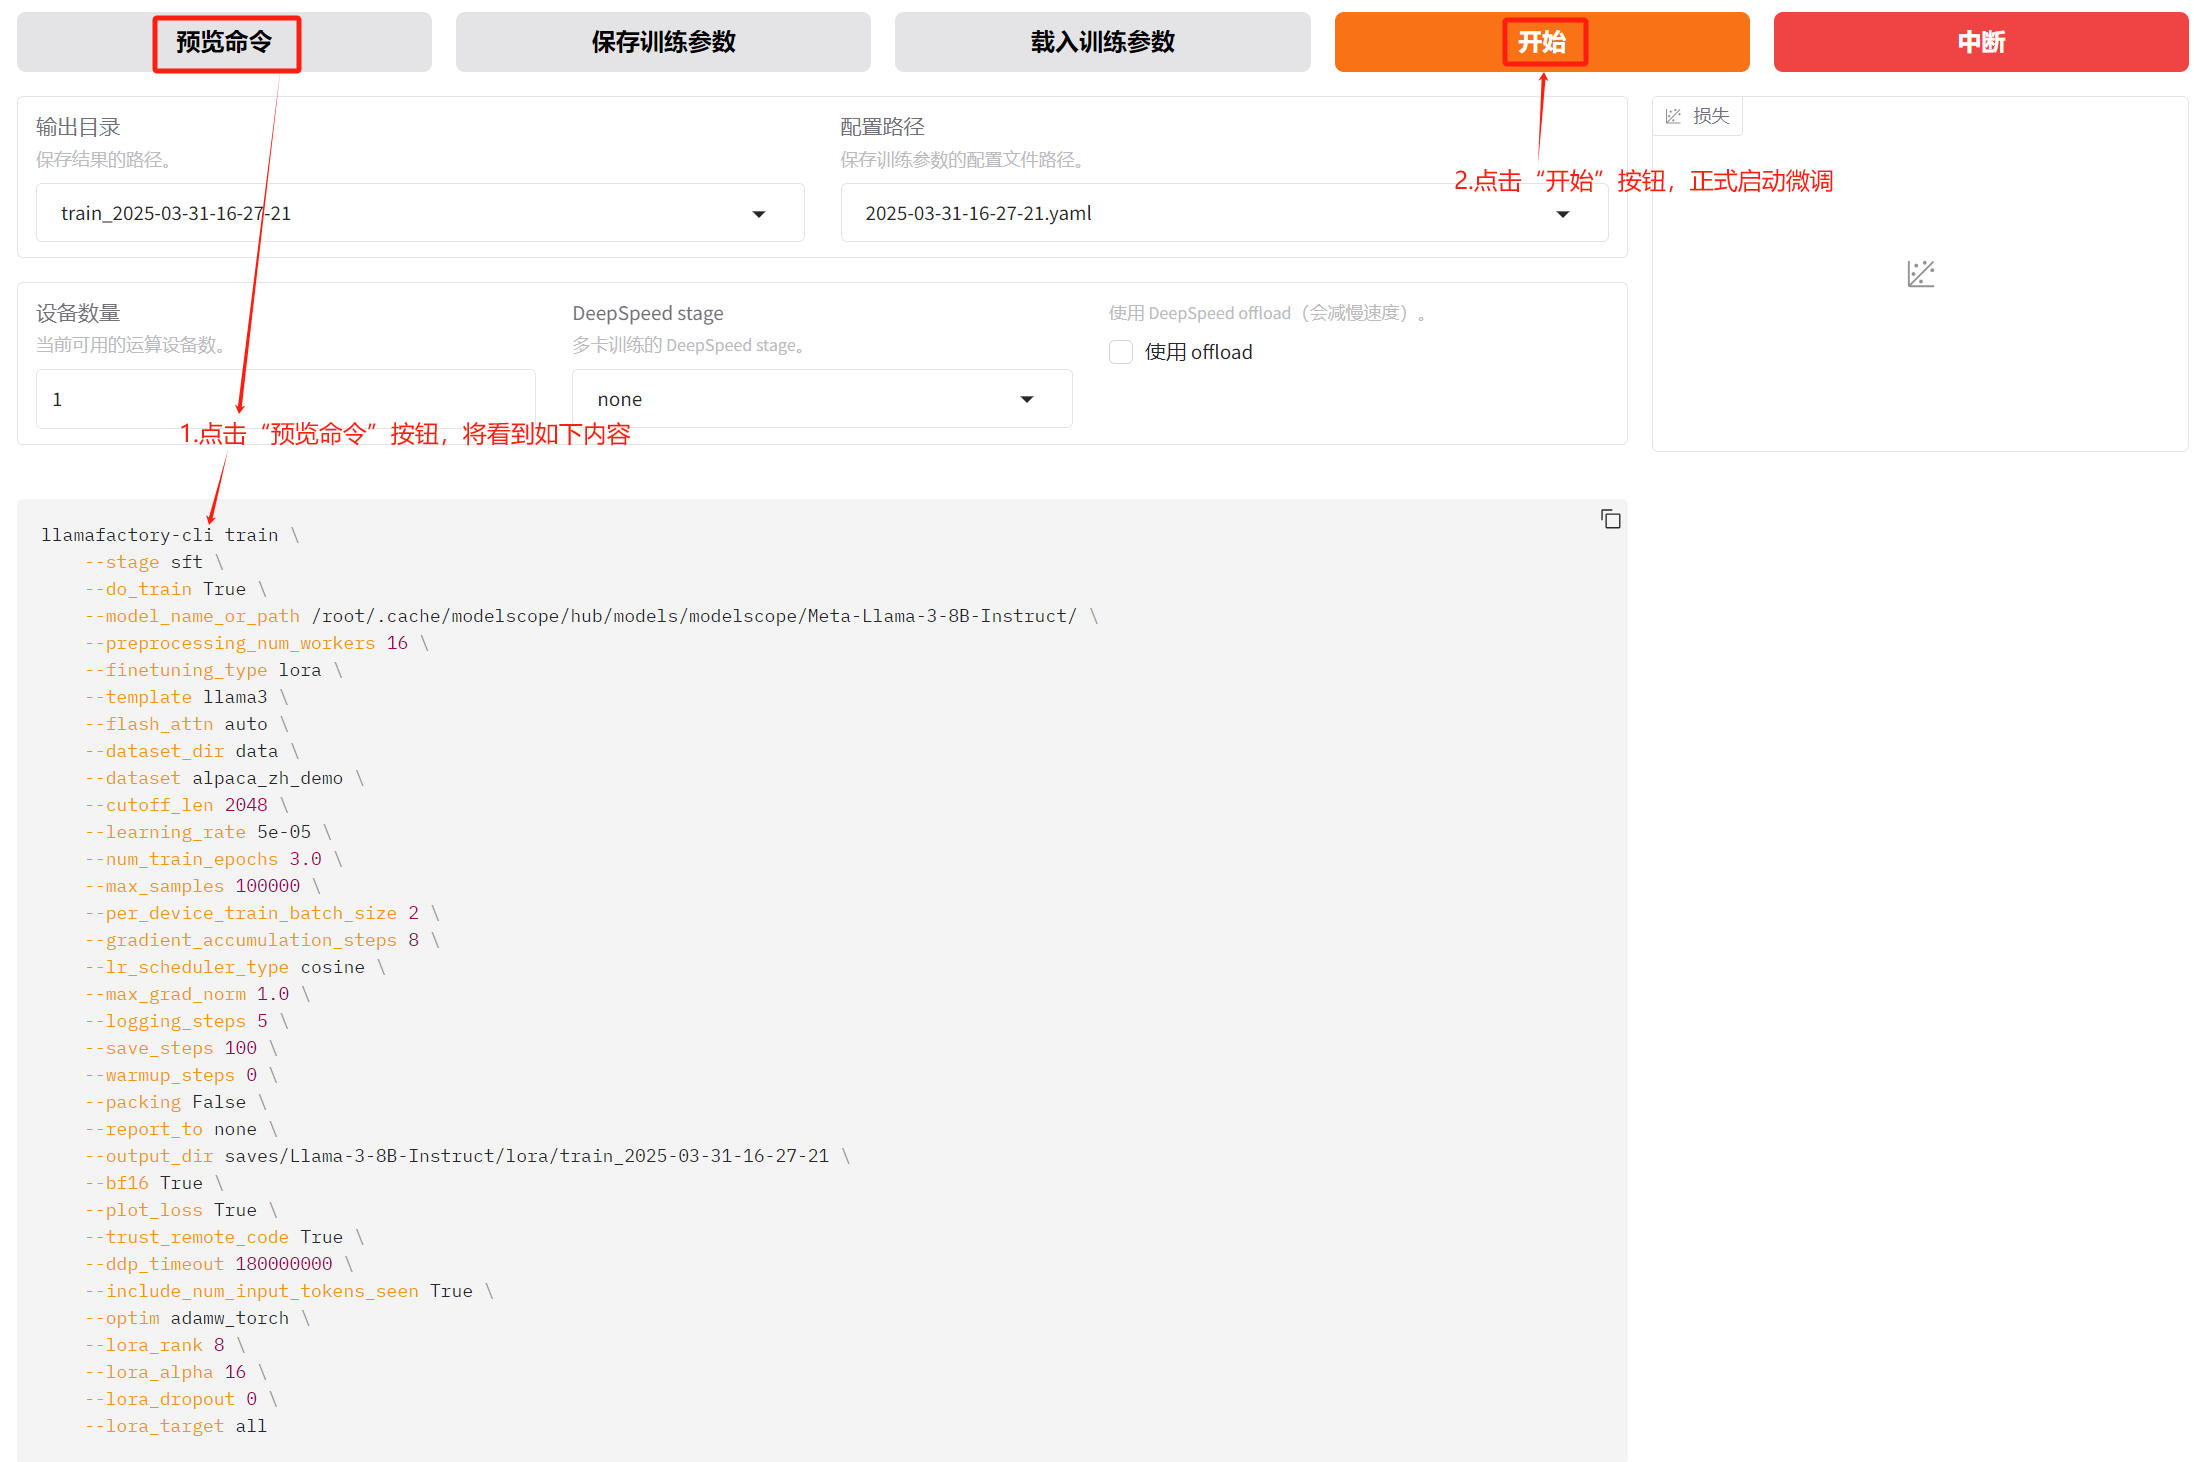
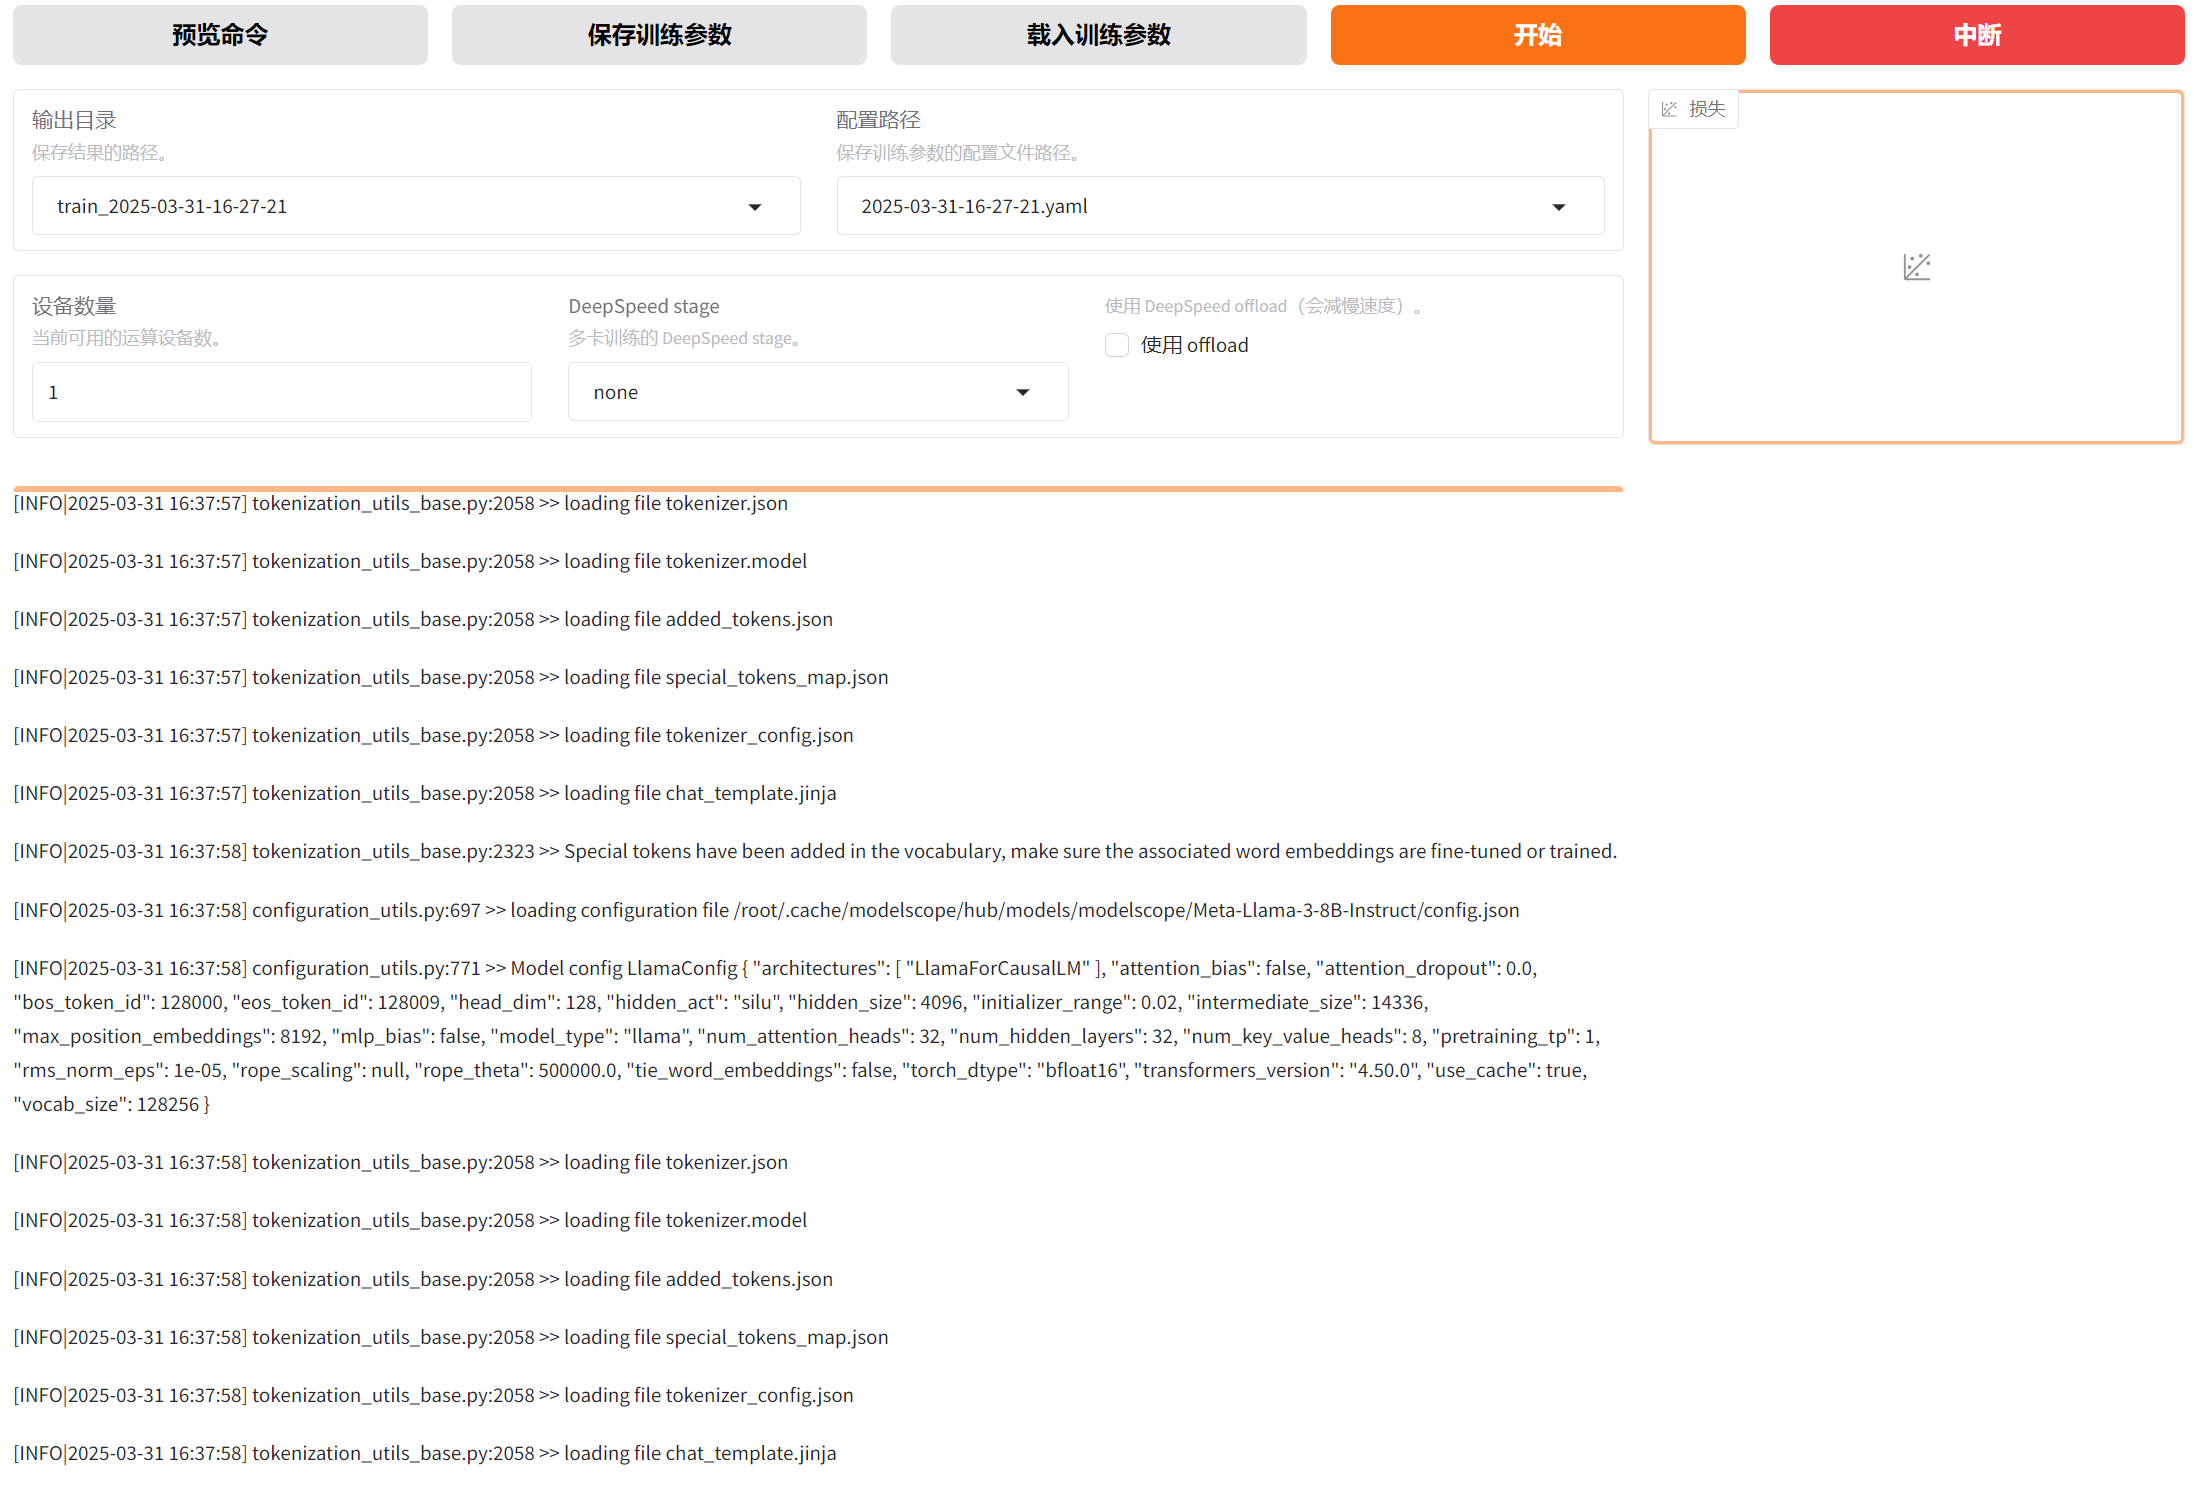
正式开始执行微调后,在当前页面的最底部,将看到日志不断滚动输出,如下:
image-20250331163915582
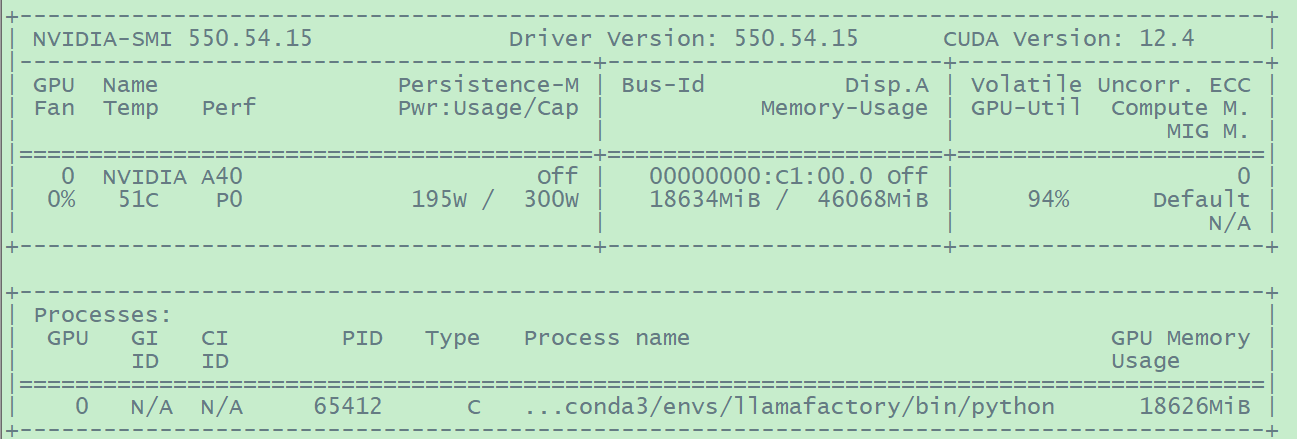
微调过程中默认能使用所有能用的GPU卡(参考https://github.com/hiyouga/LLaMA-Factory/blob/main/examples/README_zh.md),如下可以看到微调过程上,笔者的服务器上仅有一个GPU被使用中。
image-20250331172933559
在当前目录的“./saves/Llama-3-8B-Instruct/lora/train_2025-03-31-16-27-21”子目录中可以看到相关输出配置信息与微调日志信息。
3.2
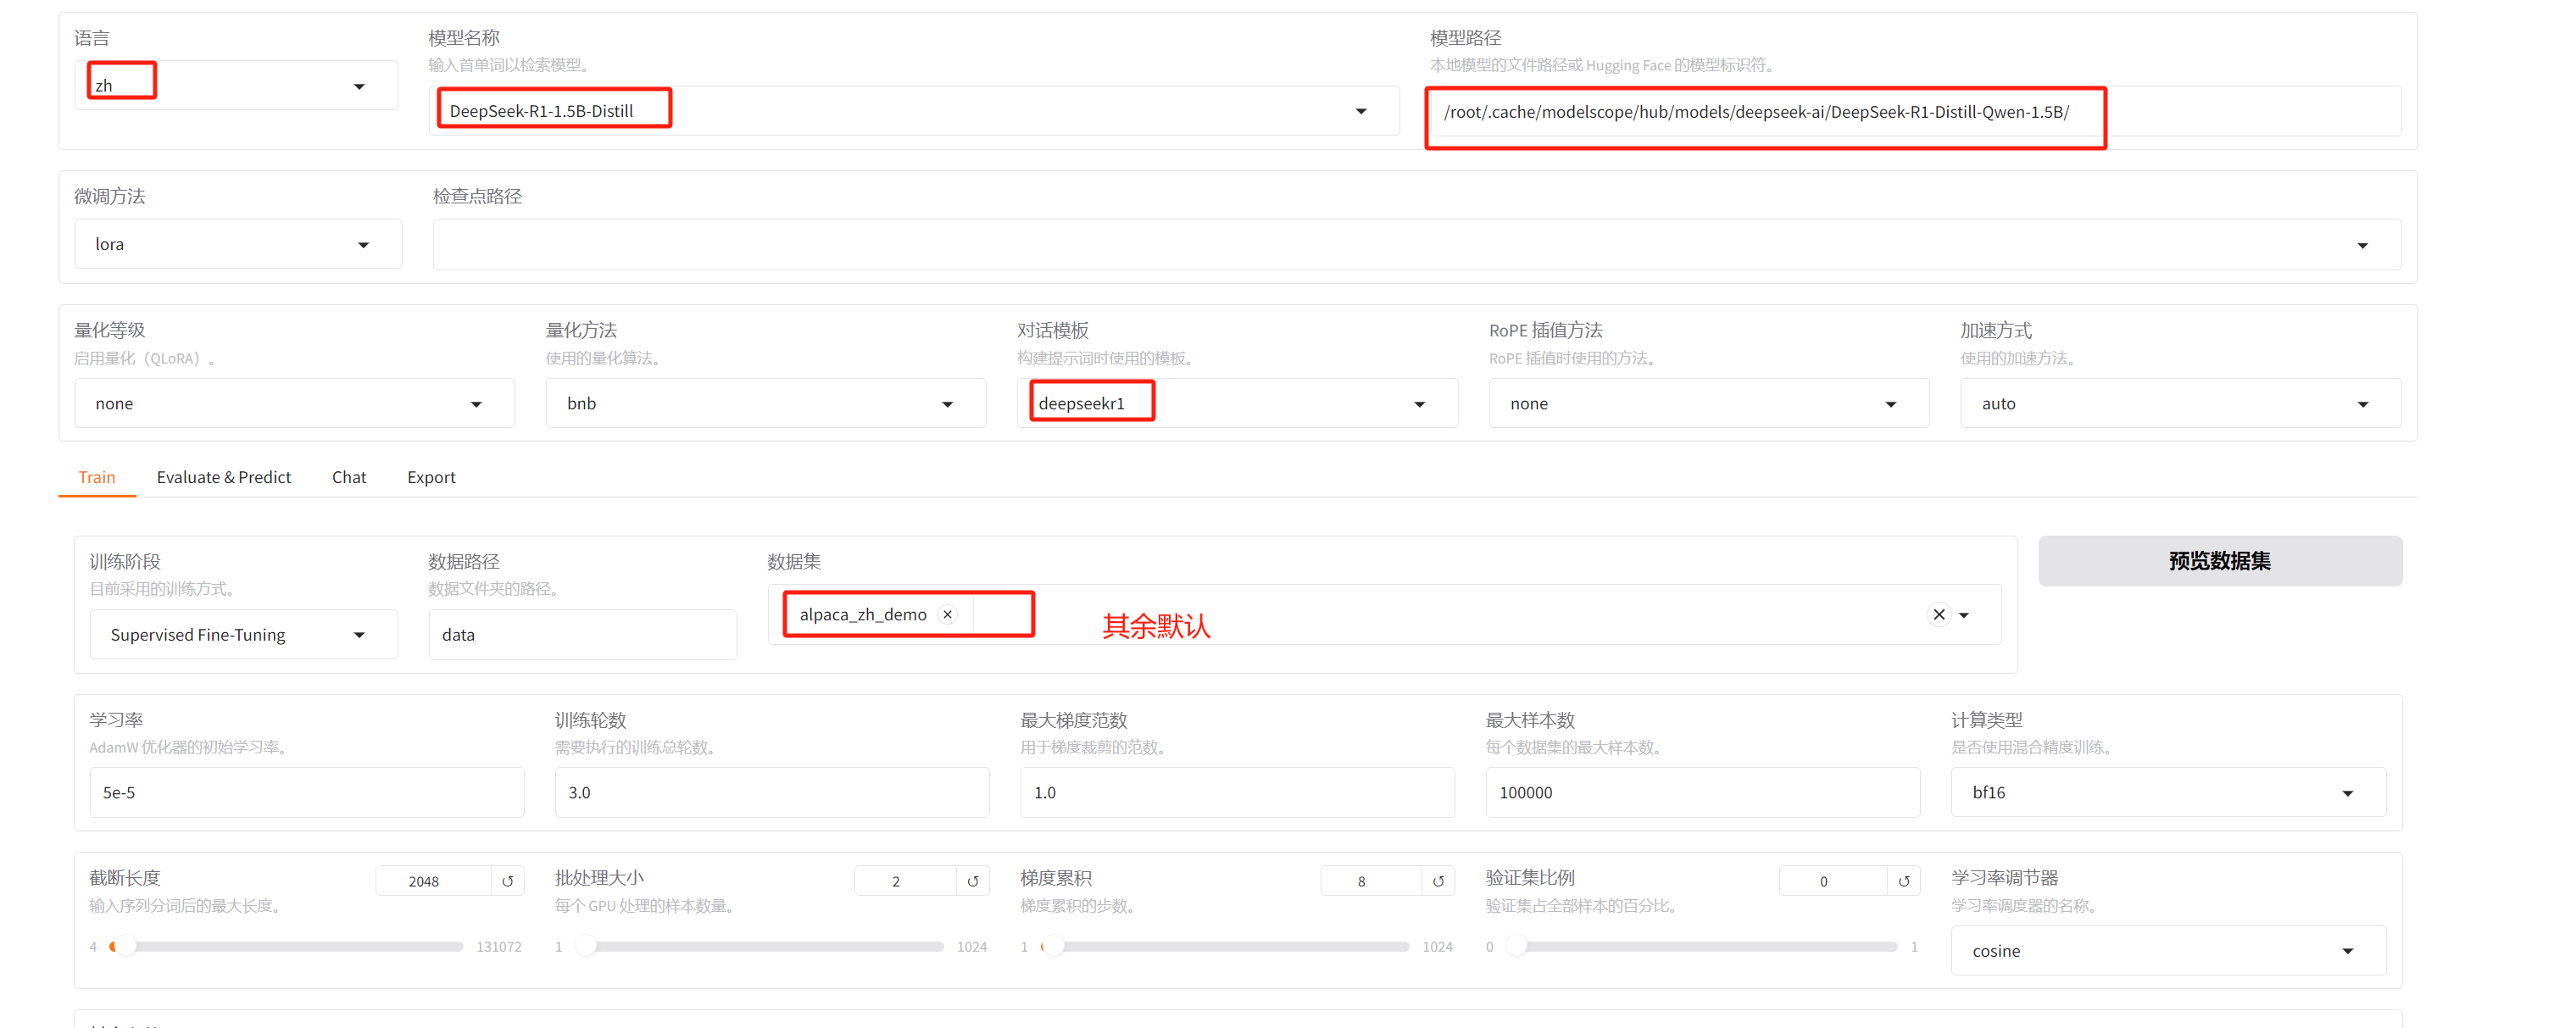
微调DeepSeek-R1-Distill-Qwen-1.5B
image-20250530112133627
image-20250530112210193
image-20250530112606079
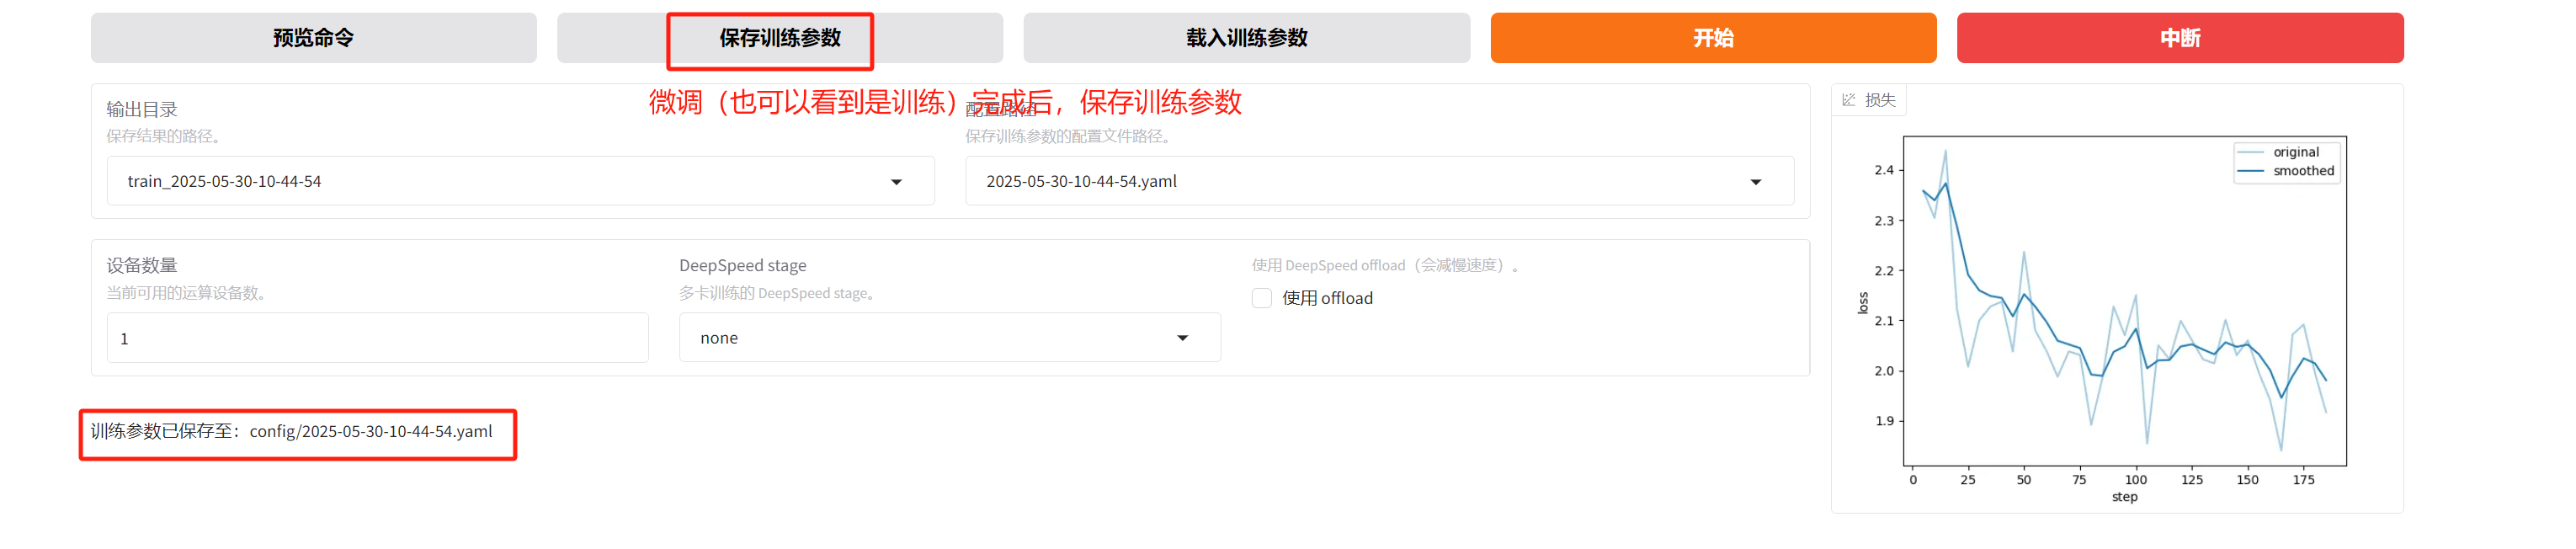
训练参数保存在如下目录下:
image-20250530112657883
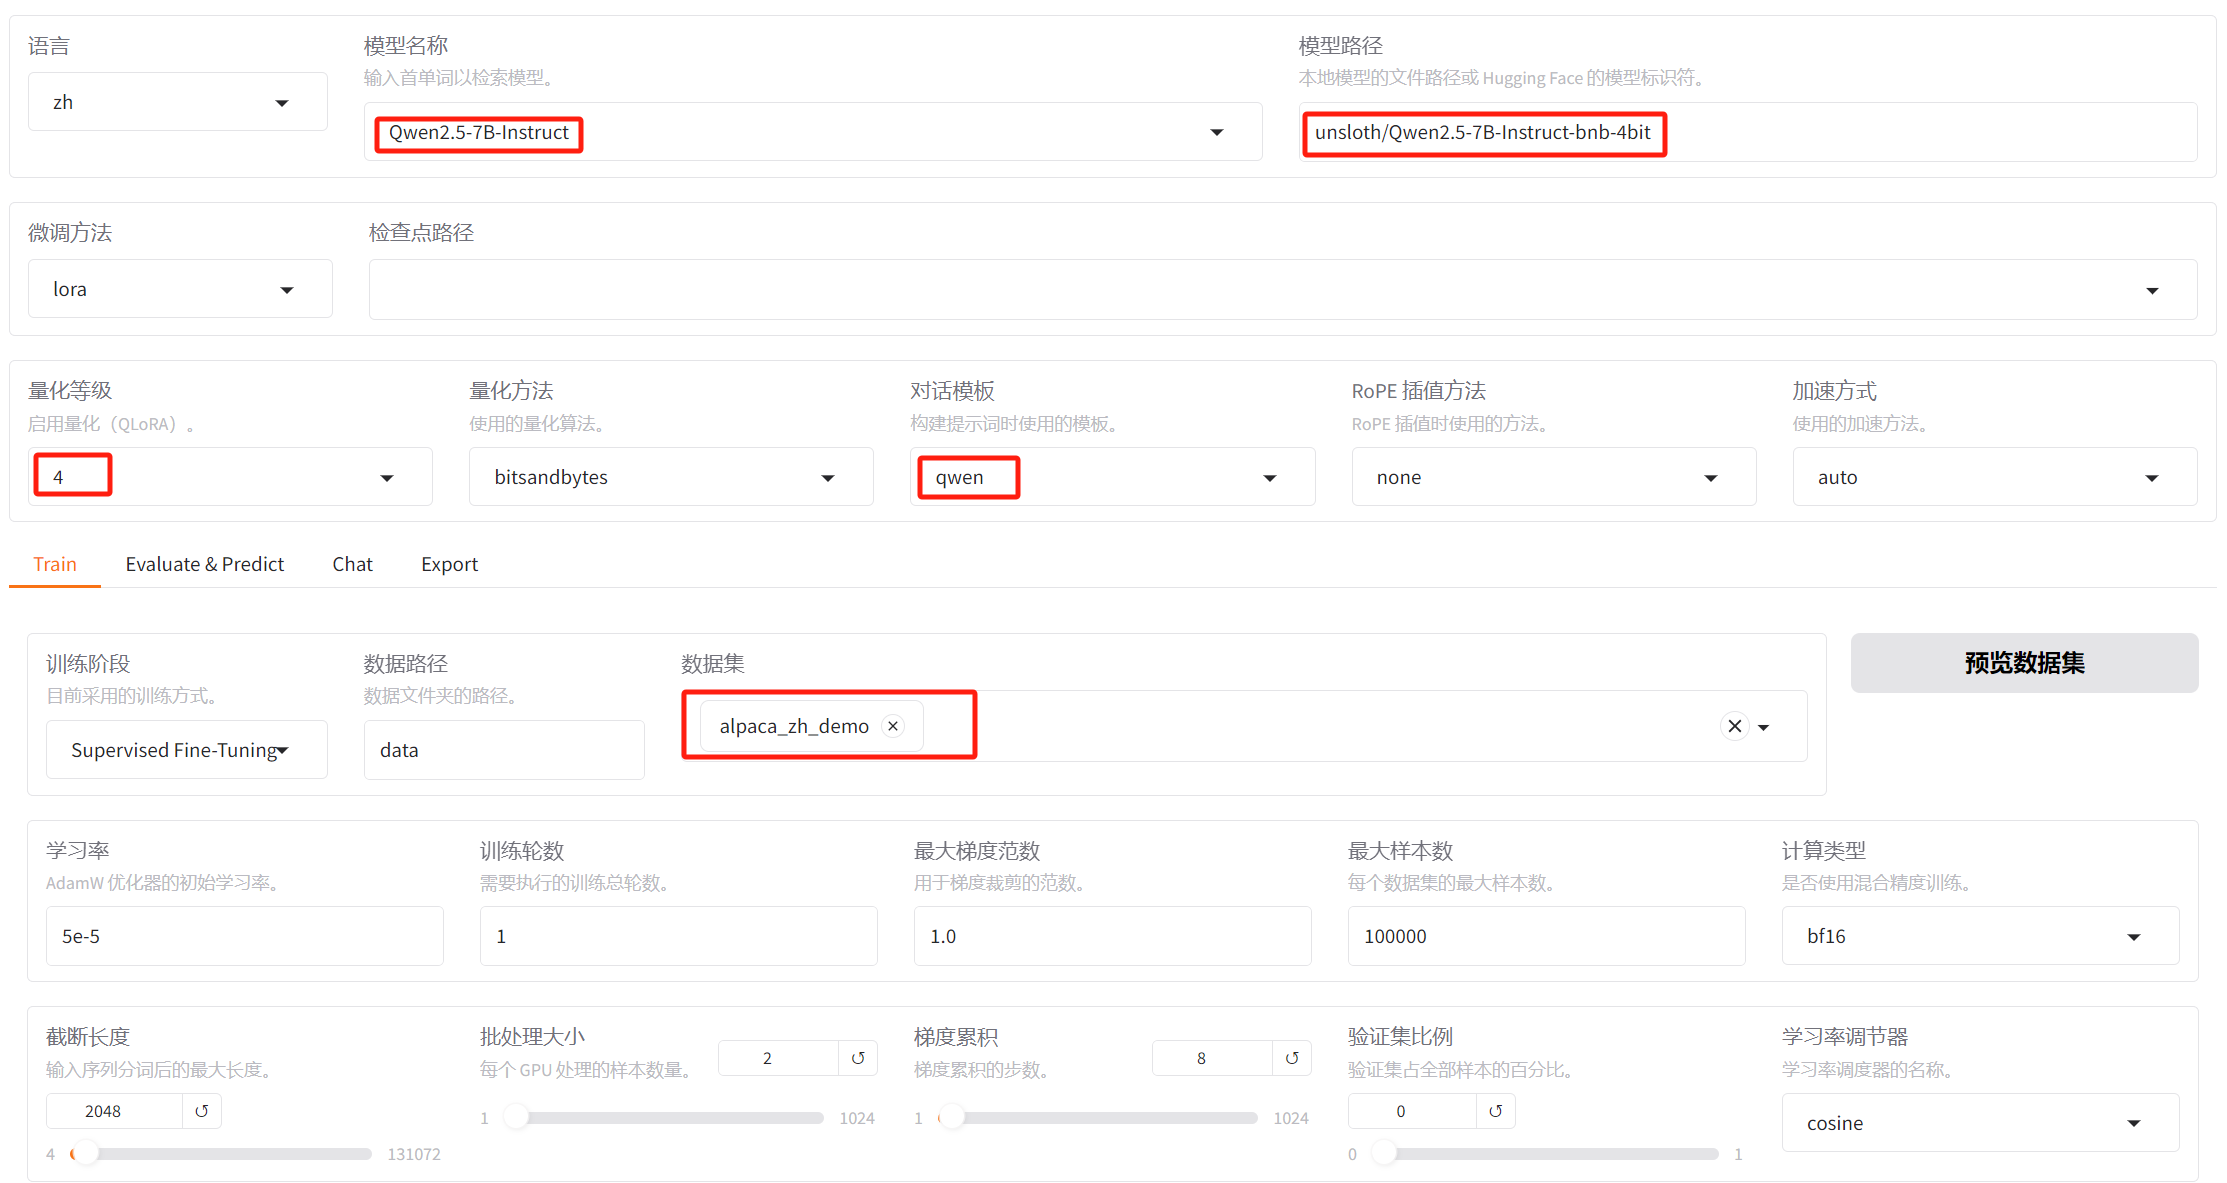
3.3 报错处理
image-20250401105307875
image-20250401105126808
1
2
3
pip install bitsandbytes bitsandbytes-cuda117==0.26.0.post2# 下面这行命令,笔者未执行成功(暂时忽略,不执行也可) # pip install transformers[audio,deepspeed,ftfy,onnx,sentencepiece,timm,tokenizers,video,vision]==4.50.0
四、使用微调后的模型对话
为了对比微调前后的效果,此处对比它们的对话结果。
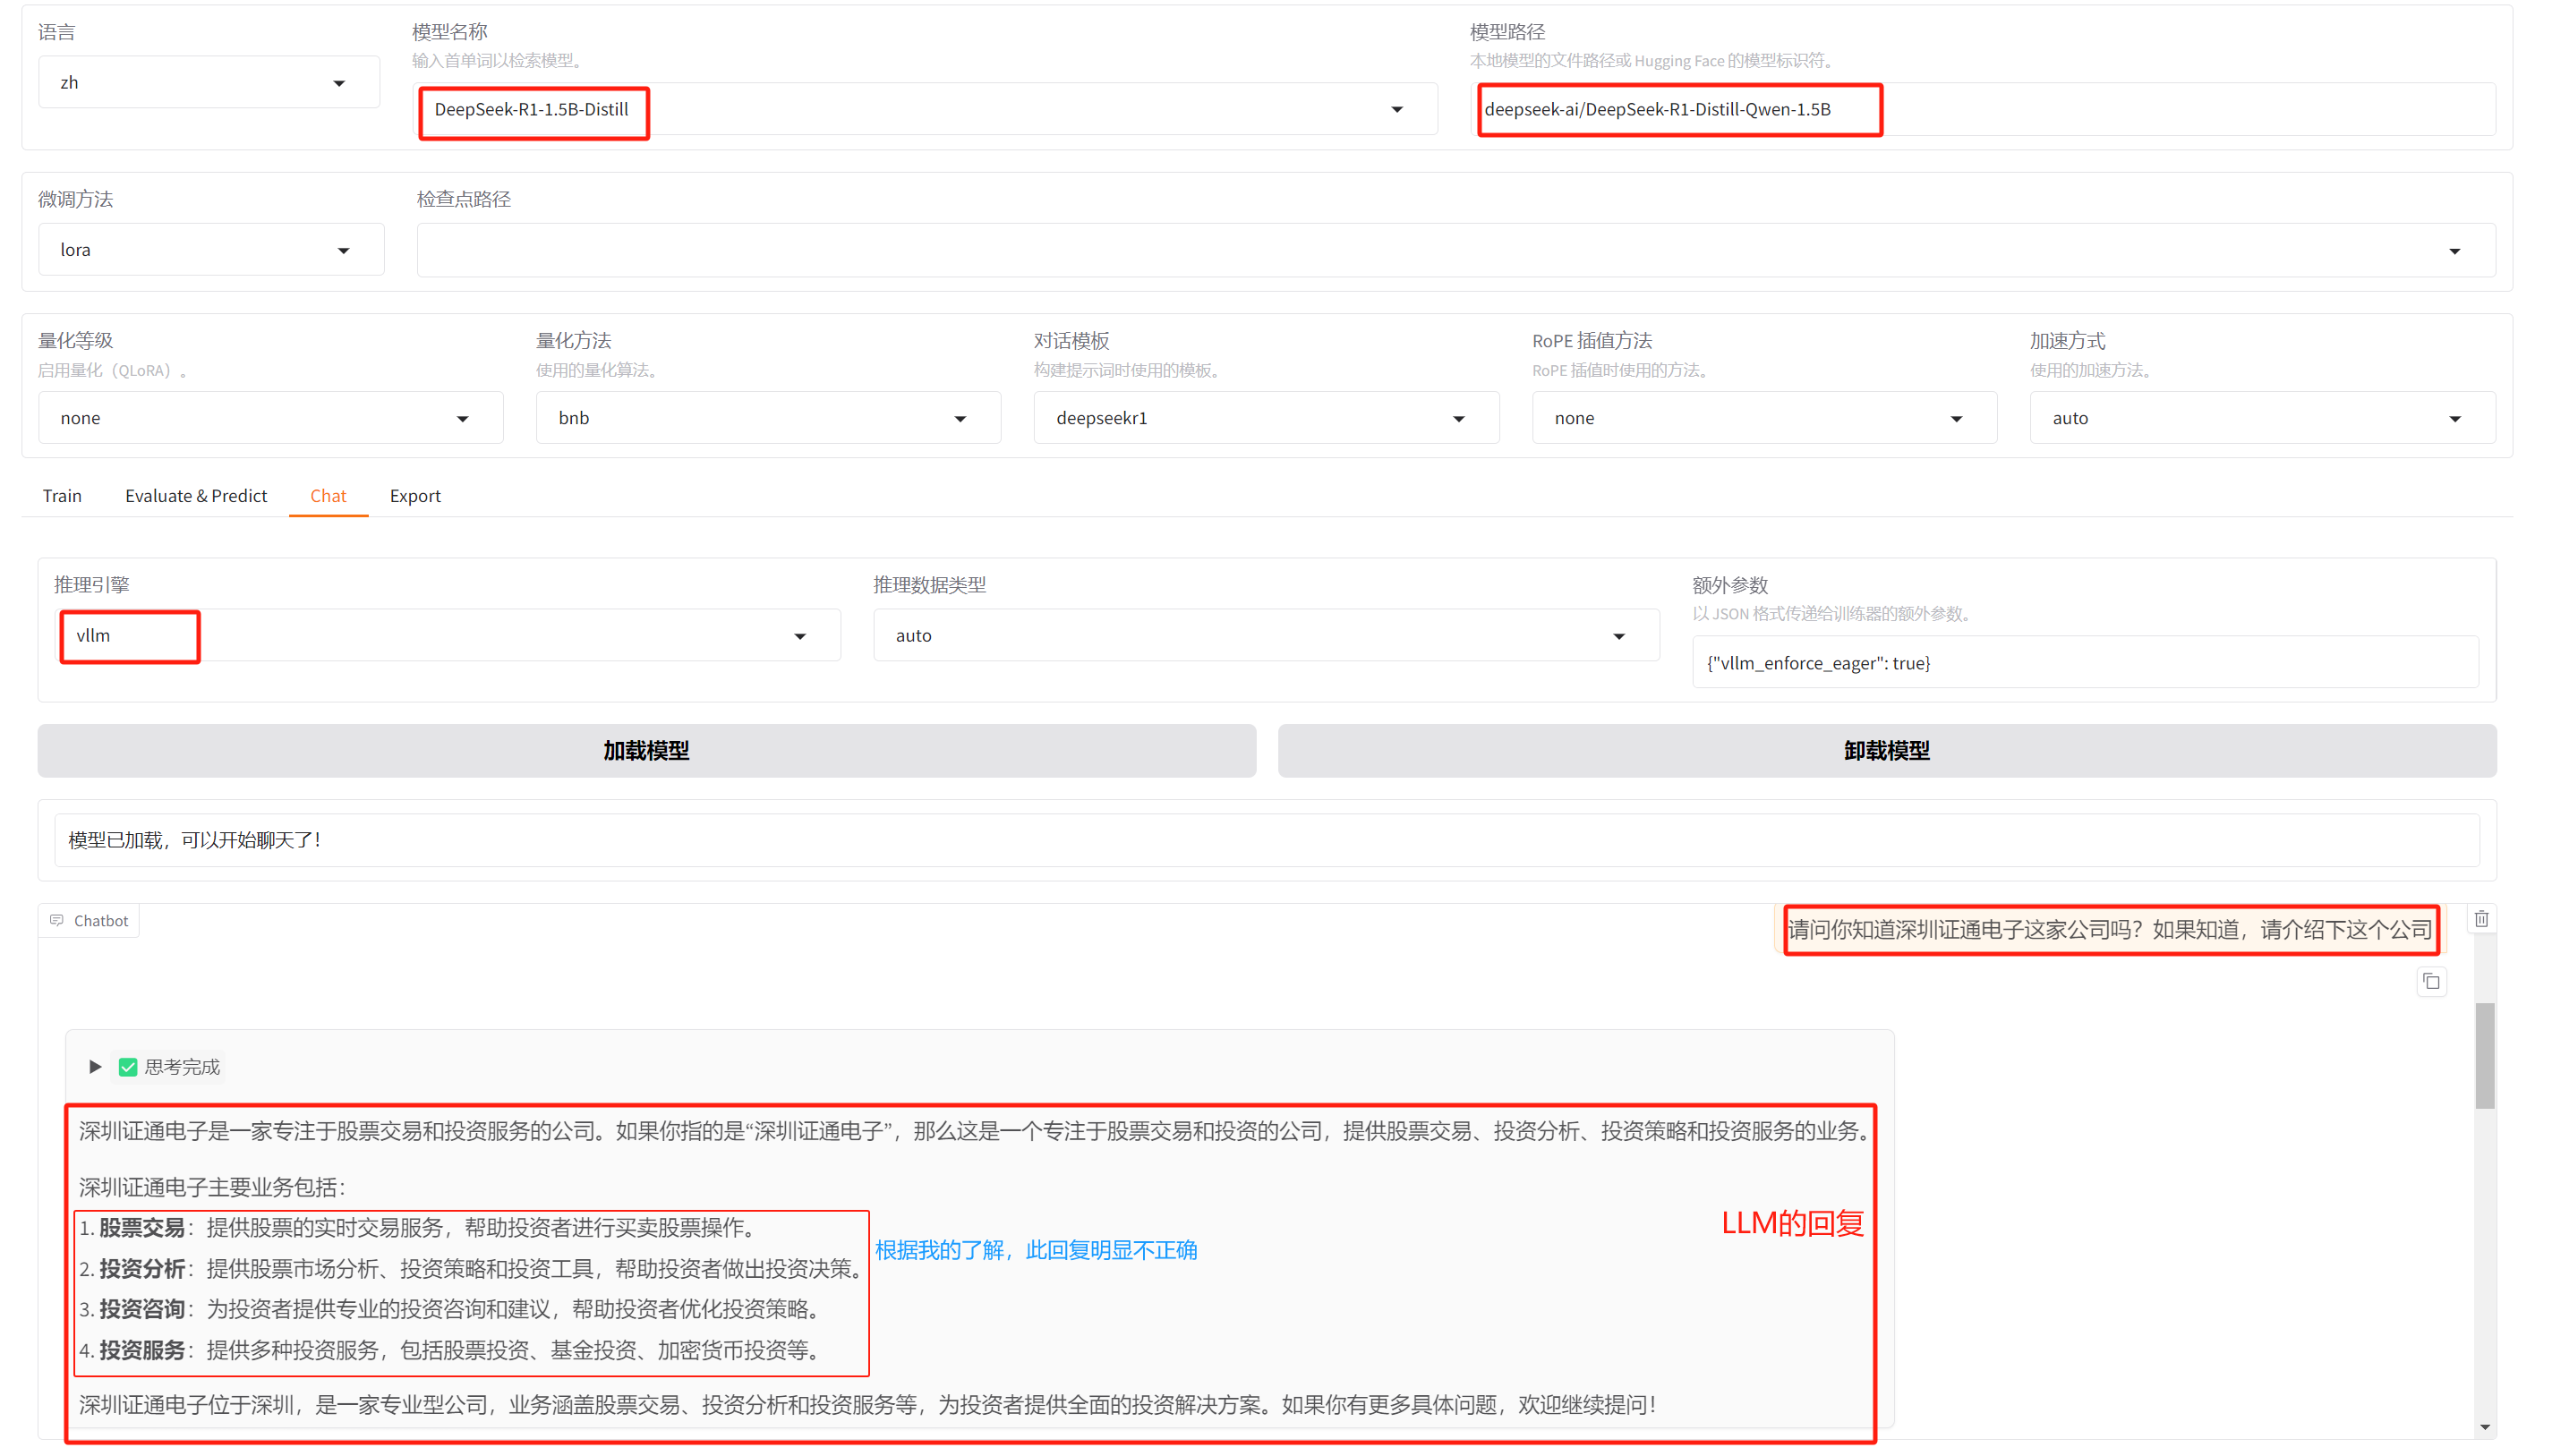
4.1 微调前
image-20250530162943727
上述对深圳证通电子公司的介绍的相关回复,就有点乱七八糟了,基本上是不对的!
image-20250530163049670
LLM完整的回复如下:
image-20250530163204838
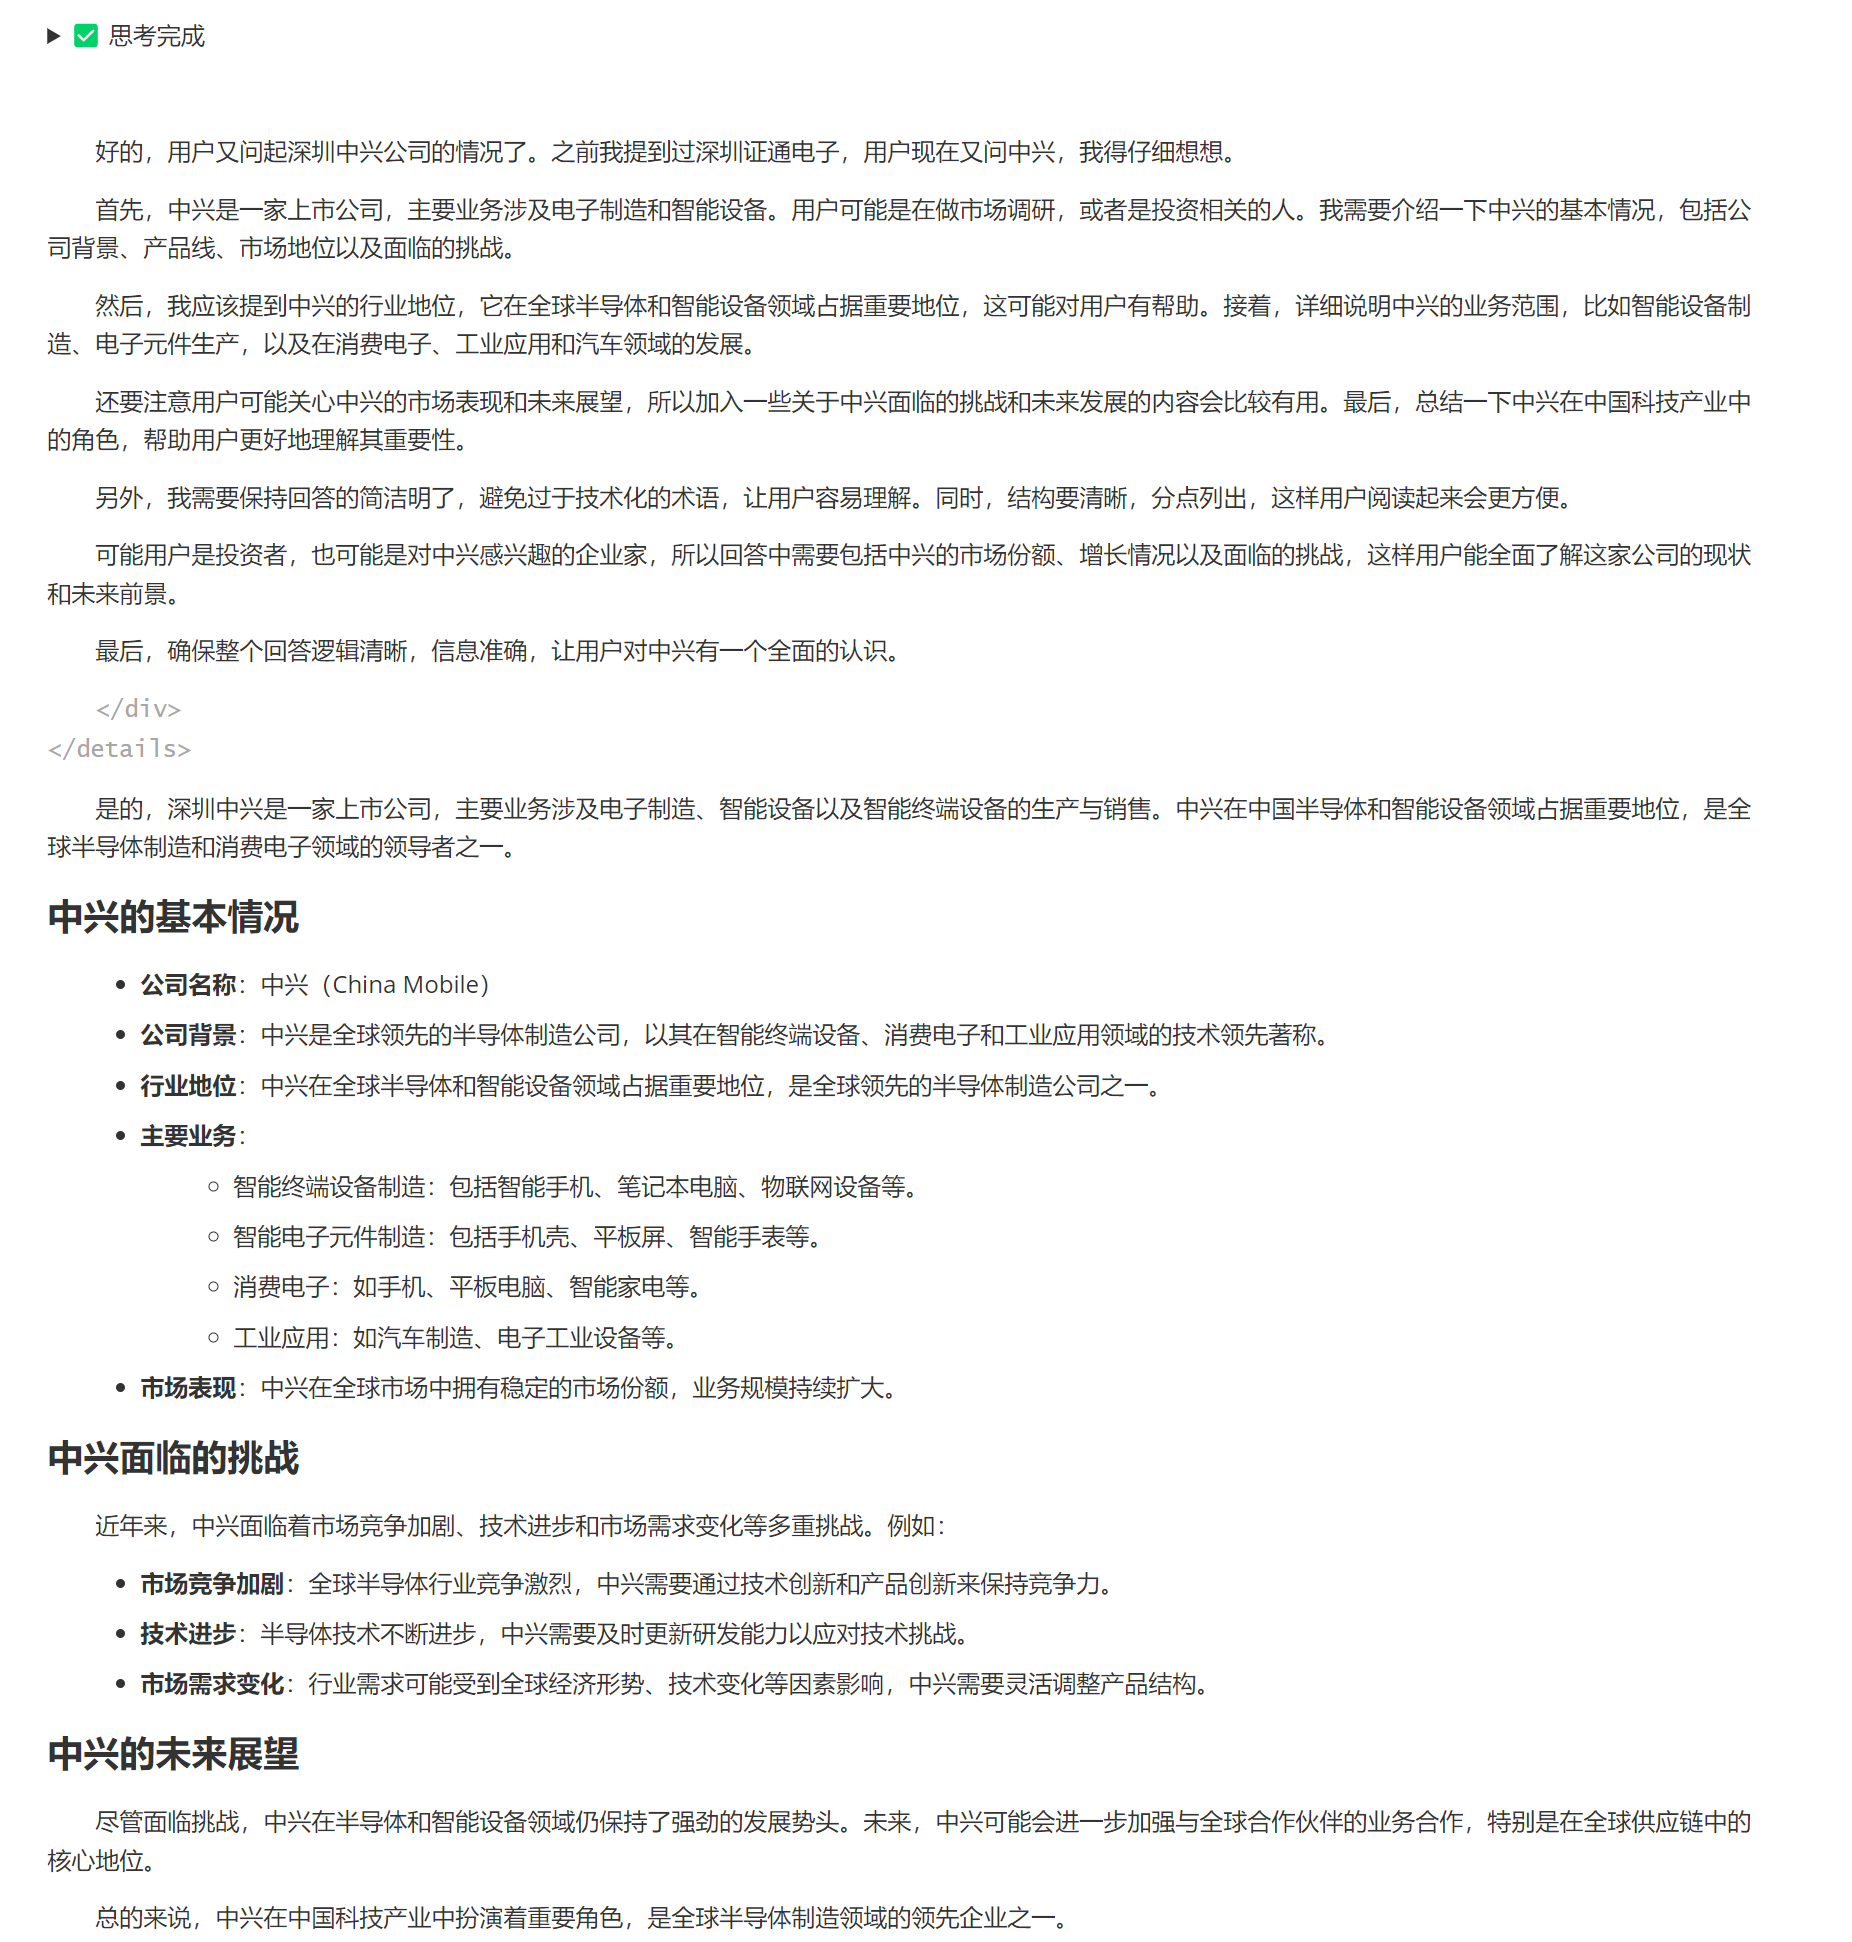
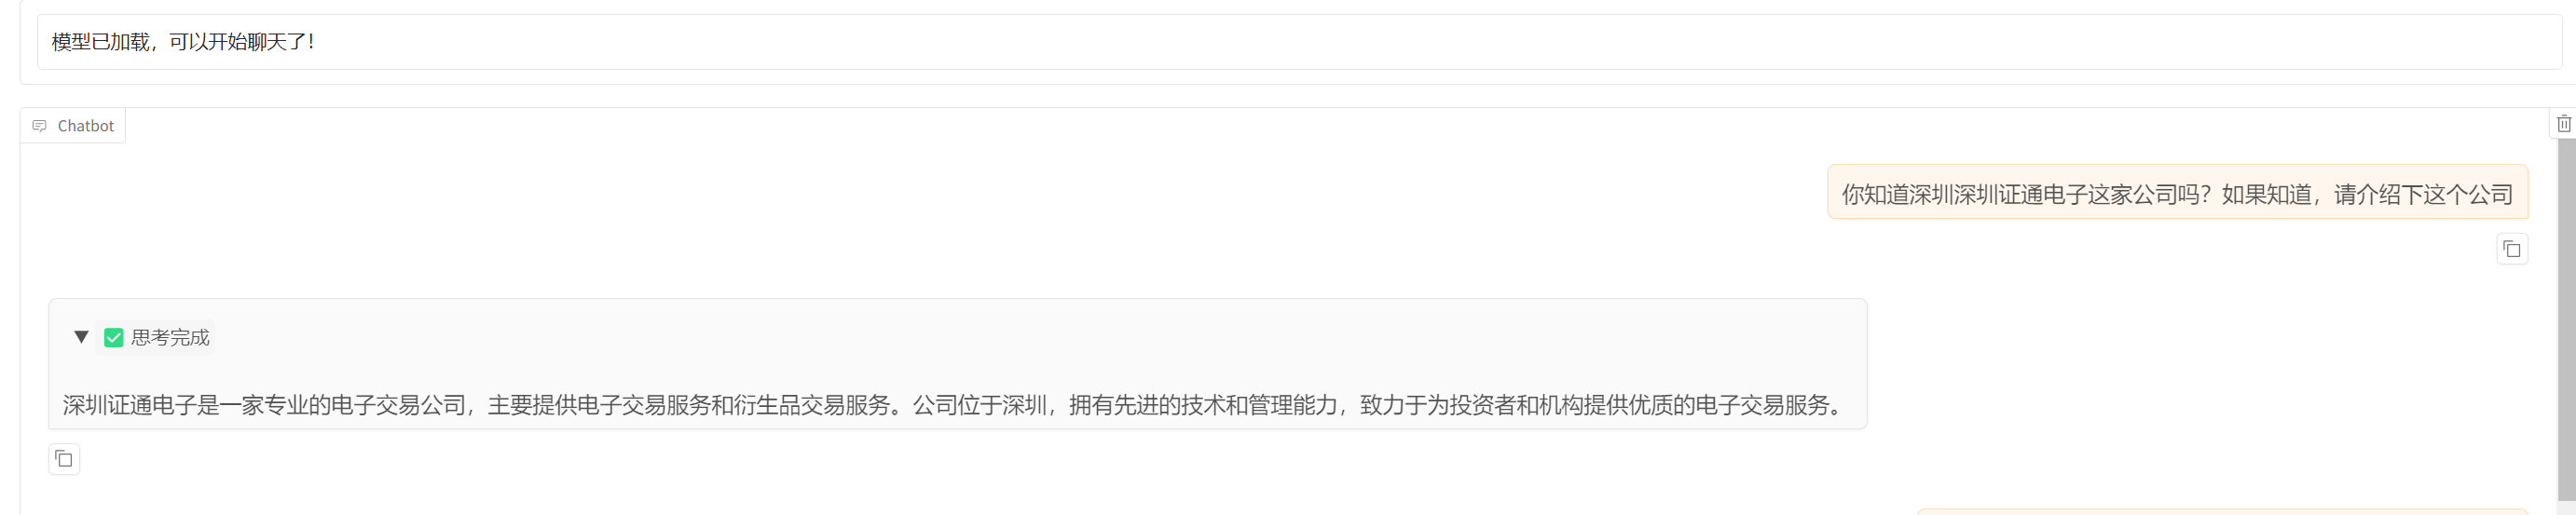
4.2 微调后
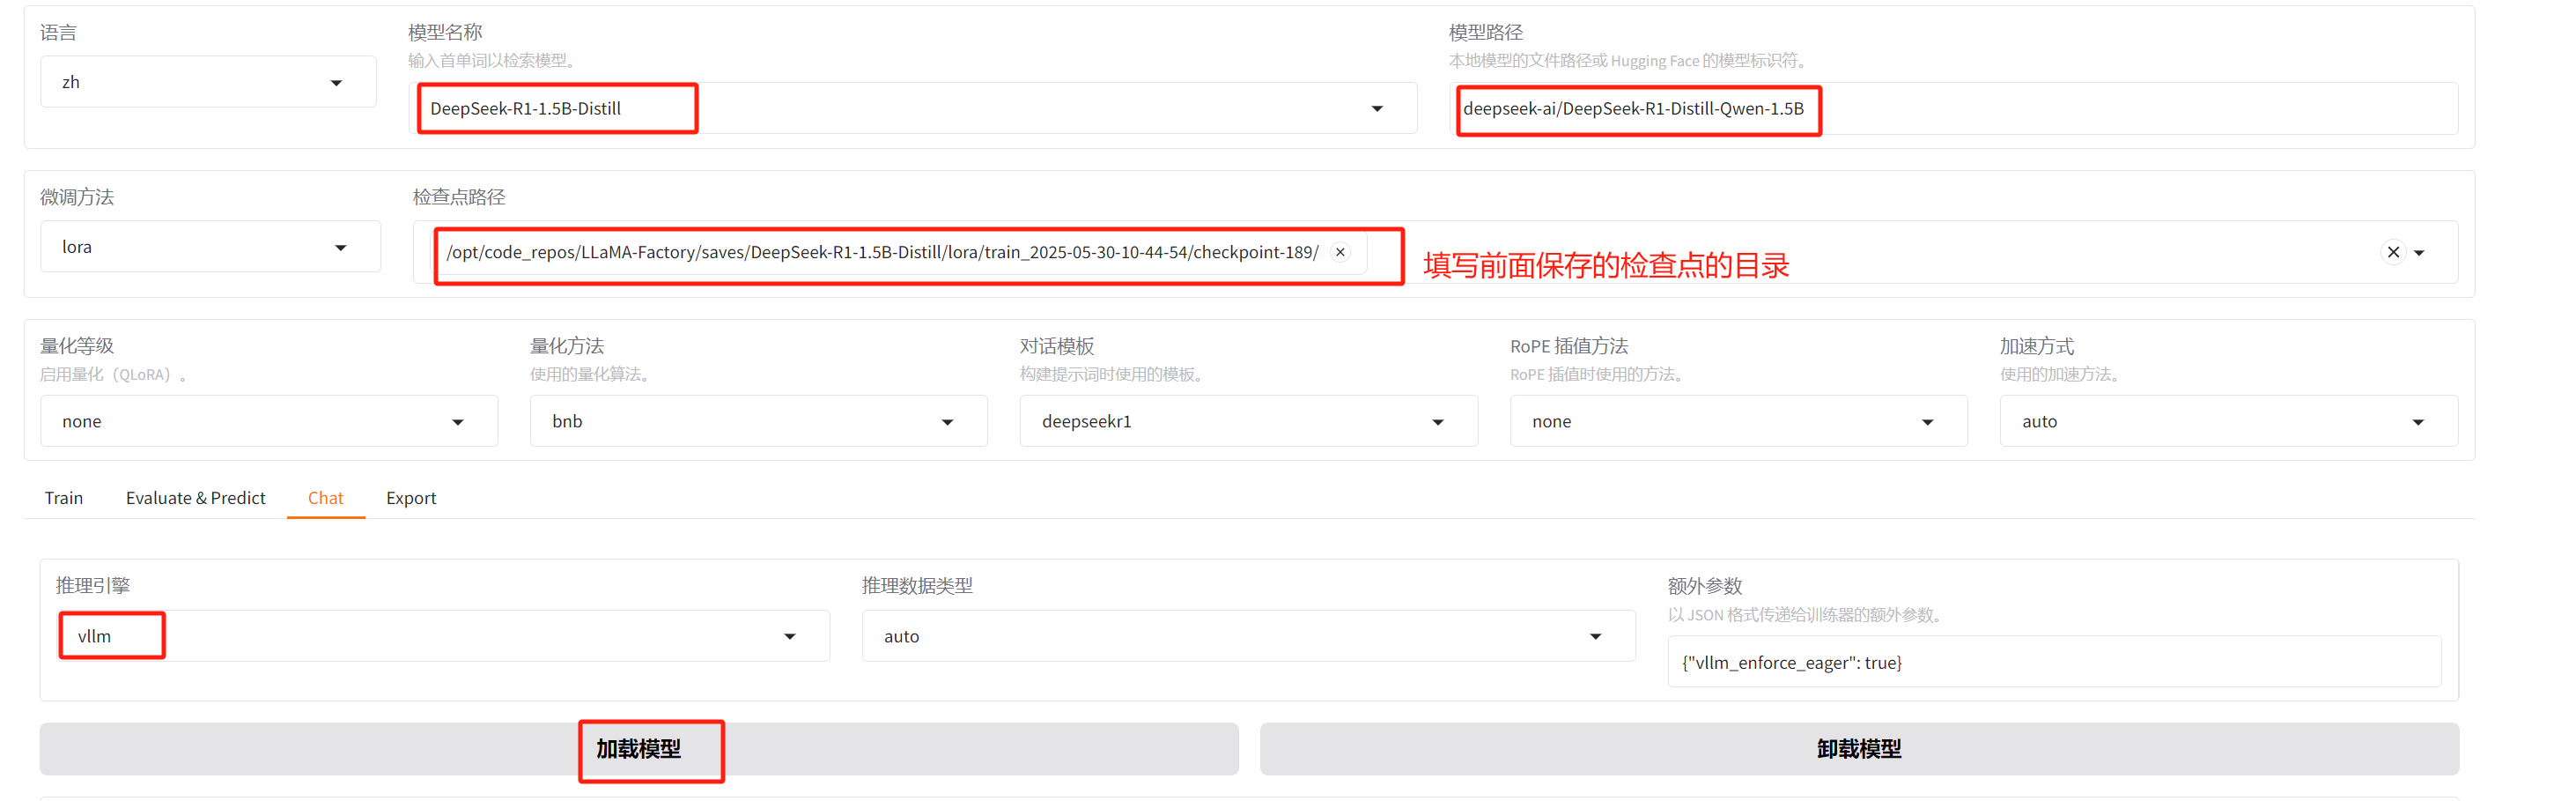
因为此处我此处使用的推荐引擎是 vllm,所以在启动llamafactory
webui服务前,先安装相关python库:
1 (llamafactory) root@ksp-registry:~
如果已经启动llamafactory
webui服务,安装后重启此服务,再进行如下操作。
image-20250530163417517
image-20250530163600544
image-20250530163618426
可以看到,微调后,对上述两家公司的介绍的相关回复变得更加简洁与正确(相对准确)了。
五、参考资料
https://github.com/hiyouga/LLaMA-Factory/blob/main/README_zh.md
https://github.com/hiyouga/LLaMA-Factory/blob/main/examples/README_zh.md
https://llamafactory.readthedocs.io/zh-cn/latest/getting_started/sft.html
https://zhuanlan.zhihu.com/p/695287607
https://nvidia.csdn.net/675a7eabf3b8a55e4e980776.html