大语言模型MCP学习03-MCP实现对MySQL数据库的操作
一、背景与需求
本人能够熟练使用Python语言,能对MySQL数据库、常见的AI工具进行操作。
在当前MCP服务开发社区内,我发现在网上(主要是mcp.so)上并没有找到一个能够完全正常通过远程服务方式运行的操作MySQL数据库的MCP服务端,但我在使用LLM时又有操作MySQL数据库的需求,所以我想自己开发一个通过本地运行方式运行的操作MySQL数据库的MCP服务端。
由于平时有工作,且最近做的工作也没有直接与MCP相关。所以考虑到时间的紧迫性与自己对于python MCP SDK不够熟练,所以自己想通过LLM来完成“编写MCP服务端代码”这个工作,自己主要编写LLM的提示词即可。然后自己通过自己已经掌握的方法将其部署到cursor/trae这个工具中进行使用。
二、环境信息
2.1 MySQL数据库
- MySQL数据库服务所在IP、远程访问用户名、密码与数据库名称分别是:172.20.0.22、root、root@123、test01。
- MySQL数据库版本:10.5.6-MariaDB-1:10.5.6+maria~focal
2.2 客户端环境
- 联想笔记本电脑,win11操作系统
- 已经安装好uv工具
- python3.11
三、具体实施步骤
使用Claude(使用trace也可以)这个工具及其中的Claude3.7 LLM来帮助我编写python代码。
3.1 撰写MCP应用服务端代码
自己编写的提示词如下:
1 | |
然后LLM会给出服务端python代码的内容,以及使用说明。
将上述生成的服务端代码保存为main.py。并修改其中的数据库连接信息(暂时未对MySQL的连接信息及连接过程进行修改与封装)
1
2
3
4
5
6
7
8
9
10
11
12
13
14
15
16
17
18
19
20
21
22
23
24
25
26
27
28
29
30
31
32
33
34
35
36
37
38
39
40
41
42
43
44
45
46
47
48
49
50
51
52
53
54
55
56
57
58
59
60
61
62
63
64
65
66
67
68
69
70
71
72
73
74
75
76
77
78
79
80
81
82
83
84
85
86
87
88
89
90
91
92
93
94
95
96
97
98
99
100
101
102
103
104
105
106
107
108
109
110
111
112
113
114
115
116
117
118
119
120
121
122
123
124
125
126
127
128
129
130
131
132
133
134
135
136
137
138
139
140
141
142
143
144
145
146
147
148
149
150
151
152
153
154
155
156
157
158
159
160
161
162
163
164
165
166
167
168
169
170
171
172
173
174
175
176
177
178
179
180
181
182
183
184
185
186
187
188
189
190
191
192
193
194
195
196
197
198
199
200
201
202
203
204
205
206
207
208
209
210
211
212
213
214
215
216
217
218
219
220
221
222
223
224
225
226
227
228
229
230
231
232
233
234
235
236
237
238
239
240
241
242
243
244
245
246
247
248
249
250
251
252
253
254
255
256
257
258
259
260
261
262
263
264
265
266
267
268
269
270
271
272
273
274
275
276
277
278
279
280
281
282
283
284
285
286
287
288
289
290
291
292
293
294
295
296
297
298
299
300
301
302
303
304
305
306
307
308
309
310
311
312
313
314
315
316
317
318
319
320
321
322
323
324
325
326
327
328
329
330
331
332
333
334
335
336
337
338
339
340
341
342
343
344
345
346
347
348
349
350
351
352
353
354
355
356
357
358
359
360
361
362
363
364
365
366
367
368
369
370
371
372
373
374
375
376
377
378
379
380
381
382
383
384
385
386
387
388
389
390
391
392
393
394
395
396
397
398
399
400
401
402
403
404
405
406"""
MySQL MCP Server - 修复版本
提供MySQL数据库的创建表、增删改查等操作功能
"""
import asyncio
import json
import logging
import sys
from typing import Any, Dict, List, Optional
import aiomysql
from mcp.server.fastmcp import FastMCP
from mcp.server.stdio import stdio_server
# 配置日志
logging.basicConfig(
level=logging.INFO,
format='%(asctime)s - %(name)s - %(levelname)s - %(message)s',
handlers=[
logging.StreamHandler(sys.stderr) # 输出到stderr避免与MCP通信冲突
]
)
logger = logging.getLogger(__name__)
# 创建FastMCP实例
app = FastMCP("mysql-mcp-server")
class MySQLManager:
def __init__(self):
self.db_config = {
'host': '172.20.0.22',
'port': 3306,
'user': 'root',
'password': 'root@123',
'db': 'test01',
'charset': 'utf8mb4',
'autocommit': True
}
self.pool = None
self._lock = asyncio.Lock()
async def get_connection(self):
"""获取数据库连接"""
async with self._lock:
if not self.pool:
try:
logger.info(f"正在连接数据库: {self.db_config['host']}:{self.db_config['port']}")
self.pool = await aiomysql.create_pool(
host=self.db_config['host'],
port=self.db_config['port'],
user=self.db_config['user'],
password=self.db_config['password'],
db=self.db_config['db'],
charset=self.db_config['charset'],
autocommit=self.db_config['autocommit'],
minsize=1,
maxsize=5,
connect_timeout=10,
pool_recycle=3600
)
logger.info("数据库连接池创建成功")
except Exception as e:
logger.error(f"创建数据库连接池失败: {e}")
raise
try:
conn = await self.pool.acquire()
return conn
except Exception as e:
logger.error(f"获取数据库连接失败: {e}")
raise
async def release_connection(self, conn):
"""释放数据库连接"""
if conn and self.pool:
try:
await self.pool.release(conn)
except Exception as e:
logger.error(f"释放数据库连接失败: {e}")
async def close_pool(self):
"""关闭连接池"""
if self.pool:
try:
self.pool.close()
await self.pool.wait_closed()
self.pool = None
logger.info("数据库连接池已关闭")
except Exception as e:
logger.error(f"关闭连接池失败: {e}")
# 创建全局MySQL管理器实例
mysql_manager = MySQLManager()
@app.tool()
async def create_table(table_name: str, columns: List[Dict[str, str]]) -> str:
"""
创建MySQL数据表
Args:
table_name: 表名
columns: 列定义数组,每个元素包含name(列名)、type(数据类型)、constraints(约束条件,可选)
Returns:
创建结果消息
"""
conn = None
try:
conn = await mysql_manager.get_connection()
async with conn.cursor() as cursor:
# 构建CREATE TABLE语句
column_defs = []
for col in columns:
col_def = f"`{col['name']}` {col['type']}"
if col.get('constraints'):
col_def += f" {col['constraints']}"
column_defs.append(col_def)
sql = f"CREATE TABLE IF NOT EXISTS `{table_name}` ({', '.join(column_defs)})"
await cursor.execute(sql)
logger.info(f"表 '{table_name}' 创建成功")
return f"表 '{table_name}' 创建成功"
except Exception as e:
error_msg = f"创建表失败: {str(e)}"
logger.error(error_msg)
return error_msg
finally:
if conn:
await mysql_manager.release_connection(conn)
@app.tool()
async def insert_data(table_name: str, data: Dict[str, Any]) -> str:
"""
向表中插入数据
Args:
table_name: 表名
data: 要插入的数据,键值对形式
Returns:
插入结果消息
"""
conn = None
try:
conn = await mysql_manager.get_connection()
async with conn.cursor() as cursor:
columns = list(data.keys())
values = list(data.values())
placeholders = ', '.join(['%s'] * len(values))
column_names = ', '.join([f"`{col}`" for col in columns])
sql = f"INSERT INTO `{table_name}` ({column_names}) VALUES ({placeholders})"
await cursor.execute(sql, values)
result_msg = f"数据插入成功,受影响行数: {cursor.rowcount}"
logger.info(result_msg)
return result_msg
except Exception as e:
error_msg = f"插入数据失败: {str(e)}"
logger.error(error_msg)
return error_msg
finally:
if conn:
await mysql_manager.release_connection(conn)
@app.tool()
async def select_data(table_name: str, columns: Optional[List[str]] = None,
where_clause: str = "", limit: int = 100) -> str:
"""
查询表中的数据
Args:
table_name: 表名
columns: 要查询的列名,默认为所有列
where_clause: WHERE条件子句
limit: 限制返回行数
Returns:
查询结果的JSON字符串
"""
if columns is None:
columns = ["*"]
conn = None
try:
conn = await mysql_manager.get_connection()
async with conn.cursor(aiomysql.DictCursor) as cursor:
if columns == ["*"]:
column_str = "*"
else:
column_str = ', '.join([f"`{col}`" for col in columns])
sql = f"SELECT {column_str} FROM `{table_name}`"
if where_clause:
sql += f" WHERE {where_clause}"
sql += f" LIMIT {limit}"
await cursor.execute(sql)
results = await cursor.fetchall()
if not results:
return "未找到数据"
# 格式化结果
formatted_results = []
for row in results:
formatted_results.append(dict(row))
return json.dumps(formatted_results, ensure_ascii=False, indent=2, default=str)
except Exception as e:
error_msg = f"查询数据失败: {str(e)}"
logger.error(error_msg)
return error_msg
finally:
if conn:
await mysql_manager.release_connection(conn)
@app.tool()
async def update_data(table_name: str, data: Dict[str, Any], where_clause: str) -> str:
"""
更新表中的数据
Args:
table_name: 表名
data: 要更新的数据,键值对形式
where_clause: WHERE条件子句
Returns:
更新结果消息
"""
conn = None
try:
conn = await mysql_manager.get_connection()
async with conn.cursor() as cursor:
set_clauses = [f"`{key}` = %s" for key in data.keys()]
set_clause = ', '.join(set_clauses)
values = list(data.values())
sql = f"UPDATE `{table_name}` SET {set_clause} WHERE {where_clause}"
await cursor.execute(sql, values)
result_msg = f"数据更新成功,受影响行数: {cursor.rowcount}"
logger.info(result_msg)
return result_msg
except Exception as e:
error_msg = f"更新数据失败: {str(e)}"
logger.error(error_msg)
return error_msg
finally:
if conn:
await mysql_manager.release_connection(conn)
@app.tool()
async def delete_data(table_name: str, where_clause: str) -> str:
"""
删除表中的数据
Args:
table_name: 表名
where_clause: WHERE条件子句
Returns:
删除结果消息
"""
conn = None
try:
conn = await mysql_manager.get_connection()
async with conn.cursor() as cursor:
sql = f"DELETE FROM `{table_name}` WHERE {where_clause}"
await cursor.execute(sql)
result_msg = f"数据删除成功,受影响行数: {cursor.rowcount}"
logger.info(result_msg)
return result_msg
except Exception as e:
error_msg = f"删除数据失败: {str(e)}"
logger.error(error_msg)
return error_msg
finally:
if conn:
await mysql_manager.release_connection(conn)
@app.tool()
async def show_tables() -> str:
"""
显示所有数据表
Returns:
表列表字符串
"""
conn = None
try:
conn = await mysql_manager.get_connection()
async with conn.cursor() as cursor:
await cursor.execute("SHOW TABLES")
tables = await cursor.fetchall()
if not tables:
return "数据库中没有表"
table_list = [table[0] for table in tables]
return f"数据库中的表({len(table_list)}个):\n" + '\n'.join([f"- {table}" for table in table_list])
except Exception as e:
error_msg = f"显示表失败: {str(e)}"
logger.error(error_msg)
return error_msg
finally:
if conn:
await mysql_manager.release_connection(conn)
@app.tool()
async def get_database_info() -> str:
"""
获取当前数据库连接信息和状态
Returns:
数据库信息
"""
conn = None
try:
conn = await mysql_manager.get_connection()
async with conn.cursor() as cursor:
# 获取数据库版本
await cursor.execute("SELECT VERSION()")
version = await cursor.fetchone()
# 获取当前数据库
await cursor.execute("SELECT DATABASE()")
current_db = await cursor.fetchone()
# 获取连接信息
info = {
"host": mysql_manager.db_config['host'],
"port": mysql_manager.db_config['port'],
"user": mysql_manager.db_config['user'],
"database": mysql_manager.db_config['db'],
"mysql_version": version[0] if version else "Unknown",
"current_database": current_db[0] if current_db else "None",
"connection_status": "Connected"
}
return json.dumps(info, ensure_ascii=False, indent=2)
except Exception as e:
error_msg = f"获取数据库信息失败: {str(e)}"
logger.error(error_msg)
return error_msg
finally:
if conn:
await mysql_manager.release_connection(conn)
async def test_connection():
"""测试数据库连接"""
try:
logger.info("正在测试数据库连接...")
conn = await mysql_manager.get_connection()
async with conn.cursor() as cursor:
await cursor.execute("SELECT 1")
result = await cursor.fetchone()
if result[0] == 1:
logger.info("数据库连接测试成功")
return True
await mysql_manager.release_connection(conn)
except Exception as e:
logger.error(f"数据库连接测试失败: {e}")
return False
return False
async def main():
"""主函数"""
try:
logger.info("MySQL MCP Server 启动中...")
# 测试数据库连接
if not await test_connection():
logger.error("数据库连接失败,服务器无法启动")
return
# 使用stdio服务器运行MCP应用
async with stdio_server() as (read_stream, write_stream):
logger.info("MCP服务器正在运行...")
await app.run(
read_stream,
write_stream,
app.create_initialization_options()
)
except KeyboardInterrupt:
logger.info("服务器收到中断信号,正在关闭...")
except Exception as e:
logger.error(f"服务器运行错误: {e}", exc_info=True)
finally:
# 清理资源
await mysql_manager.close_pool()
logger.info("服务器已关闭")
if __name__ == "__main__":
try:
app.run(transport="stdio")
except Exception as e:
logger.error(f"程序启动失败: {e}", exc_info=True)
sys.exit(1)同时LLM还提示我运行此服务端代码时需要安装的python库列表,将这些内容保存为requirements.txt文件,内容如下:
1
2
3
4
5aiomysql==0.2.0
mcp>=1.0.0
asyncio
typing
uvicorn
3.2 为服务端运行配置环境
以管理员权限打开win11的cmd窗口,然后执行如下命令:
1 | |
将前面生成的main.py与requirements.txt 文件放到manipulate_mysql 目录下。
1 | |
3.3 调试
1 | |
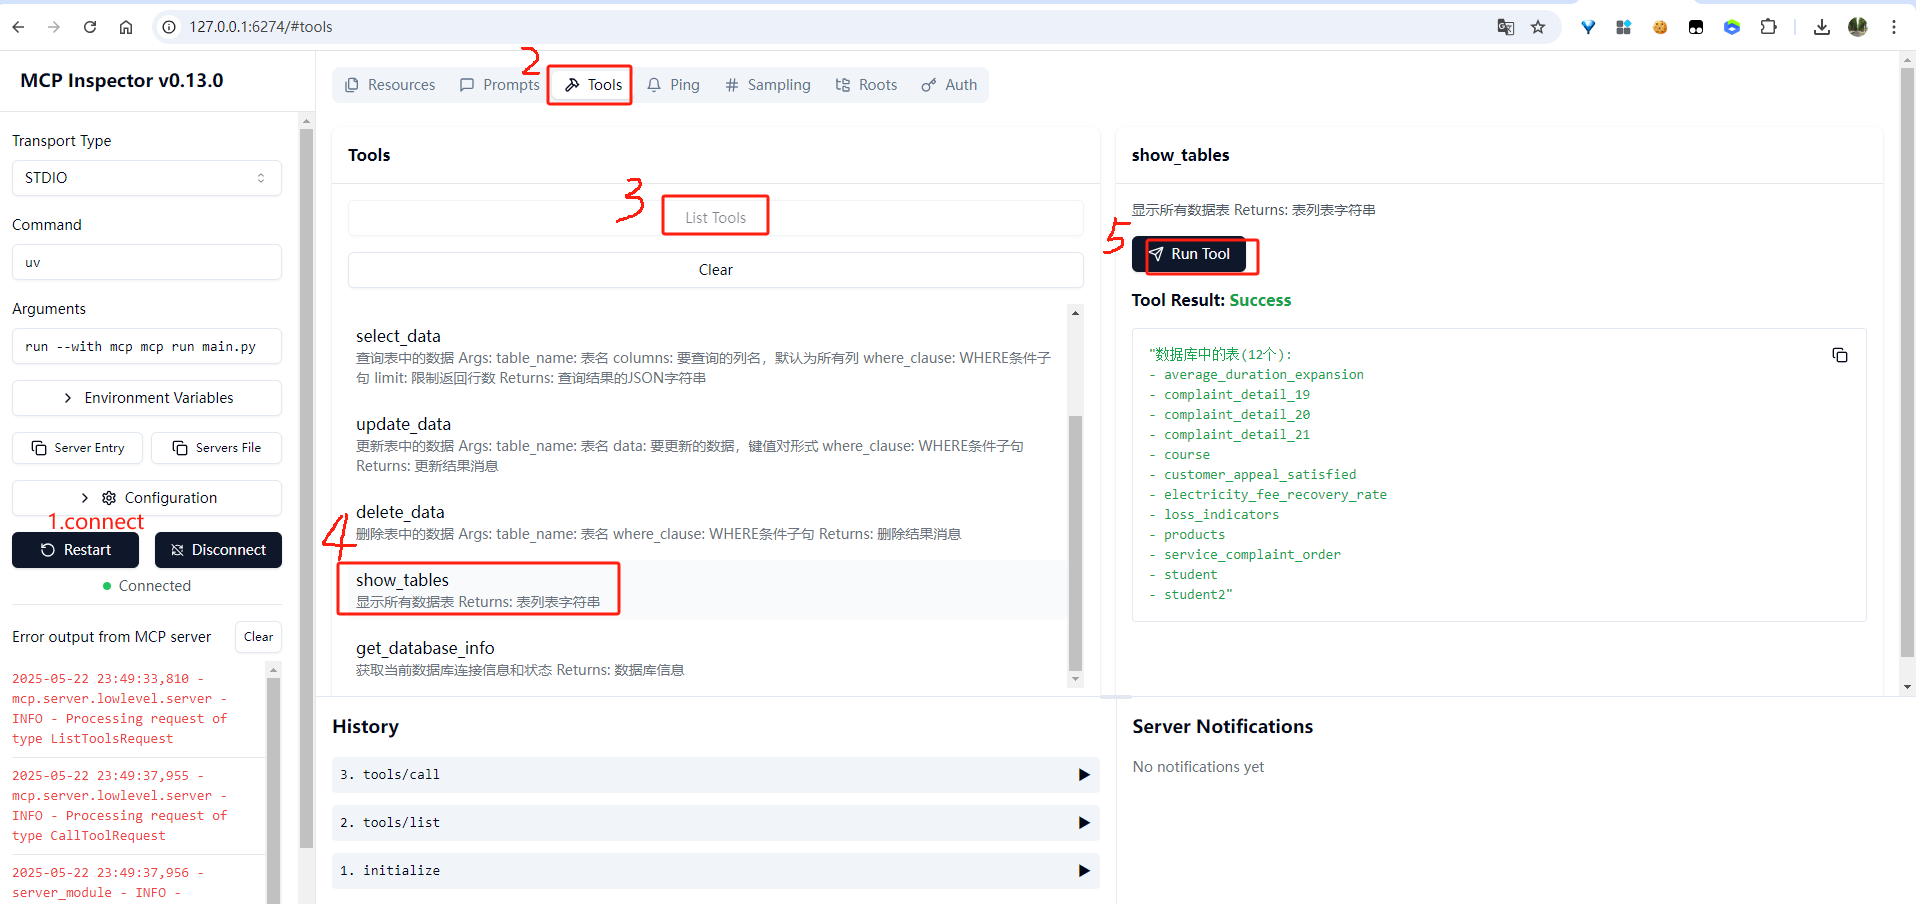
调试时显示可正常使用。
3.4 命令行部署服务端
1 | |
但是此时就报错,提示如下:
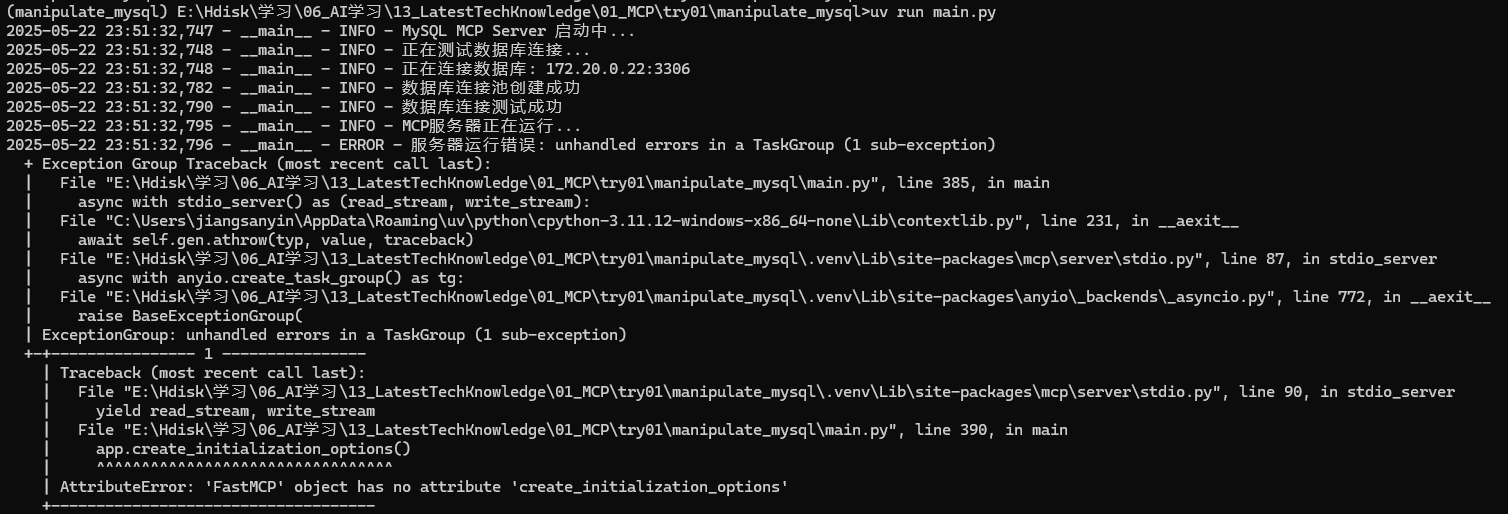
解决办法如下(将如下try中语句改成:app.run(transport="stdio"):
1 | |
原因分析如下:
1 | |
之后,再在命令启动服务端,服务端将一直处于等待状态:

正常。
3.5 cursor中配置自定义MCP服务端
File->Preferences->Cursor Settings,看到如下界面:
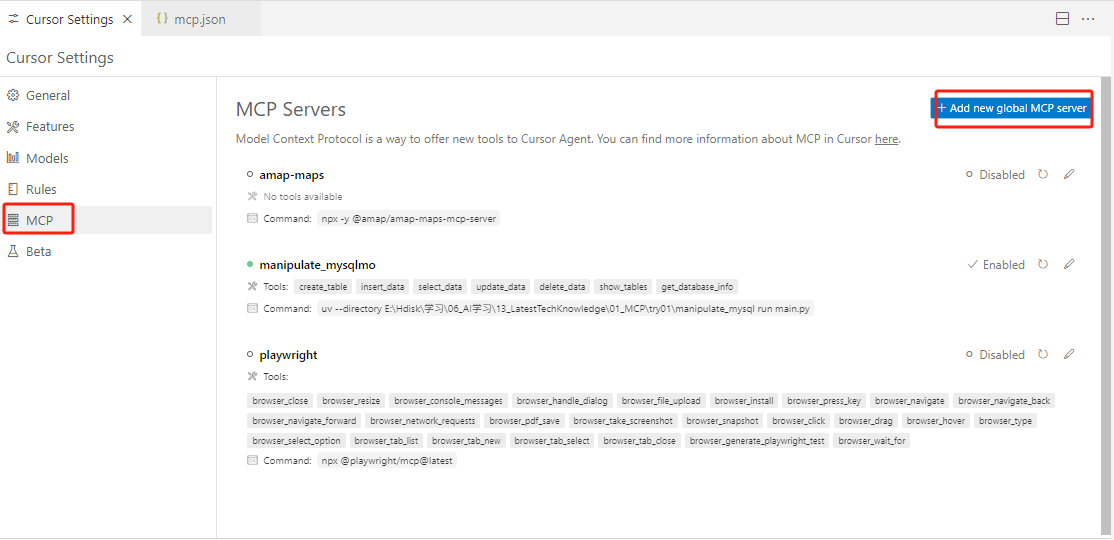
点击上述"Add new global MCP server",将显示一个mcp.json文件,添加如下内容:
1 | |
其中“E:\Hdisk\学习\06_AI学习\13_LatestTechKnowledge\01_MCP\try01\manipulate_mysql”是我的MCP服务代码的路径。
回到Cursor Settings界面,保证“Enabled”启用,然后点击“刷新”按钮,当mcp服务的左边出现一个绿点时,表示其正常工作了。

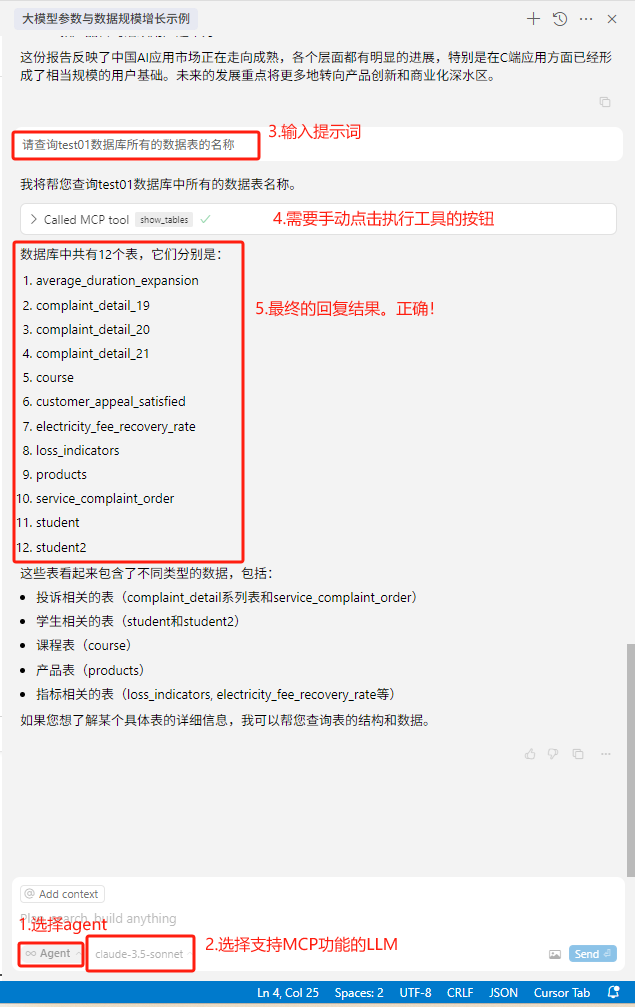
3.6 cursor中使用自定义MCP服务端