一、文档
二、实施步骤
2.1 pypi相关准备工作
2.1.1 注册pypi账号
https://pypi.org/account/register/
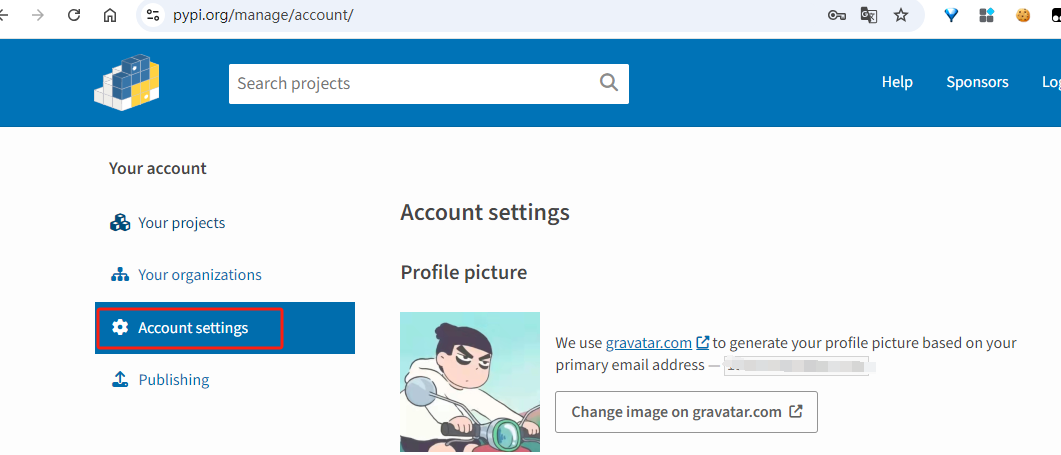
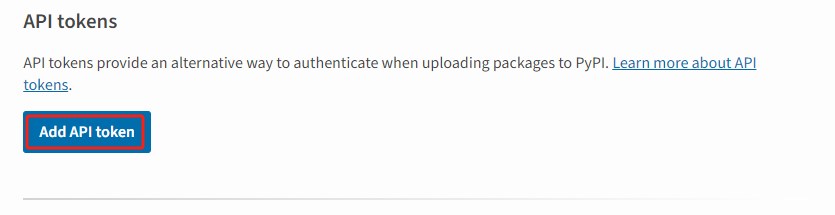
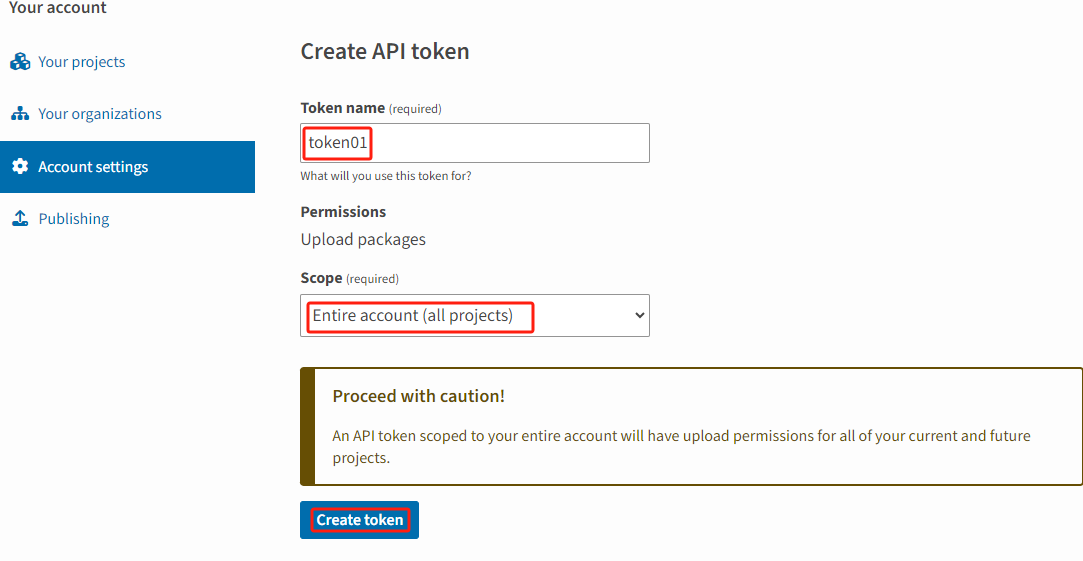
2.1.2 添加pypi API令牌
image-20250524213258148
image-20250524213323053
image-20250524213427536
2.2 创建相关python文件(夹)
首先创建如下文件结构:
1
2
3
4
5
6
7
8
my_pypi_test_pkg/
2.2.1 相关文件(夹)解析
README.md:README 文件。
pyproject.toml:这是定义项目元数据和构建配置的核心文件。
src目录与my_pypi_test_pkg_example:我们将创建一个 src
目录,并在其中放置我们的包代码。包名将是 my_pypi_test_pkg_example (与
pyproject.toml 中的 name 相对应,但 Python
模块名通常用下划线)。
__init__.py:这个文件可以为空,但它的存在告诉 Python
这个目录是一个包。我们可以在里面定义包的版本。
greeter.py:它将包含一个简单的函数。
2.2.2
修改my_pypi_test_pkg/pyproject.toml
这是定义项目元数据和构建配置的核心文件。
1
2
3
4
5
6
7
8
9
10
11
12
13
14
15
16
17
18
19
20
21
22
[build-system] requires = ["hatchling" ]build-backend = "hatchling.build" [project] name = "my_pypi_test_pkg_example" version = "0.0.1" authors = ["Your Name" , email="you@example.com" }, description = "A small example package for PyPI testing" readme = "README.md" requires-python = ">=3.7" classifiers = ["Programming Language :: Python :: 3" ,"License :: OSI Approved :: MIT License" ,"Operating System :: OS Independent" ,[project.urls] "Homepage" = "https://github.com/yourusername/my_pypi_test_pkg" "Bug Tracker" = "https://github.com/yourusername/my_pypi_test_pkg/issues"
修改之后如下:
1
2
3
4
5
6
7
8
9
10
11
12
13
14
15
16
17
18
19
20
21
22
[build-system] requires = ["hatchling" ]build-backend = "hatchling.build" [project] name = "my_pypi_test_pkg_syjiang" version = "0.0.1" authors = ["syjiang" , email="1327212357@qq.com" }, description = "A small example package for PyPI testing" readme = "README.md" requires-python = ">=3.7" classifiers = ["Programming Language :: Python :: 3" ,"License :: OSI Approved :: MIT License" ,"Operating System :: OS Independent" ,[project.urls] "Homepage" = "https://github.com/jiangsanyin/my_pypi_test_pkg" "Bug Tracker" = "https://github.com/jiangsanyin/my_pypi_test_pkg/issues"
2.2.3
修改my_pypi_test_pkg/my_pypi_test_pkg_example目录
根据my_pypi_test_pkg/pyproject.toml中[project]中修改后的name配置项的值,需要将my_pypi_test_pkg/my_pypi_test_pkg_example目录修改为my_pypi_test_pkg/my_pypi_test_pkg_syjiang目录
2.2.4
查看与修改src/my_pypi_test_pkg_syjiang/__init__.py
1
2
3
4
5
"""My PyPI Test Package - Example""" "0.0.1" from .greeter import greet
查看与修改src/my_pypi_test_pkg_syjiang/greeter.py
1
2
3
def greet (name: str ) -> str :"""Returns a greeting message.""" return f"Hello, {name} ! Welcome to your test PyPI package."
查看与修改 README.md
(可选但推荐)
1
2
3
4
5
6
7
8
9
10
11
12
13
14
15
16
17
18
19
20
21
22
23
24
25
# My PyPI Test Package (Example) `example` in the package name and `pyproject.toml` with your unique identifier.## Installation ```bash # From TestPyPI pip install -i https://test.pypi.org/simple/ my-pypi-test-pkg-example # From PyPI (if you publish there) # pip install my-pypi-test-pkg-example ``` ## Usage ```python from my_pypi_test_pkg_example import greet print(greet("Your Name")) ```
修改后为:
1
2
3
4
5
6
7
8
9
10
11
12
13
14
15
16
17
18
19
20
21
22
23
24
25
# My PyPI Test Package (Example) `example` in the package name and `pyproject.toml` with your unique identifier.## Installation ```bash # From TestPyPI pip install -i https://test.pypi.org/simple/ my-pypi-test-pkg-syjiang # From PyPI (if you publish there) # pip install my-pypi-test-pkg-syjiang ``` ## Usage ```python from my_pypi_test_pkg_syjiang import greet print(greet("Your Name")) ```
查看与修改my_pypi_test_pkg\.gitignore
1 2 3 4 5 6 7 8 9 10 11 12 13 14 [cod]
安装构建工具
构建包
1
2
3
4
5
6
7
8
9
10
11
12
13
14
15
# (在 my_pypi_test_pkg 目录下运行) $ python -m build
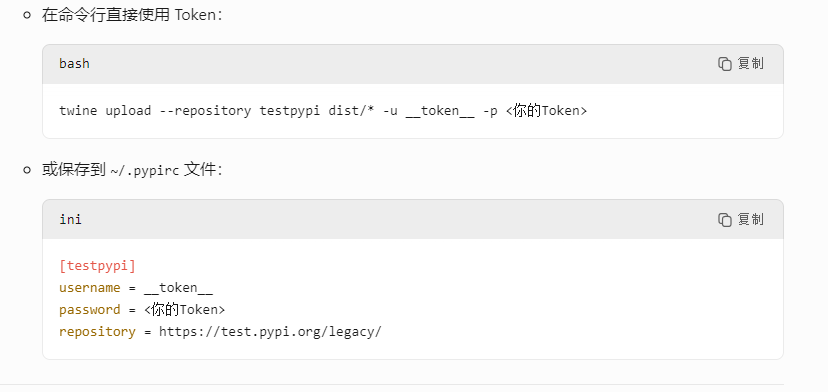
上传到 TestPyPI(一直失败)
1 twine upload --repository testpypi dist/*
但一直报错,报错信息如下:
1
2
3
4
5
6
7
Uploading distributions to https ://test.pypi.org/legacy/token :-0.0 .1 -py3-none -any .whl100 % ━━━━━━━━━━━━━━━━━━━━━━━━━━━━━━━━━━━━━━━━ 5.1 /5.1 kB • 00 :00 • ?with the 403 Forbidden from https ://test.pypi.org/legacy/
如下两种方法都试过了,仍未解决:
image-20250524224450089
测试从 TestPyPI 安装
1 pip install -i https://test.pypi.org/simple/ my_pypi_test_pkg_syjiang
上传到 PyPI
1
2
3
4
5
6
7
8
9
10
11
# 如果你准备好了,并且包名是唯一的 $ twine upload dist/* 100% ━━━━━━━━━━━━━━━━━━━━━━━━━━━━━━━━━━━━━━━━ 5.1/5.1 kB • 00:01 • ? 100% ━━━━━━━━━━━━━━━━━━━━━━━━━━━━━━━━━━━━━━━━ 4.6/4.6 kB • 00:00 • ?
测试从 PyPI 安装
1
2
3
4
5
6
7
(py312) D:\>pip install -i https://pypi.org/simple/ my-pypi-test-pkg-syjiang
1
2
3
4
5
6
7
8
9
10
11
(py312) D:\>pip show my-pypi-test-pkg-syjiang
1
2
3
4
5
6
7
8
(py312) D:\>python> >> import my_pypi_test_pkg_syjiang > >> from my_pypi_test_pkg_syjiang import greet > >> greet("jack" ) > >>