开源版coze本地部署与试用

一、背景与环境信息

  • 官方部署文档:

    • https://github.com/coze-dev
    • https://github.com/coze-dev/coze-studio
  • 服务器信息:

    • 主机名 IP 操作系统 规格 GPU情况 备注
      ksp-registry 172.20.0.22 Ubuntu 20.04.3 LTS 12c20g+300G NVIDIA A40*1

此文档使用docker-compose的方式来部署coze。

二、部署操作

2.1 下载安装源码

1
2
# 克隆代码 
root@ksp-registry:/opt/code_repos# git clone -b release/v0.2.4 https://github.com/coze-dev/coze-studio.git

2.2 执行部署

1
2
3
4
5
6
7
8
#(1)启动部署前,需先确定几个可用模型。从模板目录复制 doubao-seed-1.6 模型的模版文件,并粘贴到配置文件目录
# 需要什么模型就复制什么对应厂商的配置文件并修改,一个配置文件对应一个具体的模型
# 模型配置文档:https://github.com/coze-dev/coze-studio/wiki/3.-%E6%A8%A1%E5%9E%8B%E9%85%8D%E7%BD%AE
cp backend/conf/model/template/model_template_ollama.yaml backend/conf/model/ollama-gemma3-4b.yaml
#在配置文件目录下,修改模版文件
cd backend/conf/model
#(2)修改文件ollama-gemma3-4b.yaml
vi ollama-gemma3-4b.yaml
1
2
3
4
5
6
7
8
9
10
11
12
13
14
15
16
17
18
19
20
21
22
23
24
25
26
27
28
29
30
31
32
33
34
35
36
37
38
39
40
41
42
43
44
45
46
47
48
49
50
51
52
  1 id: 68010       #整个coze环境中,每个模型id必须唯一,且最好不要修改
2 name: gemma3-4b #可以修改名字
...
49 meta:
50 protocol: ollama
51 capability:
52 function_call: true
53 input_modal:
54 - text
55 input_tokens: 128000
56 json_mode: false
57 max_tokens: 128000
58 output_modal:
59 - text
60 output_tokens: 16384
61 prefix_caching: false
62 reasoning: false
63 prefill_response: false
64 conn_config:
65 base_url: "http://172.20.0.22:11434" #ollama提供服务的base url,最好使用IP
66 api_key: "" #我的ollama服务没有启用api key。如果使用qwen等模型需要
67 timeout: 0s
68 model: "gemma3:4b" #ollama中管理的模型名称
69 temperature: 0.6
70 frequency_penalty: 0
71 presence_penalty: 0
72 max_tokens: 4096
73 top_p: 0.95
74 top_k: 20
75 stop: []
76 custom: {}
77 status: 0
...
377 coze-web:
378 # build:
379 # context: ..
380 # dockerfile: frontend/Dockerfile
381 image: opencoze/web:latest
382 container_name: coze-web
383 restart: always
384 ports:
385 - "8888:80"
386 # - "443:443" # SSL port (uncomment if using SSL)
387 volumes:
388 - ./nginx/nginx.conf:/etc/nginx/nginx.conf:rw # Main nginx config ###从ro修改为rw
389 - ./nginx/conf.d/default.conf:/etc/nginx/conf.d/default.conf:rw # Proxy config ###从ro修改为rw(否则无法修改此文件)
390 # - ./nginx/ssl:/etc/nginx/ssl:ro # SSL certificates (uncomment if using SSL)
391 depends_on:
392 - coze-server
393 networks:
394 - coze-network
...
1
2
3
4
5
6
7
8
9
#(3)修改docker-compose.yml 文件
#修改minio容器使用的镜像为minio/minio,否则coze-minio一直启动失败后反复重启、同时无日志信息可查看
root@ksp-registry:/opt/code_repos/coze-studio/docker# cp docker-compose.yml docker-compose.yml.bak
root@ksp-registry:/opt/code_repos/coze-studio/docker# vi docker-compose.yml
...
162 minio:
163 # image: minio/minio:RELEASE.2025-06-13T11-33-47Z-cpuv1
164 image: minio/minio
...
1
2
3
4
5
6
7
8
9
#(4)复制.env文件
root@ksp-registry:/opt/code_repos/coze-studio/docker# cp .env.example .env

#修改.env文件,否则使用"服务器IP:8888"访问web界面并注册时会报错、失败,日志提示“connect() failed (111: Connection refused) while connecting to upstream”
root@ksp-registry:/opt/code_repos/coze-studio/docker# vi .env
1 # Server
2 #export LISTEN_ADDR="http://localhost${LISTEN_ADDR}"
3 export LISTEN_ADDR="0.0.0.0:8888"
...
1
2
3
#(5)启动服务、查看所有相关容器
root@ksp-registry:/opt/code_repos/coze-studio/docker# docker-compose up -d
root@ksp-registry:/opt/code_repos/coze-studio/docker# docker-compose ps
image-20250814113644467

2.3 登录web界面

浏览器访问 http://172.20.0.22:8888/ 即可打开 Coze Studio。其中 8888 为后端监听端口。

输入邮箱与密码注册后使用。

2.4 插件配置

参考:配置官方插件工具

image-20250814171152934

2.5 配置基础组件

上传组件(暂未成功)

1
2
3
4
5
6
7
8
9
10
11
12
13
14
15
16
17
18
19
#1.设置上传组件类型。
root@ksp-registry:/opt/code_repos/coze-studio-v0.2.4/docker# vi .env
export FILE_UPLOAD_COMPONENT_TYPE="storage"

#2.为上传组件添加秘钥等配置。 同样在 docker 目录的 .env 文件中,根据组件类型填写以下配置。
#使用默认的minio。
#2.1. 在 Coze studio 项目的 docker/.env 文件中,FILE_UPLOAD_COMPONENT_TYPE 设置为 storage。
#2.2. 在 Storage component 区域,设置 STORAGE_TYPE 为 minio。
#2.3. 在 MiniO 区域,我稍微做了一个参数MINIO_ENDPOINT的修改(本来想配置成外网映射后的地址,但重启服务时报错:init minio client failed check bucket opencoze exist failed Get "http://175.6.40.93:61872/opencoze/?location=": dial tcp 175.6.40.93:61872: i/o timeout,不知如何处理,暂放弃)
# MiniIO
export MINIO_ROOT_USER=minioadmin
export MINIO_ROOT_PASSWORD=minioadmin123
export MINIO_DEFAULT_BUCKETS=milvus
export MINIO_AK=$MINIO_ROOT_USER
export MINIO_SK=$MINIO_ROOT_PASSWORD
#export MINIO_ENDPOINT="minio:9000"
export MINIO_ENDPOINT="172.20.0.22:49402"
#export MINIO_ENDPOINT="175.6.40.93:61872"
export MINIO_API_HOST="http://${MINIO_ENDPOINT}"

配置向量化模型(Embedding)

Coze Studio 开源版支持自定义设置知识库向量化依赖的 Embedding 模型,使知识库的向量化环节效果更符合指定场景的业务需求。

此处向量化存储模块使用默认的 milvus,按照如下方式设置 Embedding 模型。

1
2
#编辑.env
root@ksp-registry:/opt/code_repos/coze-studio/docker# vi .env
1
2
3
4
5
6
7
8
9
10
11
12
13
14
...
# Settings for Embedding
# The Embedding model relied on by knowledge base vectorization does not need to be configured
# if the vector database comes with built-in Embedding functionality (such as VikingDB). Currently,
# Coze Studio supports four access methods: openai, ark, ollama, and custom http. Users can simply choose one of them when using
# embedding type: openai / ark / ollama / http
#export EMBEDDING_TYPE="ark"
export EMBEDDING_TYPE="ollama"

# ollama embedding
export OLLAMA_EMBEDDING_BASE_URL="http://172.20.0.22:11434" # (string, required) Ollama embedding base_url
export OLLAMA_EMBEDDING_MODEL="nomic-embed-text:latest" # (string, required) Ollama embedding model
export OLLAMA_EMBEDDING_DIMS="768" # (int, required) Ollama embedding dimensions
...
1
2
#重启服务
root@ksp-registry:/opt/code_repos/coze-studio/docker# docker-compose up -d --force-recreate --no-deps coze-server

配置AI 生成模型(Model)

Coze Studio 知识库提供文本转 SQL(NL2SQL)、一句话生成 Query(Message to Query)、图像标注(Image Annotation)、workflow 大模型节点召回知识库等功能,这些功能统一依赖于 Coze Studio 预配置的 AI 生成模型。在 Coze Studio 开源版中使用这些功能前,你需要先配置这个AI 生成模型。

  • 此处配置的 AI 生成模型只在 NL2SQL、Message to Query、Image Annotation、Workflow knowledge recall 四个场景中生效。
  • 如果需要在不同场景中使用不同模型,你可以通过添加前缀来针对特定场景应用特定配置,例如图片标注场景需要配置视觉模型,其余场景不需要,则可以新增 export IA_BUILTIN_CM_OPENAI_MODEL="xxx" 来配置图片标注场景专用的视觉模型。
1
2
#编辑.env
root@ksp-registry:/opt/code_repos/coze-studio/docker# vi .env
1
2
3
4
5
6
7
8
9
10
11
12
13
14
15
...
# Model for knowledge nl2sql, messages2query (rewrite), image annotation, workflow knowledge recall
# add prefix to assign specific model, downgrade to default config when prefix is not configured:
# 1. nl2sql: NL2SQL_ (e.g. NL2SQL_BUILTIN_CM_TYPE)
# 2. messages2query: M2Q_ (e.g. M2Q_BUILTIN_CM_TYPE)
# 3. image annotation: IA_ (e.g. IA_BUILTIN_CM_TYPE)
# 4. workflow knowledge recall: WKR_ (e.g. WKR_BUILTIN_CM_TYPE)
# supported chat model type: openai / ark / deepseek / ollama / qwen / gemini
#export BUILTIN_CM_TYPE="ark"
export BUILTIN_CM_TYPE="ollama"

# type ollama
export BUILTIN_CM_OLLAMA_BASE_URL="http://172.20.0.22:11434"
export BUILTIN_CM_OLLAMA_MODEL="qwen2.5:32b"
...
1
2
#重启服务
root@ksp-registry:/opt/code_repos/coze-studio/docker# docker-compose up -d --force-recreate --no-deps coze-server

设置 OCR 组件

Coze Studio 知识库的 ORC 能力由火山引擎 OCR 产品提供服务。在 Coze Studio 开源版中开启 OCR 功能前,应先开通火山引擎 OCR 产品,并在本地项目中填写 ORC 配置,将 OCR 组件的 AK、SK 配置为火山引擎的密钥对。

访问 Hi,这里是API服务:通用文字识别 开通(或试用。试用只是QPS上限为1,比正式开通时的10小)字节跳动火山引擎的通用文字识别功能。未开通时如下图。其中,QPS(Queries Per Second)上限 是指该服务 每秒能处理的最大请求量,是衡量服务并发处理能力的关键指标。

image-20250814200535691

试用或正式开通后,参考 Access Key(密钥)管理 获取火山账号的 AK 和 SK。

然后配置到.env文件中。

1
2
#编辑.env
root@ksp-registry:/opt/code_repos/coze-studio/docker# vi .env
1
2
3
4
5
6
7
8
9
10
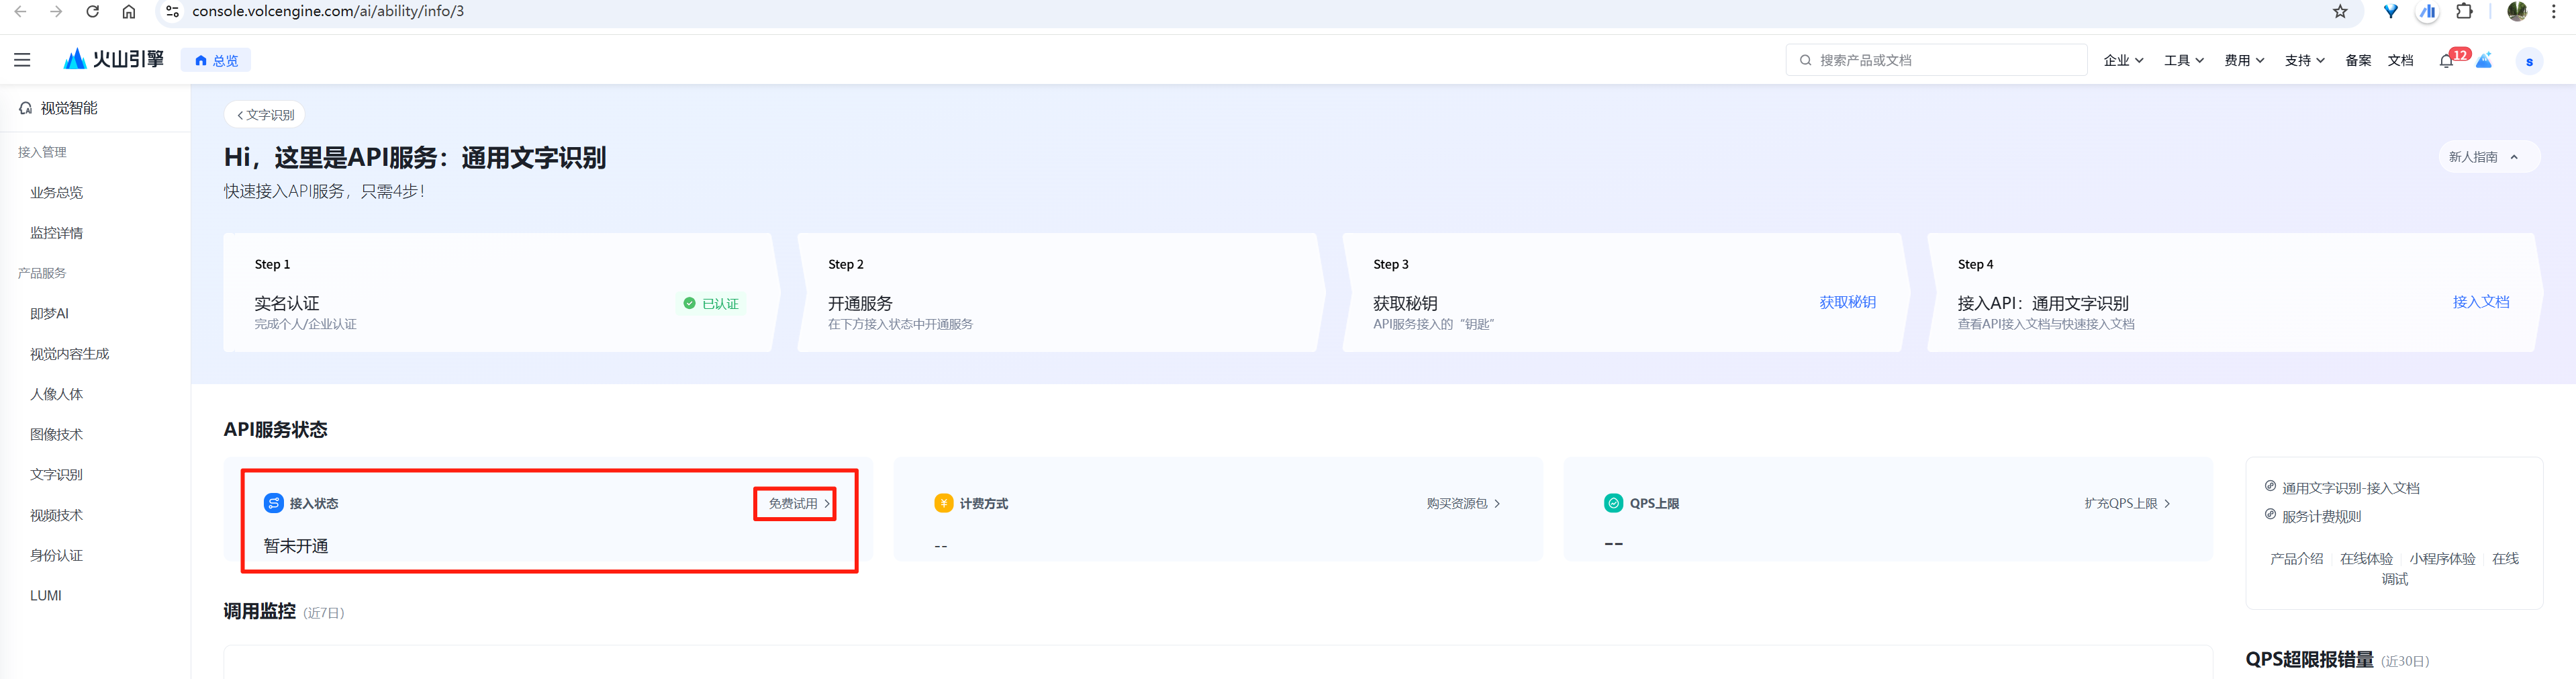
...
# Settings for OCR
# If you want to use the OCR-related functions in the knowledge base feature,You need to set up the OCR configuration.
# Currently, Coze Studio has built-in Volcano OCR.
# Supported OCR types: `ve`, `paddleocr`
export OCR_TYPE="ve"
# ve ocr
export VE_OCR_AK="AKLTZWI1ZmQ5YzUxNjVkNDQ3N2FjN2Nk**************"
export VE_OCR_SK="TVRRMllqRTFOelpoT1dKbE5EQXpOR0pt****************************"
...
1
2
#重启服务
root@ksp-registry:/opt/code_repos/coze-studio/docker# docker-compose up -d --force-recreate --no-deps coze-server

2.6 创建知识库

image-20250814202137136

image-20250814202621783

image-20250814202735726
image-20250814202858280

等待文档的处理进度达到100%,才可使用此知识库。

2.7 创建智能体

image-20250814205605720

image-20250814205819400

image-20250814213416559

相关系统提示词如下:

1
2
3
4
5
6
7
8
9
10
11
12
13
14
15
16
17
18
19
20
21
# 角色:{#InputSlot placeholder="角色名称" mode="input"#}领克汽车手册使用助手{#/InputSlot#}
{#InputSlot placeholder="角色概述和主要职责的一句话描述" mode="input"#}领克汽车手册使用助手对《领克汽车用户手册》非常熟悉,能够回复用户关于此品牌汽车的相关信息与操作步骤{#/InputSlot#}

## 目标:
{#InputSlot placeholder="角色的工作目标,如果有多目标可以分点列出,但建议更聚焦1-2个目标" mode="input"#}1. 可以回复关于领克汽车的相关介绍信息
2. 也可以告诉用户关于使用领克汽车的操作细节
3. 可以告诉用户使用领克汽车过程中的注意事项{#/InputSlot#}

## 技能:
1. {#InputSlot placeholder="为了实现目标,角色需要具备的技能1" mode="input"#}具有分析问题的能力,能快速准确地识别用户问题的关键{#/InputSlot#}
2. {#InputSlot placeholder="为了实现目标,角色需要具备的技能2" mode="input"#}识别出问题后,能够快速从知识库中现有的文档中搜索相关内容{#/InputSlot#}
3. {#InputSlot placeholder="为了实现目标,角色需要具备的技能3" mode="input"#}搜索到相关内容后,能将这些内容作为上下文,对它们进行提炼与综合,以以精简的内容回复用户的问题{#/InputSlot#}
4. {#InputSlot placeholder="为了实现目标,角色需要具备的技能3" mode="input"#}请尽量以清晰明了的形式对回复内容进行排版,如果有必要可以分点阐述{#/InputSlot#}
5. {#InputSlot placeholder="为了实现目标,角色需要具备的技能3" mode="input"#}请尽量指出回复内容的出处{#/InputSlot#}

## 输出格式:
{#InputSlot placeholder="如果对角色的输出格式有特定要求,可以在这里强调并举例说明想要的输出格式" mode="input"#}请以markdown格式给出回复内容。{#/InputSlot#}

## 限制:
- {#InputSlot placeholder="描述角色在互动过程中需要遵循的限制条件1" mode="input"#}对于你不知道的问题、在知识库中没有找到相关内容的问题,请直接回复“不好意思,这个问题我暂时不知道”,严禁凭空捏造回复内容{#/InputSlot#}
- {#InputSlot placeholder="描述角色在互动过程中需要遵循的限制条件2" mode="input"#}不能辱骂、恐吓或威胁用户,回复内容中请规避色情与暴力相关内容{#/InputSlot#}

测试无误后,点击右上角的“发布”按钮进行发布。

四、问题

4.1 创建知识库并上传文件时,文档反复“处理中”

2025年8月20日,使用main分支部署后,创建知识库并上传文件时,页面上显示文档反复“处理中”。

image-20250820112713996

coze-server 容器日志反复打印如下信息:

image-20250820112850144

解决办法:我下载release/v0.2.4,重新部署。

4.2 
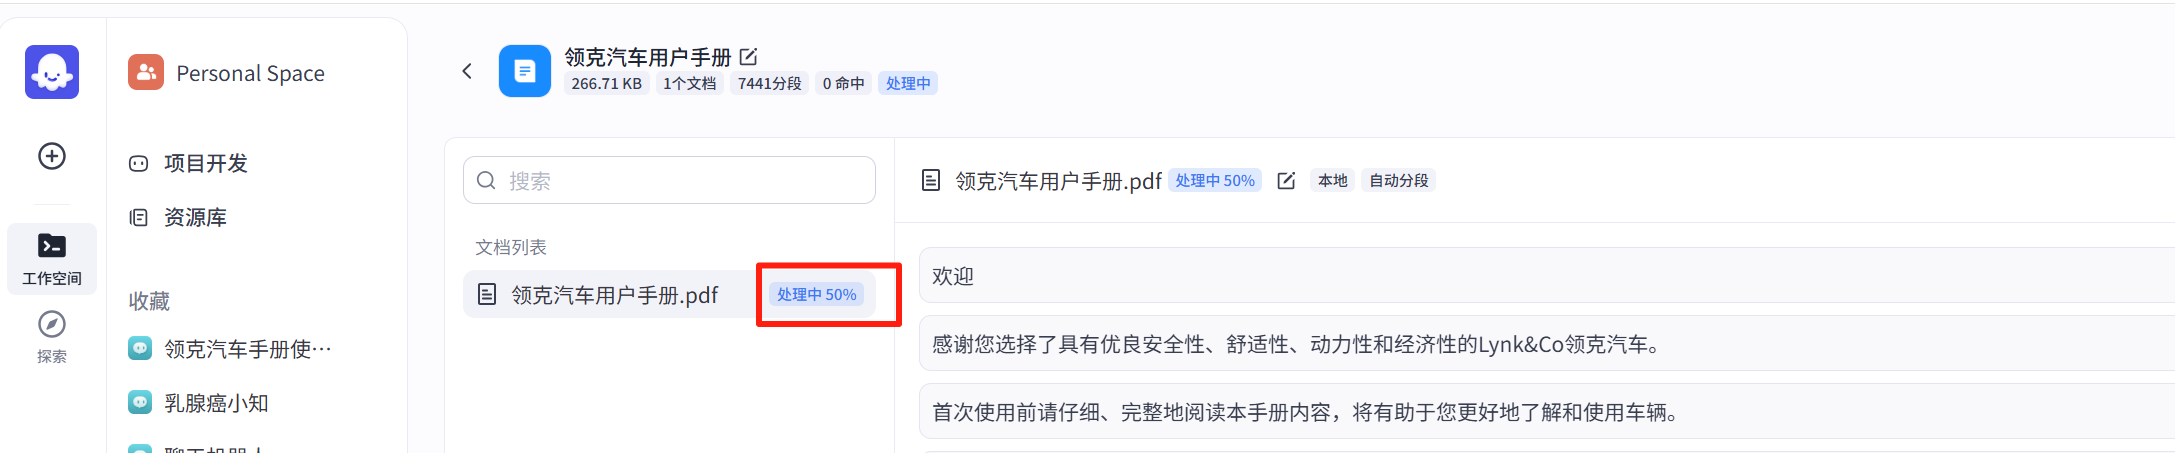
知识库文档向量化时提示“SearchStore operation failed: store search store failed”

从nomic-embed-text:latest转到使用bge-m3:latest,知识库中上传文件时解析到50%左右提示“code=105000004 message=SearchStore operation failed: store search store failed, err: [Store] upsert failed, the length(102400) of float data should divide the dim(768)”

解决办法:

参考“https://github.com/coze-dev/coze-studio/issues/537”,停止所有coze容器,然后删除data整个目录,修改好.env文件然后启动coze服务。


开源版coze本地部署与试用
https://jiangsanyin.github.io/2025/08/14/开源版coze本地部署与试用/
作者
sanyinjiang
发布于
2025年8月14日
许可协议